How to Quickly Add Images to a Video in Less than a Minute
There are many reasons why do you need to add images to video. For instance, some editors found that adding images to their videos creates a new interaction for the other users. In this way, you can use this to represent your branding or make an excellent visual presentation and help your video convey the right message to the users. But did you know that many tools perform the same job? We know it is hard to choose which tool will suit you the best. So today, we have already sifted out the three tools we found that performs well. Once you've read this article, you will learn to add images to your videos.

Part 1. Step-by-step Guide on Adding Image to Video with Video Converter Ultimate
Want to add a picture to the video with the ultimate tool? In that case, use the Video Converter Ultimate. With the help of this ultimate tool, you can easily overlay the image to the video even though you aren't a pro in this area of editing. Besides its overlaying on video ability, you can easily use this tool to add music as a background, add subtitles, and do more. It is known for being the one-stop solution for most of the problems in regards to the video. Want to know what are the advantages of using this? If so, you can read the provided details below.

FVC Video Converter Ultimate
5,689,200+ Downloads- Provides outstanding performance on converting and editing.
- Edit and make a fantastic video within a few clicks.
- It supports 200+ formats, such as MP4, MOV, FLV, WMV, AVI, MTV, etc.
- Available in all cross-platforms to download, such as Windows and Mac.
Free DownloadFor Windows 7 or laterSecure Download
Free DownloadFor MacOS 10.7 or laterSecure Download
Isn't it amazing what are things you can do with the tool? Yes, we know the tool is impressive in many ways. If this tool caught your attention and you want to learn how to add a picture to a video with this tool, you can read the tutorial below.
Step 1. Click the download button below to directly download it on your drive, follow the installation promptly, and launch it. Before anything else, we would appreciate it if you got familiarized with the tool's interface to distinguish the proceeding steps easily.
Free DownloadFor Windows 7 or laterSecure Download
Free DownloadFor MacOS 10.7 or laterSecure Download
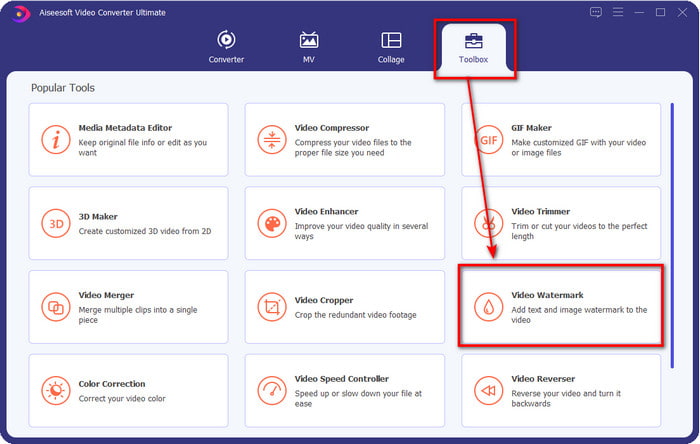
Step 2. Once the tool is running on the system, click Toolbox; under it, locate the Video Watermark and open it.
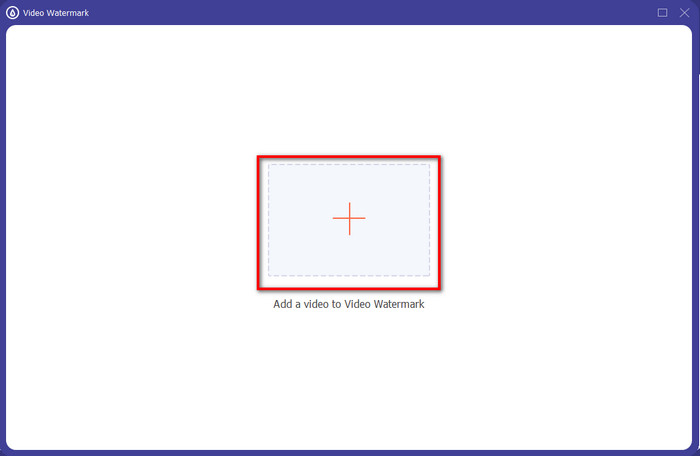
Step 3. Once you've ticked the + button, a file folder will show on your display; locate the file and hit Open if that is the video file.
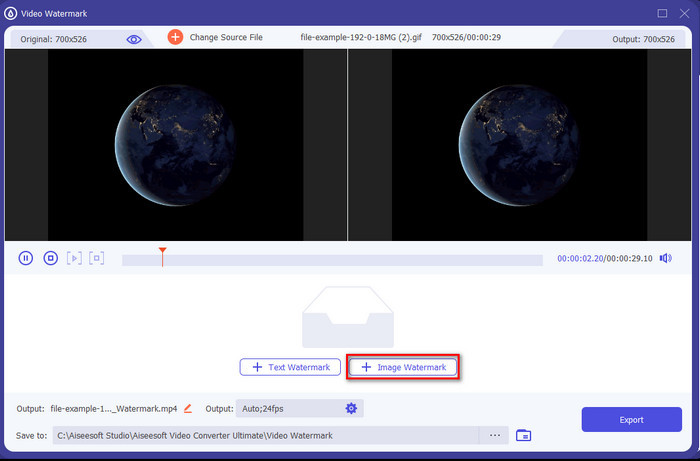
Step 4. A new window will show, click Image Watermark, then a folder will show again, but this time you'll insert the image you want to add to your video and press Open.
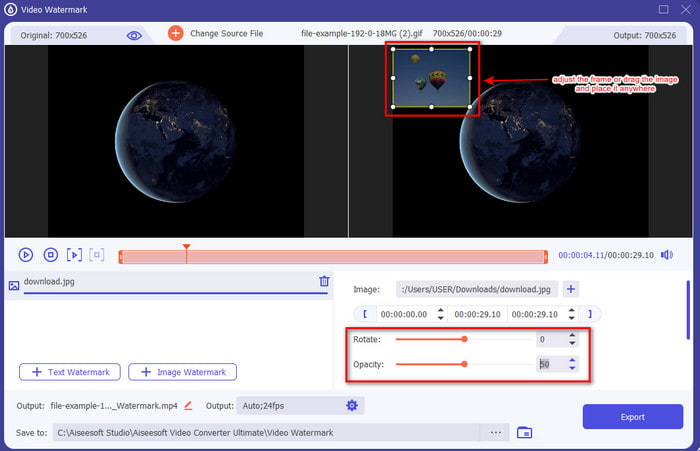
Step 5. Adjust the image size you've inserted on the video and its position by dragging the frame of the photo. You can place it anywhere you want by holding and dragging the image. What's more, you can also adjust the picture's visibility by adjusting the Opacity. Also, you can rotate the image by dragging the slider of Rotate.
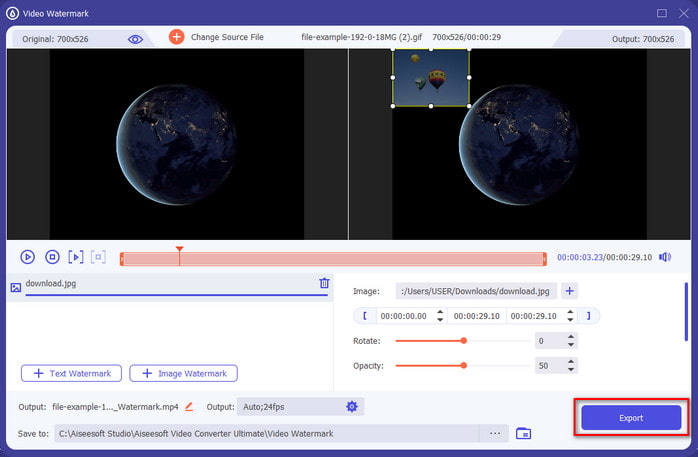
Step 6. If you've edited the photo, it is now the time to click Export.
Related:
Part 2. How to Overlay Images to Videos on the Internet for Free
Online Video Cutter – Add Image to a Video
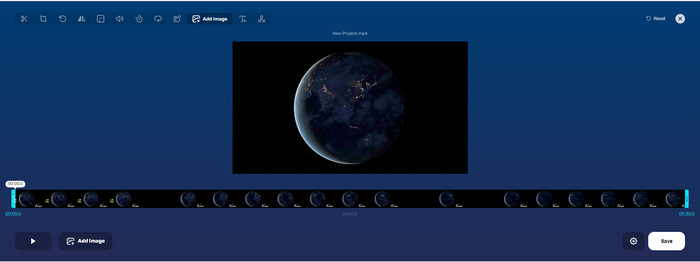
If you want to overlay images online, you can use the Online Video Cutter – Add Image to a Video. This web tool provides a simple yet effective way of adding photos to any video. Although the tool is excellent to use, it is still a bit hassle to upload the video because it depends on your internet connection. Also, you can't add two images here because it is unsupported. But if you want to use the tool, you can follow the steps below.
Step 1. Open your browser and search the web tool on the search tab, then open it.
Step 2. Click Open File to upload the video, then click Add Image to upload the image you've inserted.
Step 3. Drag the image to change its position, click Save to encode, and save it on your computer.
Pros
- Free to use, and you won't need to download it.
- It supports basic editing features for the users.
- It doesn’t have a watermark on the final output.
Cons
- It can’t add up to 2 or more images on the video.
- Uploading the image and video takes time to load up.
Flixier

You can use Flixier to add an image to a video online for free. Also, you can edit your video template with this online tool, including adding pictures. This tool provides exceptional built-in editing features you can use to make your video look better. Although the web tool offers you this unique feature, when the time you export it, there will be a watermark on the final output because it is free. But you can purchase the premium tool to remove this watermark.
Step 1. Open your search engine, search the tool's name, and click Choose File.
Step 2. Click Import to upload the video and images, drag the video and the image to the Timeline, make sure that the image is at the top of the video. Change the position of the picture by dragging it inside the video.
Step 3. Click Export, then Export and Download to save it on your desktop drive.
Pros
- Cost-free and accessible on the web.
- It provides more editing features than the first online tool.
- It supports adding multiple images to your video.
Cons
- The Final output does have a watermark at the end because it is free.
- It needs to purchase the VIP version to remove the watermark on the video output.
Part 3. FAQs about Adding Images to Video
Does adding images to a video affect the quality?
The video quality won’t affect the image you add. To simplify, adding images doesn’t have any significant video quality, even if you add many photos. However, if you export the video on the editor you’ve used and set it on low quality, expect the video output below.
Why do the images I add to the video become blurry?
The main reason it became is that the image is already blurry from the start. To avoid this problem, you must check the picture first and ensure it isn't blurry before using it on your video.
Can I add a transition to the image on the video?
With some editors, adding a transition to your image is possible. Although there are many different animated transitions, cut, fade, wipe, and dissolve are the most commonly available. Even though these are the most common, it is still ideal for adding a transition to the image to make the video more professional and exciting.
Conclusion
After you’ve read this blog, learning how to add photos in a video became easier to understand if you read this article's full scope with the different tools online and offline. Even though we present different sets of tools, we still recommend that any users use the ultimate tool to take up this task. Video Converter Ultimate provides an easy-to-understand interface to help the users do the job efficiently. Still not sure if it fits you? Well, downloading the tool is the only way to prove that it suits you.


 Video Converter Ultimate
 Screen Recorder