


Cách Giảm Kích Thước Hình Ảnh Trên Mac Một Cách Dễ Dàng [Hướng Dẫn Tối Ưu]
Khi bạn đang xử lý các tệp hình ảnh lớn trên máy Mac, đừng lo lắng! Có nhiều cách để giải quyết vấn đề này.
Chúng tôi hiểu nhu cầu nén hình ảnh vì nó giúp chúng dễ quản lý và thuận tiện hơn khi sử dụng. Thông thường, nếu bạn có thể quan sát, một số hệ thống yêu cầu chúng tôi tải lên các tệp hình ảnh ở kích thước tệp cụ thể, một số trang web tải chậm hơn và việc gửi tệp hình ảnh qua email mất thời gian. Những vấn đề này xuất phát từ cùng một nguồn, đó là tệp hình ảnh lớn. Với điều đó, trong bài viết này, chúng tôi sẽ đi sâu vào ba phương pháp về cách bạn có thể dễ dàng giảm kích thước hình ảnh trên Mac. Điều này đặc biệt hữu ích khi bạn cần tối ưu hóa quy trình làm việc và đảm bảo rằng hình ảnh của bạn có thể truy cập được và tải nhanh chóng.

Phần 1. Giảm kích thước hình ảnh trên máy Mac bằng cách giảm pixel
Các thiết bị Mac có một cách tuyệt vời để giảm dung lượng hình ảnh bằng các công cụ tích hợp sẵn. Với những công cụ này, người dùng Mac có thể dễ dàng và tự do nén ảnh ngay trên thiết bị của mình.
Preview là công cụ xem ảnh và PDF tích hợp sẵn. Với công cụ này, người dùng không chỉ có thể tận hưởng các tính năng xem ảnh và tệp PDF. Ngoài ra, họ còn có thể tận dụng các tính năng chỉnh sửa của công cụ này để có thể giảm kích thước ảnh trên máy Mac một cách dễ dàng. Hơn nữa, công cụ này rất tiện lợi và miễn phí, giúp mọi người đều có thể sử dụng. Để thực hiện, hãy làm theo các bước dưới đây:
Bước 1. Đầu tiên, hãy mở ứng dụng Preview trên thiết bị Mac của bạn.
Bước 2. Sau đó, mở tệp hình ảnh mà bạn muốn nén kích thước bằng cách vào Tập tin tab và nhấp vào Mở cái nút.
Bước 3. Bây giờ, hãy đi đến Dụng cụ tab trong menu ngữ cảnh và sau đó nhấp vào Điều chỉnh kích thước.

Bước 4. Lựa chọn Lấy lại hình ảnh nếu bạn muốn giảm kích thước của tập tin hình ảnh.

Bước 5. Bây giờ, hãy thay đổi giá trị của bạn Độ phân giải tập tin. Sau khi thực hiện xong, kích thước mới sẽ hiển thị ở phía dưới.
Để duy trì chất lượng cao nhất có thể trong khi giảm kích thước hình ảnh trên máy Mac, bạn có thể thử nghiệm và sai sót về cài đặt độ phân giải nào phù hợp nhất với hình ảnh. Khi làm như vậy, điều quan trọng là bắt đầu với độ phân giải giảm nhỏ hơn và tăng dần cho đến khi bạn đạt được sự cân bằng tốt giữa chất lượng hình ảnh và kích thước tệp.
Phần 2. Nén Kích Thước Hình Ảnh trên Mac bằng Phím Tắt
Khi bạn muốn có cách dễ dàng hơn để nén kích thước hình ảnh trên máy Mac, bạn có thể sử dụng Quick Actions để hợp lý hóa quy trình nén hình ảnh. Với tính năng này, bạn có thể thực hiện nhiều tác vụ khác nhau trực tiếp từ Finder mà không cần phải mở ứng dụng. Bao gồm khả năng thay đổi kích thước hình ảnh nhanh chóng và hiệu quả. Hơn nữa, nó cung cấp một quy trình thuận tiện để xử lý các tác vụ chỉnh sửa hình ảnh cơ bản, như thay đổi kích thước, rất hữu ích cho những người cần xử lý nhiều hình ảnh nhanh chóng.
Sau đây là cách bạn có thể sử dụng Hành động nhanh để nén kích thước hình ảnh trên máy Mac:
Bước 1. Nhấp chuột phải vào hình ảnh bạn muốn nén.
Bước 2. Từ menu ngữ cảnh, chọn Hành động nhanh và sau đó Chuyển đổi hình ảnh.
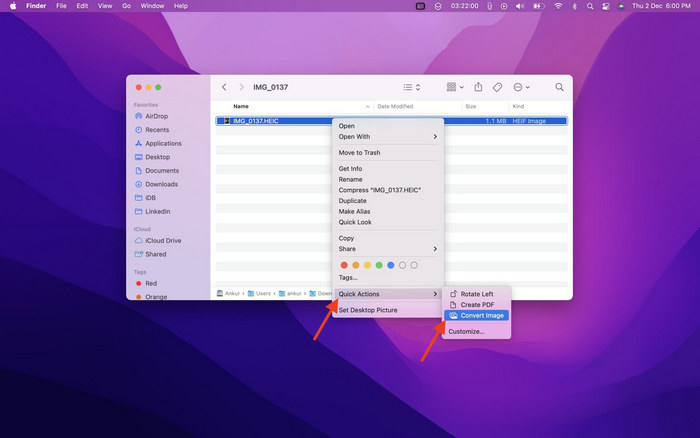
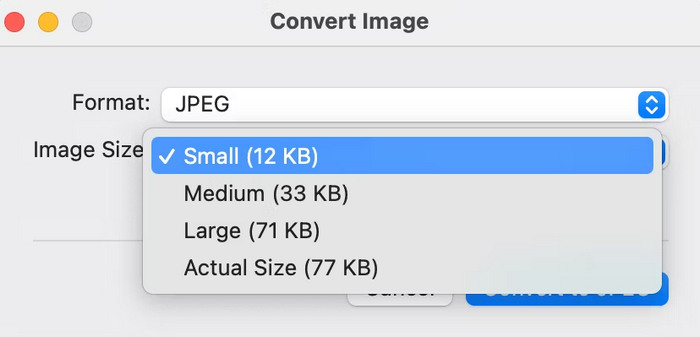
Bước 3. Nhấn vào Kích cỡ hình trường và chọn Nhỏ, Trung bình, hoặc Lớn từ menu thả xuống, menu này cũng hiển thị kích thước tệp tương ứng.
Bước 4. Kiểm tra Bảo tồn siêu dữ liệu để lưu giữ toàn bộ thông tin của hình ảnh.
Nếu bạn muốn tùy chỉnh Quick Actions và muốn đưa nó vào các tùy chọn thay đổi kích thước thường dùng nhất của bạn. Bạn có thể thực hiện thông qua tùy chọn hệ thống trong phần mở rộng. Hơn nữa, nếu bạn muốn giảm kích thước hình ảnh trên máy Mac để nén hàng loạt, chỉ cần chọn nhiều hình ảnh trước khi áp dụng Quick Action để tiết kiệm thời gian.
Phần 3. Cách nhanh nhất để nén hình ảnh trên máy Mac [Tối đa 40 hình ảnh cùng lúc]
Nếu bạn đang tìm kiếm một công cụ thay thế để giảm kích thước hình ảnh trên Mac, bạn có thể thử Máy nén hình ảnh miễn phí FVC. Công cụ này hoàn toàn miễn phí và hỗ trợ nén hàng loạt, cho phép người dùng thu nhỏ tệp hình ảnh của họ lên đến 40 cùng một lúc. Hơn nữa, công cụ này tích hợp các thuật toán nén và tối ưu hóa tốt nhất để giữ nguyên chất lượng của ảnh đã nén. Khi nói đến tính dễ sử dụng, công cụ này lý tưởng cho người mới bắt đầu vì họ chỉ cần thực hiện hai bước và quá trình nén sẽ tự động xử lý.
Sau đây là cách nén JPEG bằng FVC Free Image Compressor
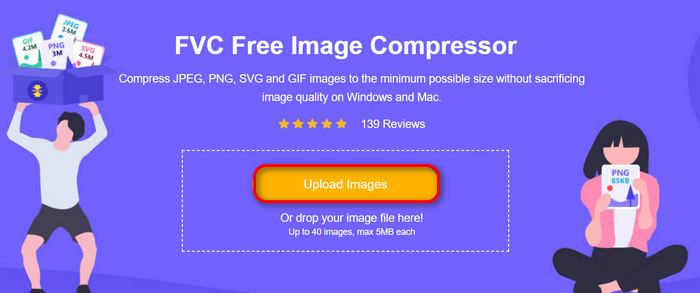
Bước 1. Để bắt đầu, bạn cần truy cập trang web chính thức của họ bằng cách tìm kiếm FVC Free Image Compressor trên trình duyệt của bạn.
Bước 2. Tiếp theo, nhấp vào Đăng tải hình ảnh để nhập ảnh bạn muốn nén vào máy Mac. Công cụ sẽ tự động nén chúng.
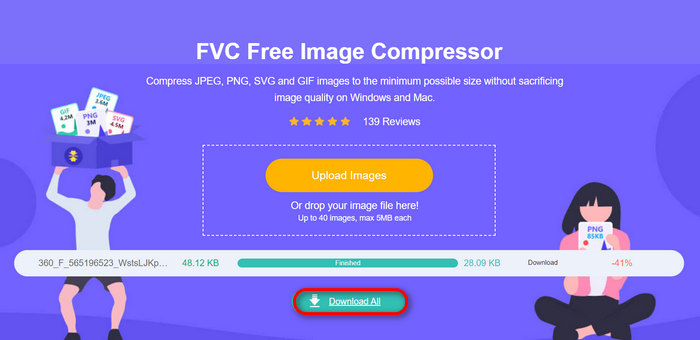
Bước 3. Sau khi nén, bạn có thể xem trước kích thước tệp mới của tệp hình ảnh đã nén. Cuối cùng, nhấp vào Tải xuống tất cả để lưu hình ảnh của bạn.
Với FVC Free Image Compressor, bạn có thể dễ dàng giảm kích thước hình ảnh trên máy Mac, đảm bảo chất lượng đầu ra, hỗ trợ nhiều định dạng tệp hình ảnh và có các tính năng quan trọng khác như nén hàng loạt.
Bạn có thể tận dụng tính năng nén hàng loạt của công cụ này để tiết kiệm thời gian, đặc biệt là nếu bạn có nhiều hình ảnh cần nén. Tất cả những gì bạn cần làm là nhập chúng cùng lúc vào công cụ. Nhưng hãy lưu ý rằng bạn có thể nén tới 40 hình ảnh cùng một lúc, giúp quá trình này nhanh hơn và hiệu quả hơn.
Phần 4. Câu hỏi thường gặp về Giảm kích thước hình ảnh trên máy Mac
Làm thế nào để thay đổi kích thước hình ảnh trong Apple Photos?
Để bạn có thể thay đổi kích thước hình ảnh trong Apple Photos, bạn có thể sử dụng tính năng chỉnh sửa tích hợp của ứng dụng, nơi bạn có thể cắt ảnh. Để thực hiện việc này, hãy mở ảnh trên ứng dụng và chạm vào nút chỉnh sửa. Tiếp theo, chạm vào công cụ cắt và điều chỉnh vùng hiển thị của hình ảnh. Ngoài ra, bạn có thể kéo các góc của hộp cắt để thay đổi kích thước vùng hiển thị của ảnh hoặc chọn tỷ lệ khung hình được cài đặt trước để kiểm soát nhiều hơn.
Làm thế nào để thu nhỏ hình ảnh tính bằng MB trên máy Mac?
Để làm cho hình ảnh nhỏ hơn tính bằng MB trên máy Mac, hãy sử dụng ứng dụng Xem trước để nén, nơi bạn có thể giảm độ phân giải và kích thước của hình ảnh để giảm kích thước tệp. Nhưng hãy lưu ý, việc giảm chất lượng sẽ làm giảm kích thước tệp nhưng có thể ảnh hưởng đôi chút đến giao diện của hình ảnh.
Ứng dụng thay đổi kích thước ảnh hàng loạt cho Mac là gì?
Batch Photo Resizer là một phần mềm tuyệt vời ứng dụng thay đổi kích thước hình ảnh dành cho Mac. Nó cung cấp một bộ tính năng toàn diện hoàn hảo để giảm kích thước hình ảnh. Với tính năng này, bạn có thể thay đổi kích thước hàng loạt hình ảnh theo kích thước mong muốn trong khi vẫn đảm bảo chất lượng cao nhất có thể.
Phần kết luận
Tóm lại, biết sử dụng công cụ nào để giảm kích thước hình ảnh trên máy Mac rất quan trọng, đặc biệt là khi bạn làm việc với hình ảnh. Vì vậy, bất kể công cụ hoặc phương pháp nào bạn sẽ sử dụng, bất kỳ công cụ nào trong số chúng đều có thể giúp bạn nén hình ảnh hiệu quả. Bạn đã sẵn sàng tận dụng tất cả các công cụ này để nén ảnh của mình chưa? Hãy bắt đầu ngay hôm nay!
-
 Cách giảm kích thước tệp ảnh trên iPhone: Các bước cho tất cả iOS
 Bạn đang phải xử lý các tệp hình ảnh lớn trên iPhone và thấy khó tải chúng lên? Bài viết này sẽ hướng dẫn bạn cách giảm kích thước tệp ảnh trên iPhone.
-
 Nén PNG: 5 Phương Pháp Tốt Nhất Mà Bạn Phải Biết [2024]
 Bạn đang thắc mắc công cụ nào là tốt nhất để Nén PNG? Trong bài viết này, hãy tìm hiểu về 5 công cụ trong số đó và được hướng dẫn cách thu nhỏ chúng trong khi vẫn giữ nguyên hình ảnh.
-
 Tỷ lệ nén ảnh: Tôi cần biết những gì? [Đánh giá]
 Tìm hiểu tỷ lệ nén ảnh là gì và nó ảnh hưởng đến chất lượng hình ảnh như thế nào. Ngoài ra, hãy được hướng dẫn cách thay đổi tỷ lệ nén này khi thực hiện không đúng cách.