


Learn 4 Ways How to Take a Screenshot on Iphone Easily
The screenshot function on the iPhone is a very useful feature for most of us. We can do so much with it, like saving important information, memories, and interesting content. It’s literally taking screenshots of everything that pops up on our screens. Also, it only takes a few steps to do them, so there’s a big possibility that everyone can learn it. Moreover, the ability to easily share these screenshots to messaging apps or any social media platforms helps us to communicate effectively. It is also a great way to engage with others creatively. Now, if you're looking for ways to take a screenshot on iPhone in 4 different ways, read this article to learn more.

Part 1: Take a Screenshot on iPhone With Face ID
Taking screenshots on iPhones varies depending on the model. The most recent models, starting from the iPhone X, have changed when it comes to taking screenshots due to the Face ID functionality. This feature is introduced to the new iPhone models to enable a smooth and safe means of verification through facial recognition. With this, the home button, which was frequently used to take screenshots, has been removed. On iPhones with Face ID, taking a screenshot is still simple, though, but instead of pressing the home button, users will use a combination of physical buttons to achieve the same result.
Here’s what you need to follow when you want to take a screenshot on iPhone 14 and other models with Face ID:
Step 1. First, click on the Side and Volume up buttons together.
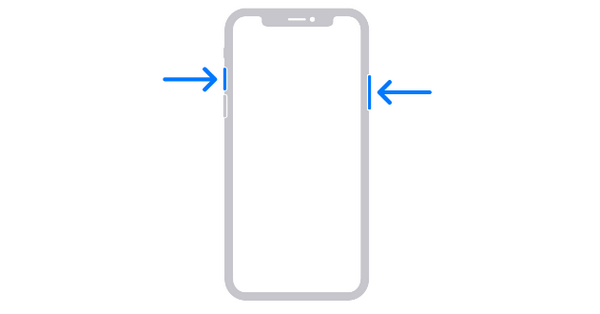
Step 2. After that, quickly release both buttons.
This is now the common way of taking screenshots on iPhones, especially those with the latest models.
Part 2: Screenshot on iPhone With Home Button
Meanwhile, if you're using an iPhone with a home button, like iPhone SE 1st generation, iPhone 5, 6, 7, and 8, you will use its classic method of taking screenshots. This method involves only pressing both the power and home buttons. By doing so, your iPhone is prompted to screenshot whatever is currently displayed on the screen. It's a simple and quick way of taking a screenshot and has long been a standard feature of iPhones.
Step 1. Press the Side button and Home button at the same time.
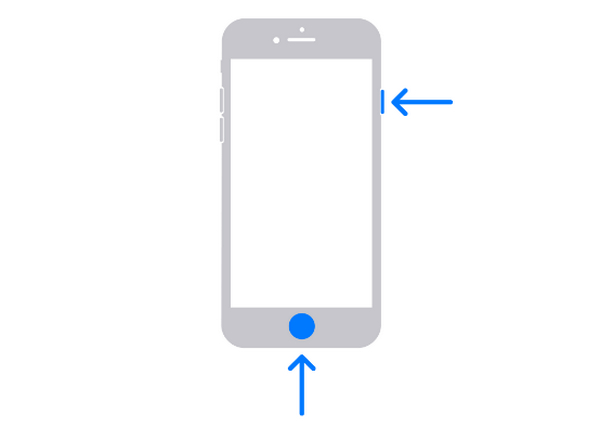
Step 2. Release both buttons right away.
Also in this method, a preview will pop up briefly. Tap it to open or swipe left to dismiss.
Therefore, if you’re still using iPhones with home buttons, this classic method is still the best way to take screenshots on iPhone,
Part 3: Screenshot on iPhone Without Any Button
Now, if your iPhone lacks any buttons or if the screenshot function isn't functioning well, using a third-party tool like the FVC Screen Recorder can be a great alternative way for you to take screenshots on iPhone easily. This tool allows you to effortlessly capture what's on your iPhone screen without the need for any buttons. You only need a few steps, and once set, you’re just going to click whenever you want to take a screenshot from your iPhone screen. Lastly, with its intuitive interface, users won’t be overwhelmed compared to any screen recording tools that have complex interfaces.
Here’s the guide on how to take a screenshot on iPhone without any button:
Step 1. Download and open FVC Screen Recorder on your Windows Computer.
Free DownloadFor Windows 7 or laterSecure Download
Free DownloadFor MacOS 10.7 or laterSecure Download
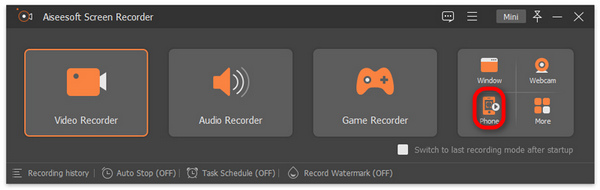
Step 2. Now, on the right side of the tool’s window, together with the other 3 options, click on the Phone Recorder option.
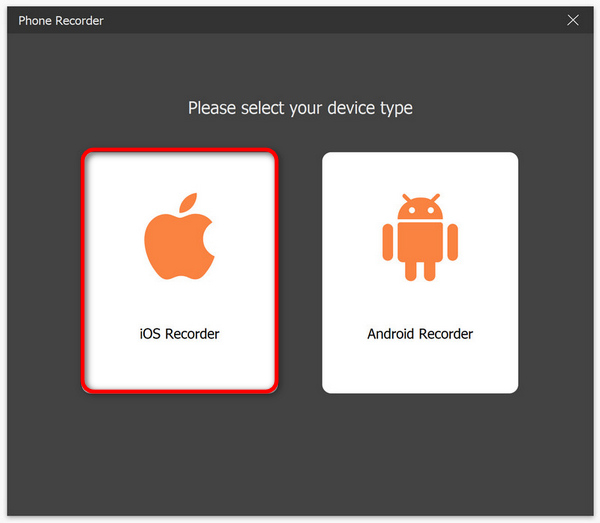
Step 3. After that, click the iOS Recorder option.
Step 4. A new window containing an on-screen instruction will appear. Also, you will be asked to choose between Screen Mirroring or Audio Mirroring, in your case, choose Screen Mirroring.
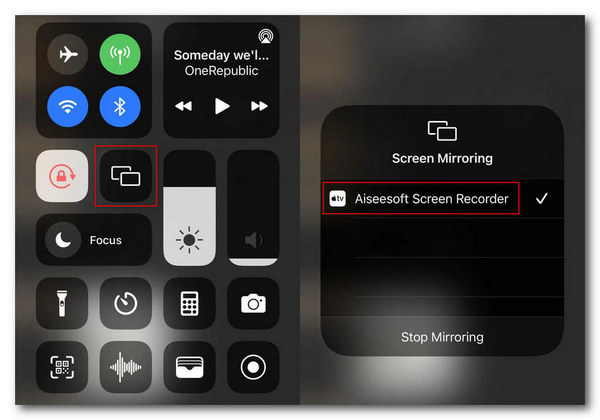
Step 5. Now, on your iPhone, open your Control Center. Click Screen Mirroring to open the drop-down list. Then click on Aiseesoft Screen Recorder to connect the iPhone to the computer.
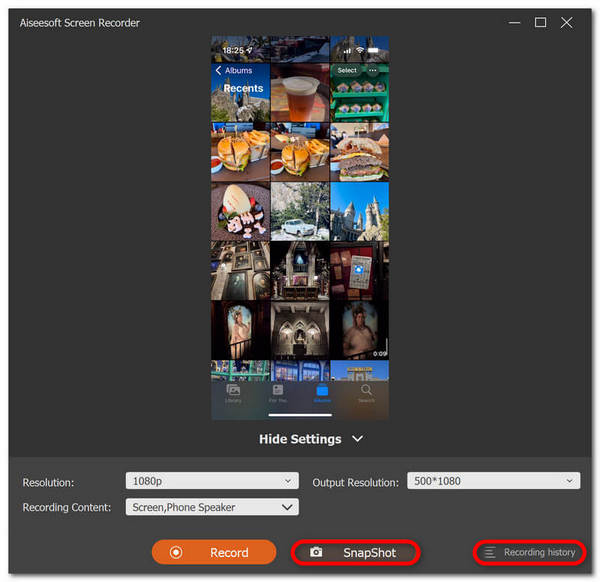
Step 6. Finally, to take a screenshot on your iPhone, just click on the Snapshot icon. Moreover, these screenshots will be directly saved to the computer’s Windows folder.
It is indeed true that taking screenshots on an iPhone using the FVC Screen Recording tool becomes effortless due to its intuitive and easy-to-follow interface. Thus, this tool is now a must-have tool for anyone seeking a reliable way to capture screenshots on iPhones.
Part 4: Take a Screenshot on iPhone by Tapping
For iPhones where the model starts with iPhone 8 to the latest, there’s another way for them to take screenshots. For some, it offers convenience, but for others, it’s a bit complex to set up. However, this feature allows users to take screenshots with a simple tap on the screen, eliminating the need to click with physical buttons or rely on other external applications.
Step 1. First, on your iPhone device, you need to go to Settings.
Step 2. After that, scroll down and look for Accessibility.
Step 3. Next, within the Accessibility, look for Touch and click on it.
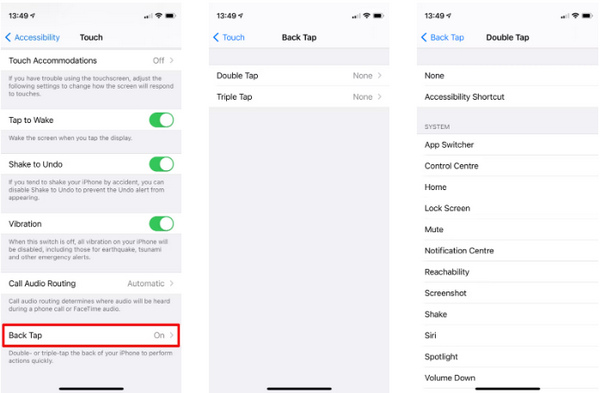
Step 4. Slowly scroll down, and at the very bottom, you’ll find the Back Tap, click on it.
Note: Here you are given two options whether you choose to set up a double-tap or a triple-tap gesture for taking screenshots on iPhone using this feature.
Step 5. Lastly, you’ll see a list of available actions, so since you’re doing this to take a screenshot, choose the Screenshot from the list.
By enabling and utilizing this built-in feature from your iPhone, you can efficiently take screenshots on your iPhone, making it quicker and more intuitive. However, setting this might be a little overwhelming for some iPhone users.
Part 5: FAQs about Taking Screenshots on iPhone
What happens to screenshots on iPhone?
After you take a screenshot on your iPhone, screenshots are automatically stored or saved in the photo library. In order for you to access this, you need to open Photos, and then select Albums. Scroll down a bit, and in the Media Types, click on Screenshots.
Does taking screenshots using tap gestures drain my iPhone's battery faster?
Not at all. While it may be true that any activity we do on an iPhone uses battery power. However, using tap gestures to take screenshots on your iPhone doesn’t significantly affect your iPhone's battery life. Please take note that these gestures are designed to cause efficiency to your iPhone, therefore, it would only consume minimal power to your iPhone’s battery and would not drain it faster.
Will using tap gestures to take screenshots interfere with other functions on my iPhone?
No. Using tap gestures to take screenshots on your iPhone won't affect other functions of your device because these kinds of features are designed to be distinct and non-intrusive to make sure that they won’t cause any trouble or conflict with any other actions or commands on your iPhone.
Conclusion
In conclusion, learning different methods on how to take a screenshot on iPhone is indeed helpful, especially for those who are new and want to explore it. Also, there might be instances that some users might be overwhelmed by what method to choose as there are plenty of ways to choose from, including button presses, tap gestures, and third-party tools. For now, choose the snapshot technique that works best for your iPhone and begin taking screenshots of your screen!
-
 How to Take Screenshots on Mac Easily With This Basic Guide
 Want to take a screenshot on your Mac but not sure how? We got you! We'll show you the simplest and quickest ways to screenshot and save images of your screen.
-
 How to Easily Edit a Screenshot [Beginner’s Guide]
 Looking for ways to edit screenshots on various devices? Youu2019ve come the right way, in this article, learn different methods all conveniently laid out for you.
-
 Screenshot on Windows Without Print Screen [2025 Guide]
 Looking for ways to screenshot on Windows without a print screen. This article made it easy for you. Read this now and capture your screen effortlessly!