


How to Screenshot on Mac [Easy and Effective Ways]
Are you looking for ways to capture what's on your Mac screen but unsure of how to do it? Look no further! In this comprehensive guide, we'll walk you through the easiest and most efficient methods on how to screenshots on Mac. Whether you're just getting started as a Mac user or someone who is pro in it but still looking for other advanced ways to capture a screenshot, you'll surely find this article valuable. From basic shortcuts to advanced techniques, we've got you covered. Now, let's dive in and discover how to screenshot on your Mac like a pro!

Part 1. How to Screenshot on macOS Using Shortcut
Learning how to take screenshots on Mac using shortcuts is a vital skill because it lets you quickly and easily capture what's on your screen. Instead of searching through menus, you can press a few keys to screenshot a picture of your screen in different ways.
The following are the 3 shortcut methods you can do to screenshot on macOS.
Method 1: Capture the entire screen:
Step 1. First, press and hold the Command, Shift, and 3 keys together. This action will capture a screenshot of your entire screen.
Step 2. There will be a floating thumbnail to appear in the bottom-right corner of your screen. You can dismiss it by swiping or allowing it to disappear on its own, and the screenshot will be directly saved to your desktop folder. Alternatively, click on the thumbnail to open it in a new editing window where you can crop, annotate, or share the screenshot with ease.
Method 2: Partial screenshot:
Step 1. Press the Command, Shift, and 4 keys and hold them together.
Step 2. Your cursor will turn into a crosshair, you need to drag that. After that, release the mouse button to take the screenshot.
Step 3. Once captured, a thumbnail may appear. Click it to edit the screenshot, or let it save to your desktop directly.
Method 3: Capture a specific window:
Step 1. Open the window you intend to capture.
Step 2. Press the Command, Shift, 4, and Space bar keys simultaneously.
Step 3. After that, the cursor will change into a camera icon. Use that to click on the window you want to capture.
Step 4. After capturing, you'll see a thumbnail in the corner of your screen. Click on it for editing options, e.g. crop screenshots on Mac, or wait for it to be saved to your desktop.
Part 2. Professional Way to Take Screenshots on Mac
Using a third-party tool like the FVC Screen Recorder is one of the best things to do when you want to take screenshots on Mac professionally. Although Mac contains basic screenshot features, it lacks the precision and convenience needed for professional use. Also, capturing specific screen areas or windows on Mac often involves different key combinations or commands, which is not convenient.
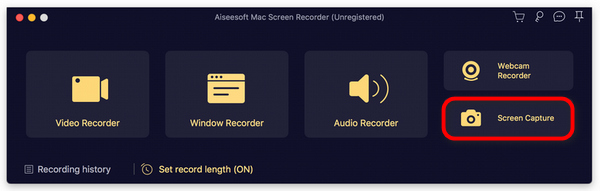
Meanwhile, FVC Screen Recorder simplifies the process of taking screenshots on Mac through its intuitive interfaces and one-click options, allowing users to capture exactly what they need, like a full-screen screenshot, a fixed region, or a custom region. Moreover, it supports various image formats like PNG, JPEG, BMP, GIF, and TIFF and offers key editing functions to enhance your screenshots on MacBook, Mac Pro, iMac, MacBook Air/Pro, and more Mac devices.
Step 1. First, download and install the FVC Screen Recorder on your Mac. This software supports almost all macOS versions including the latest macOS 14 Sonoma.
Free DownloadFor Windows 7 or laterSecure Download
Free DownloadFor MacOS 10.7 or laterSecure Download
Step 2. Next, launch the tool and click on the Screen Capture button. After that, you have three options to take screenshots on Mac: either full screen, a fixed region, or a custom region.
Step 3. Finally, you can edit your photo by utilizing the multiple tools below and click Save to save the picture to your Mac.

FVC Screen Recorder is indeed a comprehensive tool that caters to various recording and snapshot needs, making it a top choice for users seeking versatility and ease of taking screenshots on Mac.
Part 3. What If Screenshots Are Deleted from Mac
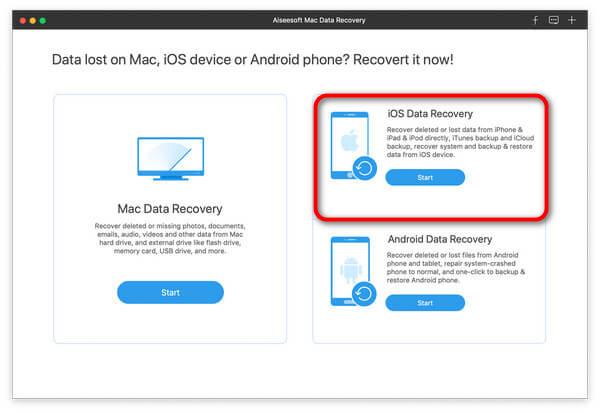
Aiseesoft Data Recovery is a software tool designed to help users retrieve lost or deleted files from their computers. With this tool, Mac users are able to recover macOS screenshots that may have been unintentionally deleted or accidentally lost due to system crashes, formatting, or other reasons. This tool offers both Quick Scan and Deep Scan options to search for lost files efficiently. With its user-friendly interface, this data recovery tool makes it easy for users to select the types of files they want to recover and the specific disk drives to scan.
Step 1. Download and install the Aiseesoft Data Recovery Software on your Mac.
Step 2. Run the tool.
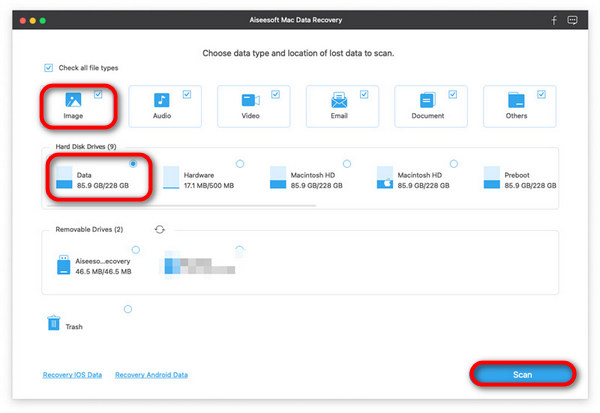
Step 3. Choose Image to recover deleted screenshots on Mac. After that, click Scan to scan for all Mac pictures.
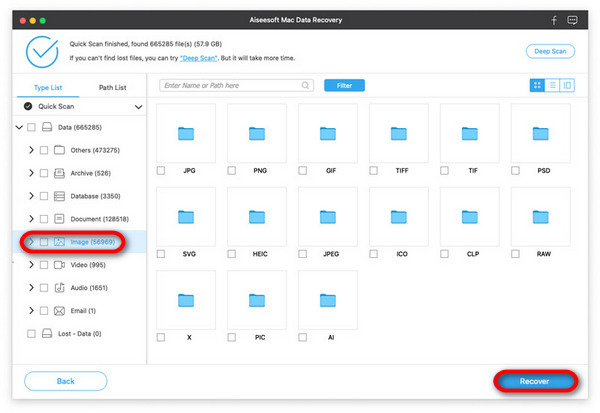
Step 4. Now, get your Mac screenshots using the image format filter then Double-click on any picture to preview details. After that, click Recover to recover the selected screenshots to your Mac.
If you can't find your missing data after the initial scan, you can try the Deep Scan option to scan the drive thoroughly. Keep in mind that this option takes longer but may provide additional results for recovery.
Part 4. FAQs about Taking Screenshots on Mac
How do you manage screenshots on a Mac?
Learning how to manage screenshots on a Mac is important because it helps you keep your files organized and saves space on your computer. When your screenshots are organized, you can find them quickly when you need them, which saves time and helps you stay productive. Plus, managing screenshots makes it easier to share them with others and communicate visually. So, by learning how to manage screenshots, you can make your Mac experience more efficient and enjoyable.
Can I take screenshots of videos playing on my Mac?
Yes. You can take, and it is possible to take screenshots of a video playing on your Mac. To take a screenshot of a video playing on your Mac, you can use the built-in keyboard shortcuts or third-party applications like FVC Screen Recorder. When taking screenshots of videos, consider pausing the video to capture the desired frame, as capturing while the video is playing may result in blurry or distorted images. Additionally, some video players may have specific settings or restrictions that prevent screenshots, so be sure to check the settings of the video player you're using.
Can I take screenshots of scrolling web pages on my Mac?
Yes. You can capture scrolling web pages on your Mac using third-party applications like FVC Screen Recorder. This tool has a feature that allows you to screenshot the entire webpage, including the parts that are not visible on the screen, by automatically scrolling while taking the screenshot.
Is it possible to capture screenshots on Mac in different file formats?
Yes. Mac allows you to capture screenshots in various file formats, including PNG, JPEG, TIFF, and PDF. By default, screenshots are saved automatically in the PNG format, but you can change the default format using Terminal commands or third-party applications. Additionally, some screenshot utilities offer options to specify the desired file format before capturing the screenshot, providing flexibility in choosing the format that best suits your needs.
Indeed, knowing how to take screenshots on a Mac is essential for capturing and sharing information effectively. Whether you're a starter or an experienced user, dwelling on this skill allows you to document your screen and communicate visually with others efficiently. Take your screenshot game to the next level by utilizing the powerful tools for Mac users from this article. Start capturing your screen like a pro today!
-
 3 Effective Ways to Screenshot on Google Chrome [Guide]
 Discover how to quickly take website screenshots on Google Chrome with these simple steps. Save time and increase productivity with our user-friendly guide.
-
 Step-by-Step Guide to Taking a Screenshot on Dell [2025]
 Learn how to take a screenshot on Dell computers with our step-by-step guide. Increase your efficiency and save time with this simple process. Read Now!
-
 How to Easily Capture Screenshots on HP [2025 Guide]
 Learn how to take a screenshot on Dell computers with our step-by-step guide. Increase your efficiency and save time with this simple process. Read Now!