Effortlessly Take Screenshots on Your Chromebook [2025 Guide]
Capturing screenshots is an essential function for many Chromebook users, whether for documentation, collaboration, or simply sharing information. Understanding the various methods and shortcuts available that can improve your productivity and ease of use. With that, if you’re looking for methods on how to screenshot on a Chromebook, we’ve got you! In this guide, we'll explore different methods to take screenshots effortlessly on your Chromebook, ensuring you can capture important moments or information with confidence and convenience. Let's dive in and discover how to capture the perfect screenshot on your Chromebook!

Part 1. How to Screenshot on Chromebook Using [Shortcuts]
Taking screenshots on a Chromebook without a Windows key is easy with these simple shortcuts. Whether you want to capture the entirety of the screen or just a part of it, Chromebooks offer convenient key combinations for both options.
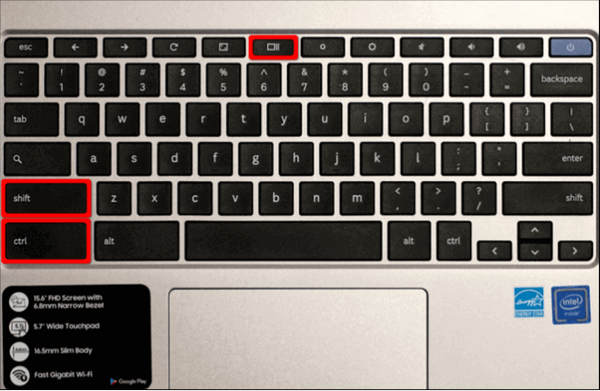
For Full-Screen Screenshots:
Press the Ctrl + Show Windows key
It is the key that looks like a rectangle with two lines beside it.
For Partial Screenshots:
Press the Ctrl + Shift + Show Windows key.
By utilizing these shortcuts, you can quickly and effortlessly take screenshots on your Chromebook, enhancing your productivity and enabling you to capture important information with ease.
Part 2. How to Screenshot on Chromebook Without a Shortcut- Awesome Screenshot
When specific keys do not work in taking a screenshot on a Chromebook, using the shortcut version, users can use a browser extension instead. These extensions seamlessly integrate into your browsing experience, offering features like capturing specific areas or entire web pages, along with extras such as annotation tools. Compatibility with Chromebooks is assured, and regular updates ensure access to the latest features without hassle.
Now, one of the most popular extension browser tools for this is the Awesome Screenshot. This tool is a Chrome extension designed for capturing and annotating screenshots on Chromebooks. It allows users to capture selected areas, entire web pages, or visible parts of web pages directly from their browser. With easy-to-use annotation tools and options for saving and sharing, it's a convenient choice for Chromebook users needing to capture and enhance screenshots.

Step 1. Install the Awesome Screenshot extension from the Chrome Web Store.
Step 2. On your browser toolbar, click on the extension icon.
Step 3. Choose the type of screenshot you want.
Step 4. Annotate or edit the screenshot as needed.
Step 5. Save or share the screenshot.
By using an extension like Awesome Screenshot, Chromebook users can streamline the process of their workflow, increase their productivity, and create more visually engaging and informative screenshots for various purposes, such as presentations, documentation, or collaboration.
Part 3. Screenshot on Chromebook From Quick Settings
Capturing screenshots on a Chromebook from Quick Settings is the best choice for several reasons. Quick Settings is easy to find and use, located in the system tray for quick access. Inside Quick Settings, the Screen Capture tool lets you pick what you want to capture: the whole screen, a specific window, or just part of it. This flexibility means you can get the exact shot you need. Plus, Quick Settings makes the process fast and simple so that you can take a screenshot in no time.
To do this, follow the steps below:
Step 1. Access Quick Settings and click on Screen Capture.
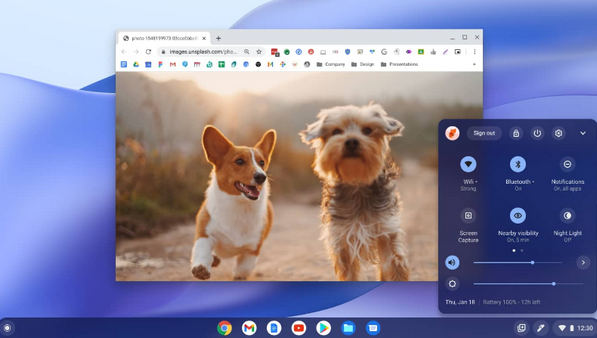
Step 2. Use the Screen Capture tool to choose between capturing the entire screen, a single window, or a specific area. You can also opt to record part or all of your screen.
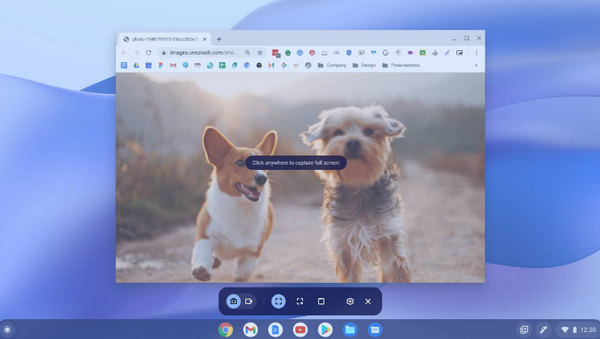
Step 3. Click on Capture after selecting your preference.
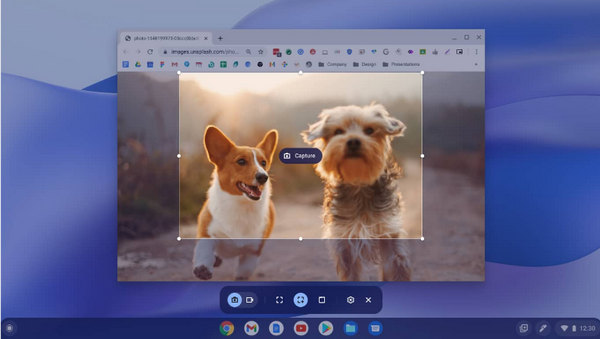
Step 4. Your screenshot or recording will appear in Tote on your shelf and will be automatically copied to your Clipboard once the process is complete.
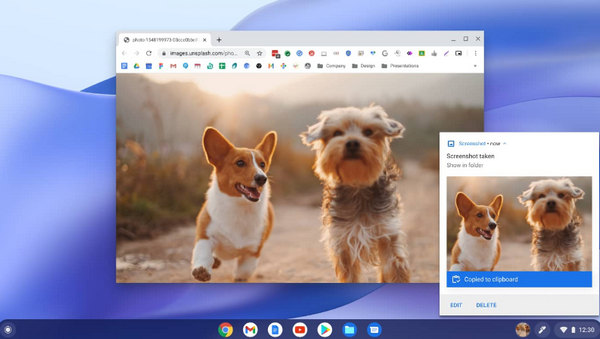
Capturing screenshots from Quick Settings on a Chromebook offers a seamless and user-friendly experience, making it the preferred method for many Chromebook users.
Part 4. FAQs About How to Screenshot on Chromebook
Can I take screenshots on any Chromebook model?
Yes. Chromebooks typically support screenshot functionality across different models. However, the specific key combinations or methods might vary depending on the Chromebook model and its operating system version.
Can I customize the format or quality of the screenshots I capture on a Chromebook?
Chromebooks typically capture screenshots in the PNG format, and there might not be native options to customize the format or quality. However, you can use third-party software or online tools to convert or edit your screenshots if needed.
Are there limitations to the size or length of screenshots I can capture on a Chromebook?
While Chromebooks allow you to capture screenshots of various sizes, there might be practical limitations depending on the available storage space on your device. Additionally, if you're capturing a video screenshot, there might be limitations on recording length based on available resources.
Can I capture screenshots of specific applications or browser tabs on a Chromebook?
Yes. You can capture screenshots of specific applications or browser tabs by using the appropriate keyboard shortcuts or by selecting the specific window or area using built-in features like Quick Settings. This allows for greater flexibility in capturing only the content you need.
Can I schedule automatic screenshots on my Chromebook?
Currently, Chromebooks don't have native support for scheduling automatic screenshots. However, you may find third-party applications or extensions in the Chrome Web Store that offer this feature. Keep in mind that using such extensions might require granting additional permissions and could affect system performance.
Conclusion
In conclusion, this comprehensive guide has provided a clear roadmap for capturing screenshots on Chromebooks, catering to users of all skill levels. From utilizing convenient keyboard shortcuts to leveraging powerful browser extensions and the intuitive Quick Settings feature, there's a method to suit every preference. By learning these methods, you can enhance your productivity, streamline your workflow, and communicate more effectively through visually engaging screenshots. Start capturing your screen effortlessly today!


 Video Converter Ultimate
 Screen Recorder
