


Ultimate Guide on How to Take FaceTime Screenshots [2025]
FaceTime is a widely used video chat application that was developed by Apple in order for their users to have real-time video conversations on either iPhone, iPad, or Mac. Now, taking screenshots during FaceTime calls is a great way to save moments with whom we are talking, especially when that person has gone missing for a long time. So, if you want to save precious moments during these calls, this article is for you. Take time to read and learn 3 ways how you can take FaceTime screenshots easily. Let’s get started!

Part 1: The Ultimate Way to Take FaceTime Screenshots on iPhone/iPad/Mac
The ultimate way to easily take FaceTime screenshots on Apple devices is by using the FVC Screen Recorder. This third-party screen recording tool is designed perfectly to take screenshots on iPhone, iPad, or Mac. So, if you’re using any of those and you want to take screenshots when you have your FaceTime Video Calls with your families, friends, and loved ones, you will greatly benefit from its snapshot and phone recorder features. Moreover, this tool can easily be navigated by any user because of its user-friendly interface. Lastly, if you want to be creative with your FaceTime screenshots, you’ll surely enjoy its editing features that you can customize.
Method 1: For Mac
Step 1. First, download and install the FVC Screen Recorder on your Mac. This software supports almost all macOS versions, including the latest macOS 14 Sonoma.
Free DownloadFor Windows 7 or laterSecure Download
Free DownloadFor MacOS 10.7 or laterSecure Download
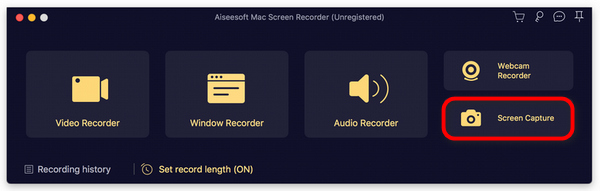
Step 2. Next, launch the tool.
Step 3. Now, while you are having your FaceTime video call on your Mac. Click on the Screen Capture button that can be found on the floating window of the tool’s interface.
Step 4. This is optional, but you can edit your FaceTime Screenshot images by utilizing the multiple editing tools below.
Step 5. Lastly, click Save to save the picture to your Mac.

Method 2: For iPhone and iPad
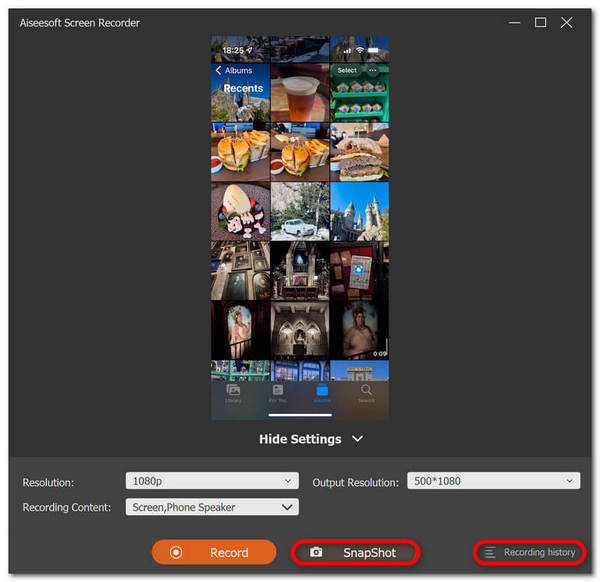
Step 1. Download and open FVC Screen Recorder, but this time on your Windows Computer.
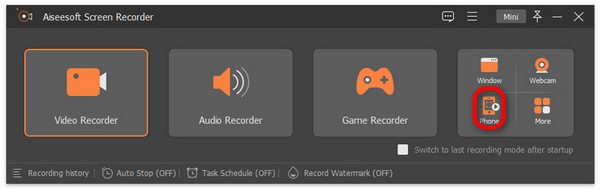
Step 2. Now, after installing the tool, open it and on the right side of the tool’s floating window interface, together with the other 3 options, click on the Phone option.
Step 3. After that, click the iOS Recorder option.
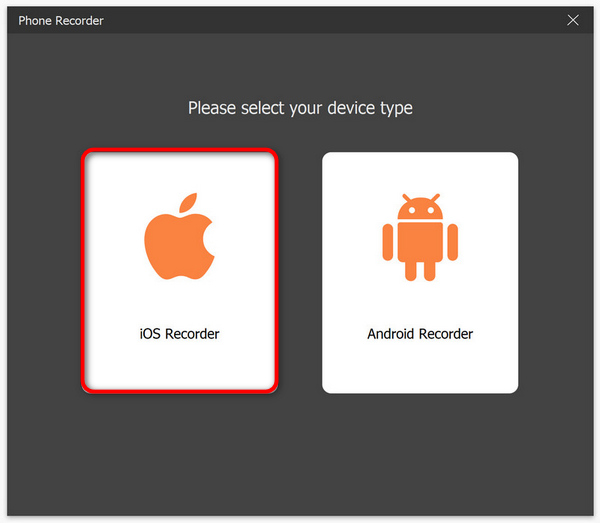
Step 4. Now, a new window will appear containing an on-screen instruction where you will also be asked to choose between Screen Mirroring or Audio Mirroring. In your case, choose Screen Mirroring.
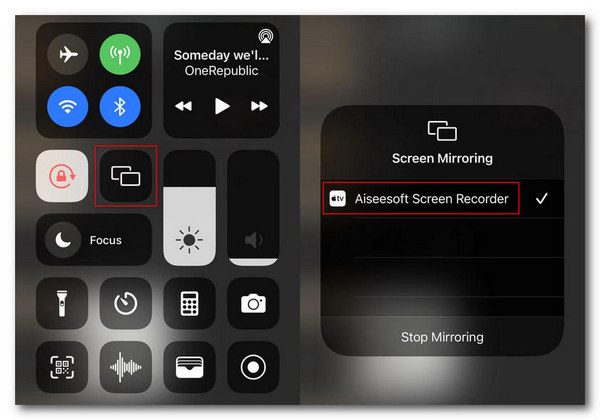
Step 5. Now, on your iPhone or iPad, open your Control Center and click on Screen Mirroring. Then click on Aiseesoft Screen Recorder to connect either your iPhone or your iPad to the computer.
Step 6. Finally, to take a screenshot on your iPhone or iPad, just click on the Snapshot icon.
FVC Screen Recorder is indeed a versatile tool when it comes to taking screenshots. Imagine one tool that can support multiple iOS devices. Too good to be true, but it is. So, regardless of what iOS device you are using, taking FaceTime screenshots during video calls is possible with this screen recording tool.
Part 2: How to Take FaceTime Screenshot on iPhone/iPad
Taking FaceTime screenshots on an iPhone or iPad can be seamlessly done using their built-in screenshot features.
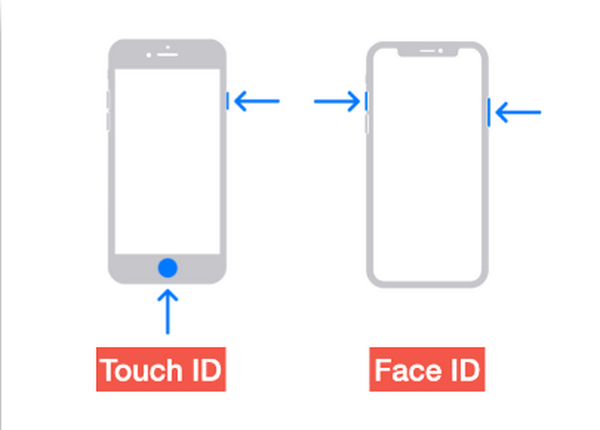
Step 1. Check the iOS or iPasOS device that you’re using during a FaceTime video call.
Step 2. When it has Touch ID, you need to simultaneously press the Home and Power buttons to take a screenshot of a FaceTime video call. Meanwhile, if your iPhone or iPad has a Face ID, you can take a Facetime call screenshot by also simultaneously pressing the Volume Up and Power buttons.
Step 3. Access your screenshot on your Photos app in the Screenshot folder,
While taking FaceTime Screenshots is just a piece of cake on an iPhone or iPad due to its built-in screenshot features. However, one must be cautious about pressing the required buttons during an active FaceTime call as it may pose a risk of accidental interruption, like ending the call or turning off the volume unknowingly.
Part 3: How to Take FaceTime Screenshot on Mac
When you are having a FaceTime video call on your Mac, the easiest way you can do this is to take FaceTime screenshots on it by using its hotkeys.
Step 1. First open your FaceTime video call on Mac.

Step 2. Now, take a FaceTime screenshot using the hotkeys while you are having a video call.
Note: To capture a screenshot of the entire screen of your FaceTime video call, press and hold the Command, Shift, and 3 keys together. Meanwhile, if you just want to capture a partial part of the screen, press the Command, Shift, and 4 keys and hold them together. Lastly, if you want to capture the FaceTime window, press the Command, Shift, 4, and Space bar keys simultaneously.
Step 3. The screenshot will be directly saved on your desktop.
The only thing about using hotkeys during a FaceTime screenshot on Mac is that you can’t edit it if you want to customize your screenshot images. Nevertheless, if you just want to screenshot it, then it’s fine, but if you want to be creative, you can use third-party tools such as FVC Screen Recorder.
Part 4: FAQs about Taking FaceTime Screenshots
Where do FaceTime screenshots go?
You can access your FaceTime screenshots on your device's Photos app. Usually, after taking a screenshot during a FaceTime call, it will be directly saved to it, specifically in the screenshots folder of that app.
Does FaceTime tell you when someone takes screenshots?
No. FaceTime doesn’t have a feature that notifies someone who takes a screenshot during a FaceTime video call. Therefore, if someone takes a screenshot during your FaceTime call, you won't receive any notification.
FaceTime screenshots not saving?
If you're experiencing issues with FaceTime screenshots not saving to your iOS device, there could be several reasons for this. First, you need to ensure that your device's storage isn't full, as this can be a primary reason why FaceTime screenshots are not saving. Basically, this prevents new screenshots from being saved. Additionally, check your device's privacy settings maybe because the Photos app doesn’t have permission to save screenshots. If the problem persists, restarting your device or updating your software may help resolve the issue.
Conclusion
In conclusion, taking FaceTime screenshots during video calls is the easiest way to save and capture memorable moments with loved ones over the line. Whether using built-in features on iOS devices or third-party tools like FVC Screen Recorder, there are various methods available to capture these moments effortlessly. So, don't hesitate to utilize these tools and features to make the most out of your FaceTime experiences. FaceTime your loved ones now and save that moment by taking a screenshot of it.
-
 How to Solve Screenshot Not Working on iPhone [2025]
 Have trouble taking screenshots on your iPhone? We got you! Learn our comprehensive guide to help you fix screenshots not working on iPhones quickly and easily.
-
 Screenshot on Windows Without Print Screen [2025 Guide]
 Looking for ways to screenshot on Windows without a print screen. This article made it easy for you. Read this now and capture your screen effortlessly!
-
 4 Ways to Screenshot on Snapchat Without Them Knowing
 Do you want to screenshot on Snapchat without them knowing it? This article has 4 effective methods tailored just for you. Check it now and try it by yourself!