


Как сжать изображение в Photoshop: результат без потерь
Photoshop — это распространенное и широко используемое программное обеспечение для редактирования фотографий. Благодаря своим невероятным и полезным функциям это программное приложение стало инструментом, к которому профессиональные фоторедакторы прибегают для улучшения своих фотографий.
Теперь, если вы имеете дело с большими файлами изображений и считаете их сложными для обработки, вы можете сжать их. С этим, эта статья научит вас трем различным методам и одной альтернативе на как уменьшить изображение в фотошопе. Мы понимаем, что использование этого инструмента может быть для кого-то непосильным, но это руководство облегчит вам задачу по сжатию фотографий. Давайте не будем затягивать. Давайте начнем!

Часть 1. Как уменьшить изображение в Photoshop путем конвертации формата изображения
Да! Вы можете сжать изображение в Photoshop, преобразовав его формат изображения. Это эффективный способ сжатия изображений, поскольку разные форматы изображений имеют разные уровни сжатия. Таким образом, выбрав правильный формат для своих нужд, вы можете оптимизировать изображения для различных целей.
Вот как можно уменьшить изображение в Photoshop:
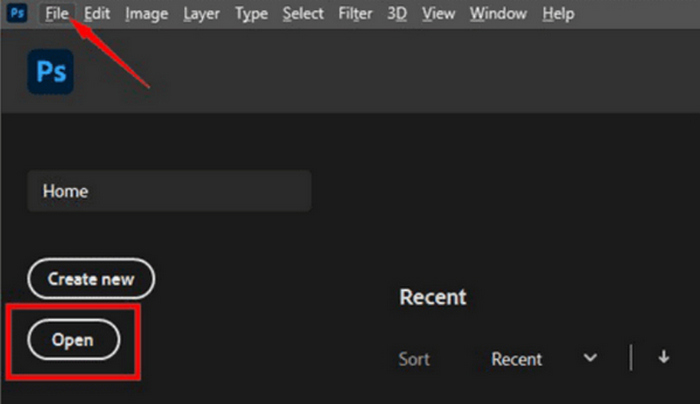
Шаг 1. В вашем Photoshop откройте файл, который вы хотите преобразовать. Для этого перейдите в Вкладка «Файл» и нажмите на открыто вариант.
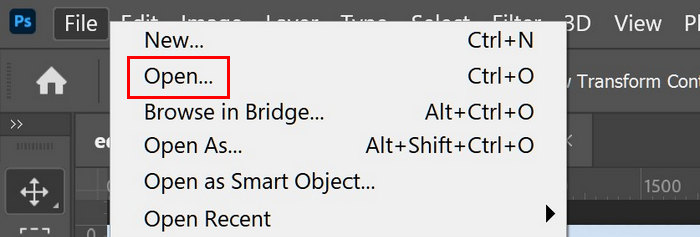
Шаг 2. Далее вернитесь к Вкладка «Файл», прокрутите вниз и найдите Сохранить как кнопка в меню.

Шаг 3. Теперь введите желаемое имя файла, затем выберите местоположение для файла.
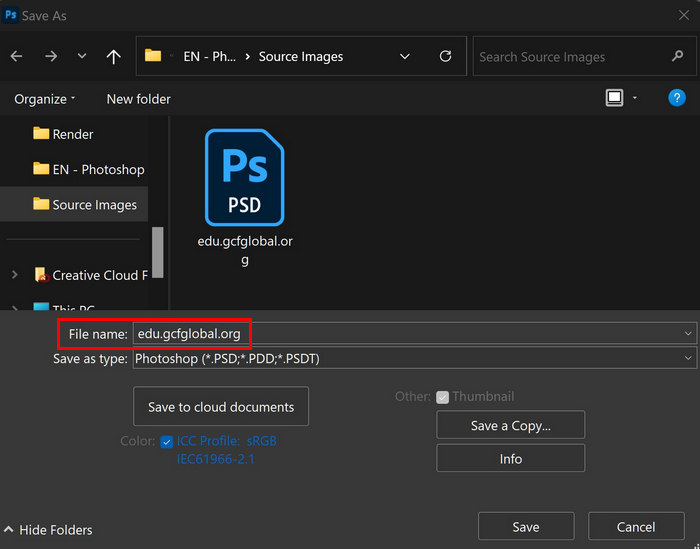
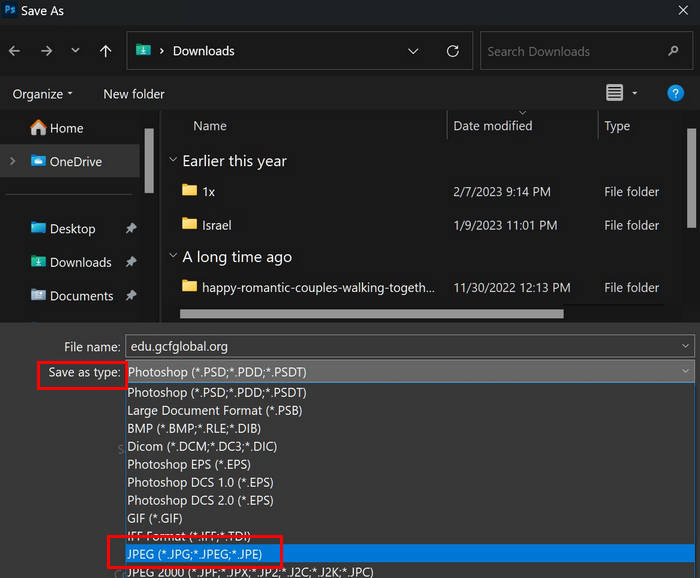
Шаг 4. После этого выберите из списка форматы файлов, в которые вы хотите преобразовать свою фотографию.
Шаг 5. После этого просто нажмите Сохранить.
Конвертация формата вашего изображения действительно может уменьшить его размер. Таким образом, с помощью этого метода вам будет легко оптимизировать ваши изображения для различных нужд. Но учтите, если вы экономите хранилище для этого метода. Простое конвертирование формата вашей фотографии не может привести к значительной потере размера.
Часть 2. Как уменьшить размер файла в Photoshop, уменьшив разрешение или качество
Другой метод уменьшения размера файла изображения в Photoshop — это мощные функции редактирования. Пользователи могут изменять размеры изображений, а также настройки качества и формата, чтобы достичь желаемого размера файла без существенной потери качества.
Шаг 1. Откройте изображение в Photoshop, нажав открыто или пойти в файл и выберите файлы изображений, размер которых вы хотите изменить.
Шаг 2. Теперь идите к Образ вкладка и выберите Размер изображения.

Шаг 3. в Размер изображения диалоговое окно, выберите Пиксели из раскрывающегося меню. Чтобы задать конкретные размеры для сжатия файлов изображений, введите значения в текстовые поля ширины и высоты и щелкните в порядке чтобы изменить размер изображения.
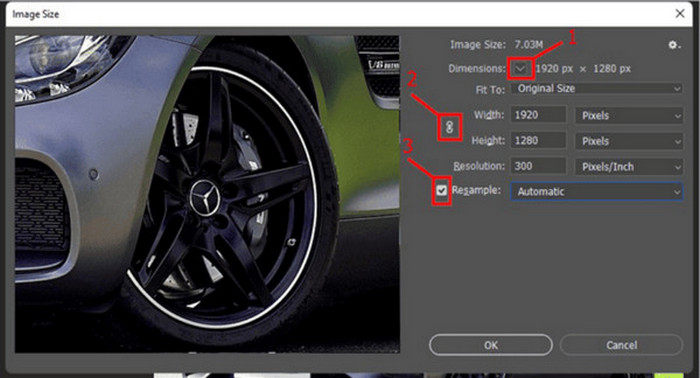
Шаг 4. Наконец, сохраните свой сжатый PNG нажав на Сохранить как кнопка под файл таб.
Перед сохранением сохраните PSD-файл в формате PNG.
Шаг 1. Откройте изображение в Photoshop, нажав открыто или пойти в файл и выберите файлы изображений, которые вы хотите сжать.
Шаг 2. Теперь идите к Образ вкладка и выберите Размер изображения.
Шаг 3. в Размер изображения диалоговое окно, выберите Дюймы из раскрывающегося меню. Чтобы задать определенные размеры для сжатия файлов изображений, введите значения в текстовые поля ширины и высоты и щелкните в порядке чтобы изменить размер изображения.
photoshop-изображение-размер-дюймыШаг 4. Наконец, нажмите кнопку Сохранить как кнопка под файл вкладку для сохранения конечного изображения.
Оба эти метода могут значительно помочь сжать файл изображения в Photoshop. Однако вам нужно пробовать и ошибаться с размером, который вы вводите в настройки, чтобы достичь наилучшего размера и качества ваших фотографий.
Часть 3. Как пакетно сжимать изображения в Photoshop
Другой способ сжатия изображений в Photoshop — пакетное сжатие. Этот метод особенно полезен для тех, кому нужно сжать кучу файлов изображений. Чтобы упростить этот процесс, пользователи могут пакетно сжимать свои фотографии в Photoshop. Вот как это сделать:
Шаг 1. Сначала вам необходимо сохранить все фотографии, которые вы хотите сжать пакетно, в одной папке.
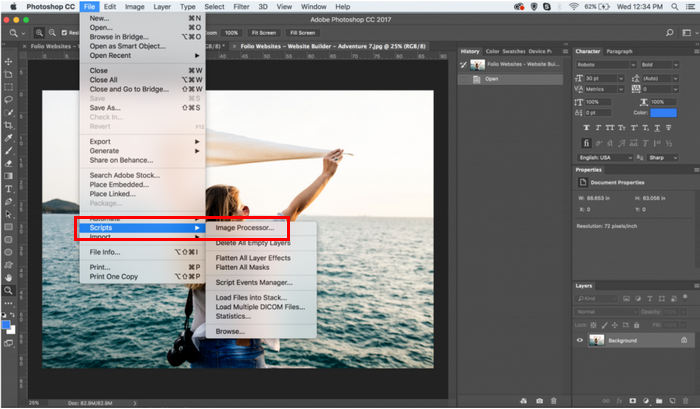
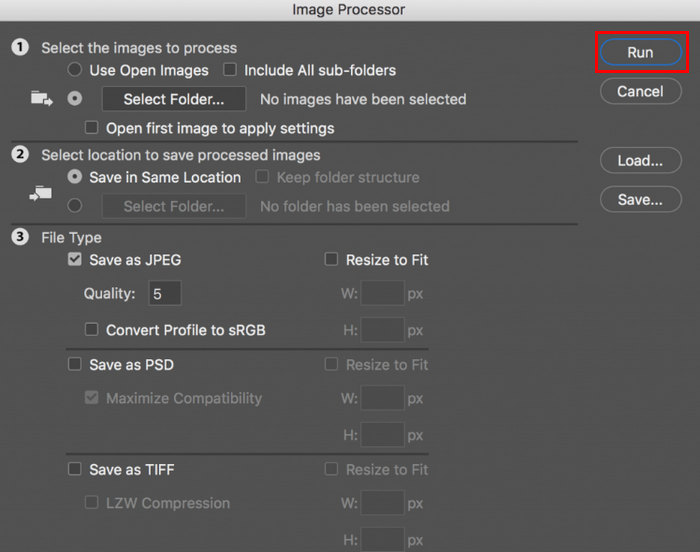
Шаг 2. Откройте Photoshop и перейдите в Вкладка «Файл»нажмите Сценарий, и выберите Процессор изображений.
Шаг 3. Затем импортируйте фотографии, которые вы хотите сжать, нажав кнопку Выберите папку в разделе «Выберите изображения для обработки».
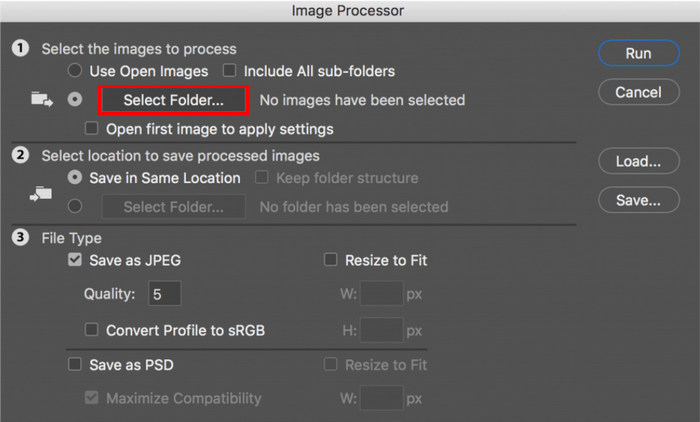
Шаг 4После этого в исходной папке автоматически будет создана новая папка, в которой будут храниться или сохраняться сжатые изображения.
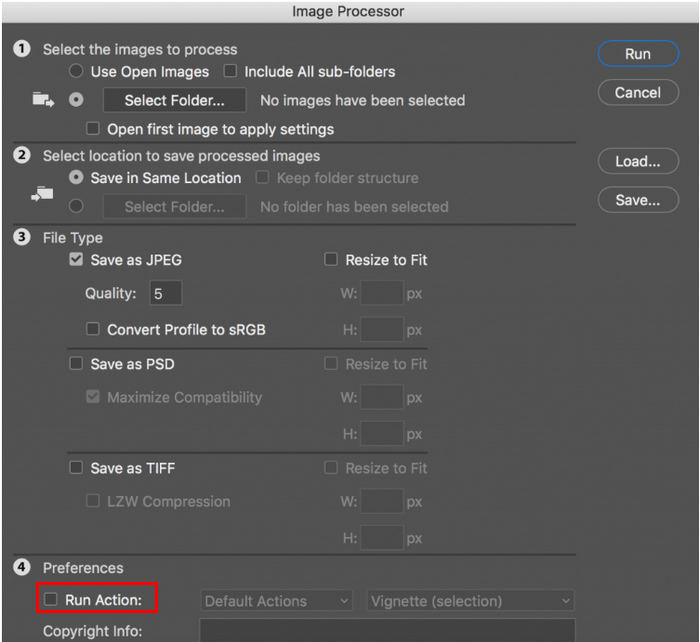
Шаг 5. Под Тип файла раздел, отрегулируйте настройки, чтобы изменить размер файла изображения. Отметьте галочкой Изменить размер, чтобы подогнать и установите максимальную высоту и ширину сжатой фотографии.

ШАГ 6. в Качество поле введите число от 1 до 12. Обратите внимание, что чем больше число, тем больше размер файла. Между тем, если вы сжимаете файлы формата JPG, не забудьте поставить галочку в поле Сохранить как JPEG.
Шаг 7. Теперь нажмите кнопку Выполнить действие кнопку для просмотра доступных действий.
Шаг 8. После завершения нажмите кнопку Запустить кнопка. Изображения в вашей папке будут обработаны и сохранены в указанной папке назначения.
Этот метод действительно хорош, когда нужно сжать несколько файлов. Однако некоторые пользователи могут посчитать этот метод немного сложным, поскольку он может потребовать сложных шагов.
Часть 4. Более простая альтернатива Photoshop для сжатия изображения
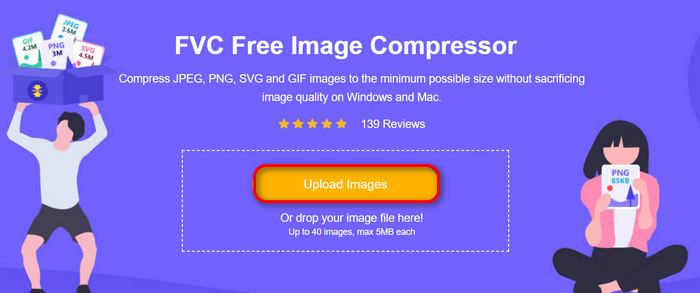
Если вы ищете более простой способ уменьшить изображение в Photoshop, вы можете воспользоваться FVC Free Image Compressor. Этот инструмент бесплатный и автоматически сжимает ваши фотографии, что приводит к значительной потере размера, но практически без потери качества. Более того, как и в Photoshop, вы также можете сжимать пакетно до 40 изображений всего за один клик с помощью этого инструмента. Чтобы использовать этот инструмент, выполните следующие действия:
Шаг 1. В браузере введите FVC Free Image Compressor и найдите его.
Шаг 2. После этого, как только вы окажетесь в его главном интерфейсе, нажмите загрузить изображения для импорта изображений, которые вы хотите сжать.
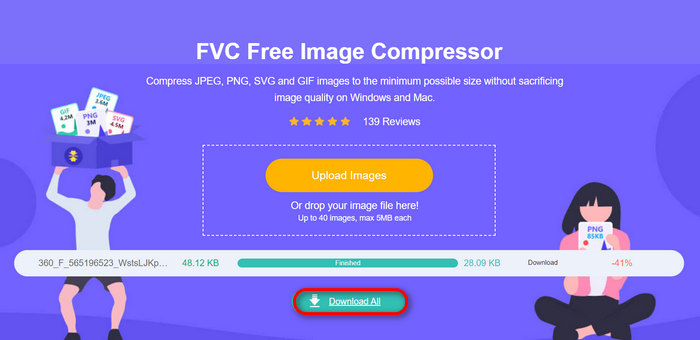
Шаг 3. После сжатия изображений вы можете просмотреть их, проверив их новые размеры после сжатия. Наконец, нажмите Скачать все чтобы сохранить изображение.
Этот альтернативный инструмент может помочь вам во многих аспектах. Он бесплатный по сравнению с Photoshop, прост в использовании и поддерживает пакетное сжатие. Так что, если вы ищете инструмент сжатия на ходу, этот компрессор изображений — то, что вам нужно.
Часть 5. Часто задаваемые вопросы об уменьшении изображения в Photoshop
Как увидеть реальный размер изображения в Photoshop?
Чтобы увидеть фактический размер изображения в Photoshop, вам нужно перейти на вкладку «Изображение» и нажать на размер изображения, чтобы проверить размеры.
Какой размер изображения подойдет для Photoshop?
Хороший размер изображения в Photoshop зависит от предполагаемого использования. Для веб-использования изображения обычно должны быть менее 2000 пикселей и сохраняться в формате JPEG со средним качеством для баланса качества и скорости загрузки. Для печати разрешение изображения должно быть не менее 300 DPI (точек на дюйм), а размеры должны соответствовать размеру печати.
Какой размер изображения по умолчанию в Photoshop в дюймах?
Размер изображения по умолчанию в Photoshop обычно зависит от настроек, настроенных при создании нового документа. По умолчанию Photoshop может начать с размера документа 8,5x11 дюймов при разрешении 300 точек на дюйм, что подходит для печати.
Вывод
Теперь, когда вы знаете различные методы как уменьшить изображение в фотошопе, вы можете легко оптимизировать свои фотографии для хранения, использования в Интернете или обмена без ущерба для качества. Начните использовать эти методы сегодня, чтобы оптимизировать свой рабочий процесс и улучшить свои навыки редактирования изображений.
-
 Как уменьшить размер файла фотографии на iPhone: шаги для всех iOS
 Работаете с большими файлами изображений на вашем iPhone и испытываете трудности с их загрузкой? Эта статья станет для вас руководством по уменьшению размера файла фотографии на iPhone.
-
 Сжимает ли Google Drive фотографии? Где правда?
 Вам также интересно, сжимает ли Google Drive фотографии? Прочитайте наш всеобъемлющий обзор, чтобы узнать правду и узнать, как это влияет на качество ваших изображений.
-
 3 способа сжатия изображений для Discord Emoji [Руководство]
 Если вы ищете способ сжатия изображений для эмодзи Discord из-за строгих ограничений на размер файла, прочитайте эту статью и воспользуйтесь тремя простыми способами.