


Cum să reduceți cu ușurință dimensiunea imaginii pe Mac [Ghid final]
Când aveți de-a face cu fișiere de imagine mari pe Mac, nu vă îngrijorați! Există modalități de a rezolva această problemă.
Înțelegem nevoia de comprimare a imaginilor, deoarece le face mai ușor de gestionat și mai comode de utilizat. De multe ori, dacă observi, unele sisteme ne cer să încărcăm fișiere imagine într-o anumită dimensiune, unele site‑uri se încarcă mai lent, iar trimiterea imaginilor prin e‑mail durează. Toate aceste probleme au aceeași sursă, și anume fișierele de imagine de dimensiuni mari. Așadar, în acest articol vom analiza trei metode prin care poți reduce dimensiunea imaginilor pe Mac cu ușurință. Acest lucru este deosebit de util atunci când ai nevoie să îți optimizezi fluxul de lucru și să te asiguri că imaginile tale sunt accesibile și se încarcă rapid.

Partea 1. Reduceți dimensiunea imaginii pe Mac prin reducerea pixelilor
Dispozitivele Mac au o modalitate excelentă de a reduce imaginile folosind instrumentele lor încorporate. Cu acestea, utilizatorii de Mac își pot comprima ușor și liber fotografiile imediat pe dispozitivele lor.
Previzualizare este un instrument de vizualizare a imaginilor și PDF încorporat. Cu acest instrument, utilizatorii nu se pot bucura doar de funcțiile sale pentru vizualizarea imaginilor și fișierelor PDF. De asemenea, pot profita de funcțiile sale de editare, unde pot reduce cu ușurință dimensiunea imaginii pe Mac. În plus, este foarte convenabil și gratuit de utilizat, făcându-l accesibil pentru toată lumea. Pentru a face acest lucru, urmați pașii de mai jos:
Pasul 1. Mai întâi, deschide aplicația Preview pe dispozitivul tău Mac.
Pasul 2. Apoi, deschide fișierul imaginii căreia vrei să îi reduci dimensiunea, mergând la fila File și făcând clic pe butonul Open.
Pasul 3. Acum, mergi la fila Tool din meniul contextual și apoi fă clic pe Adjust Size.

Pasul 4. Selectează Resample Image dacă vrei să reduci dimensiunea fișierelor imagine.

Pasul 5. Acum, modifică valoarea câmpului Resolution. După ce ai făcut acest lucru, în partea de jos va fi afișată noua dimensiune.
Pentru a menține cea mai înaltă calitate posibilă în timp ce reduci dimensiunea imaginilor pe Mac, poți testa prin încercări repetate ce setări de rezoluție se potrivesc cel mai bine imaginii. Este important să începi cu o reducere mai mică a rezoluției și să o mărești treptat până când obții un echilibru bun între calitatea imaginii și dimensiunea fișierului.
Partea 2. Comprimați dimensiunea imaginii pe Mac cu o comandă rapidă
Când doriți o modalitate mai ușoară de a comprima dimensiunea imaginii pe Mac, puteți utiliza Acțiuni rapide pentru a simplifica procesul de comprimare a imaginilor. Cu aceasta, puteți efectua diverse sarcini direct din Finder fără a fi nevoie să deschideți o aplicație. Aceasta include capacitatea de a redimensiona imaginile rapid și eficient. În plus, oferă un proces convenabil pentru a gestiona sarcinile de bază de editare a imaginilor, cum ar fi redimensionarea, care este utilă pentru cei care trebuie să proceseze mai multe imagini rapid.
Iată cum poți folosi Acțiunile rapide (Quick Actions) pentru a comprima dimensiunea imaginilor pe Mac:
Pasul 1. Dă clic dreapta pe imaginea pe care vrei să o comprimi.
Pasul 2. Din meniul contextual, selectează Quick Actions și apoi Convert Image.
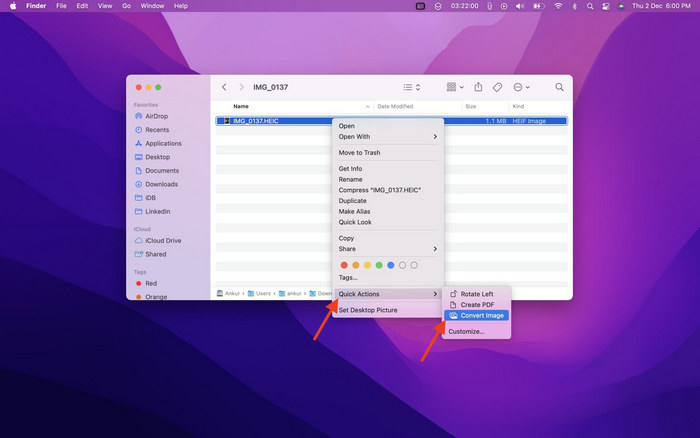
Pasul 3. Dă clic pe câmpul Image Size și selectează Small, Medium sau Large din meniul derulant, care afișează și dimensiunile corespunzătoare ale fișierelor.
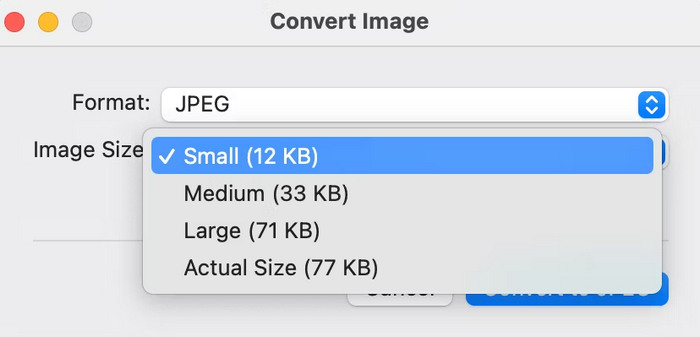
Pasul 4. Bifează Preserve Metadata pentru a păstra toate informațiile imaginii.
Dacă doriți să vă personalizați Acțiunile rapide și doriți să le includeți în opțiunile de redimensionare utilizate cel mai frecvent. Puteți face acest lucru prin preferințele de sistem din extensii. Mai mult, dacă doriți să reduceți o imagine pe Mac pentru compresie în lot, trebuie doar să selectați mai multe imagini înainte de a aplica Acțiunea rapidă pentru a economisi timp.
Partea 3. Cel mai rapid mod de a comprima imagini pe Mac [Până la 40 de imagini simultan]
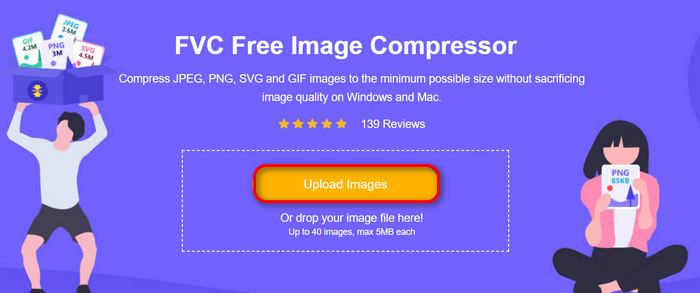
Dacă ești în căutarea unui instrument alternativ pentru reducerea dimensiunii imaginilor pe Mac, poți încerca FVC Free Image Compressor. Acest instrument este complet gratuit și suportă comprimarea în lot (batch), permițând utilizatorilor să micșoreze până la 40 de fișiere imagine deodată. În plus, acest instrument integrează cele mai bune algoritmi de optimizare și comprimare pentru a păstra calitatea fotografiei comprimate. În ceea ce privește ușurința de utilizare, acest instrument este ideal pentru începători, deoarece trebuie doar să urmeze doi pași, iar comprimarea se va realiza automat.
Iată cum să comprimi JPEG folosind FVC Free Image Compressor
Pasul 1. Pentru început, trebuie să accesezi site-ul lor oficial, căutând FVC Free Image Compressor în browser.
Pasul 2. Apoi, dă clic pe Upload Images pentru a importa fotografiile pe care vrei să le comprimi pe Mac. Instrumentul le va comprima automat.
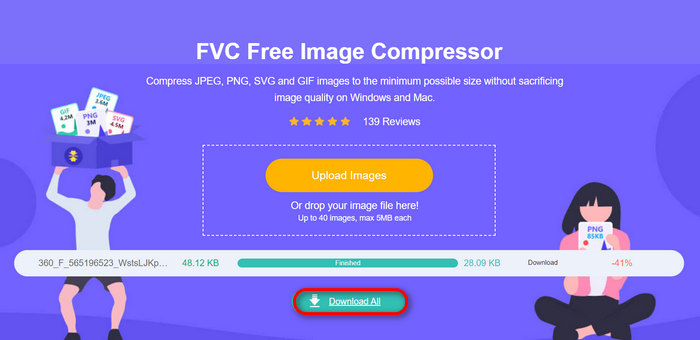
Pasul 3. După comprimare, poți previzualiza noua dimensiune a fișierelor tale de imagine comprimate. În final, dă clic pe Download All pentru a‑ți salva imaginile.
Cu FVC Free Image Compressor, puteți reduce cu ușurință dimensiunea imaginii pe Mac, puteți asigura o ieșire de calitate, puteți accepta o gamă largă de formate de fișiere de imagine și puteți avea alte caracteristici importante, cum ar fi compresia în lot.
Puteți profita de caracteristica de comprimare în lot a acestui instrument pentru a economisi timp, mai ales dacă aveți o grămadă de imagini de comprimat. Tot ce trebuie să faceți este să le importați simultan în instrument. Dar rețineți că puteți comprima până la 40 de imagini simultan, făcând procesul mai rapid și mai eficient.
Partea 4. Întrebări frecvente despre reducerea dimensiunii imaginii pe Mac
Cum redimensionați o imagine în Apple Photos?
Pentru a redimensiona o imagine în Apple Photos, puteți utiliza funcția de editare încorporată, unde puteți decupa fotografia. Pentru a face acest lucru, deschideți fotografia în aplicație și atingeți butonul de editare. Apoi, atingeți instrumentul de decupare și ajustați zona vizibilă a imaginii. De asemenea, puteți trage colțurile casetei de decupare pentru a redimensiona zona vizibilă a fotografiei sau puteți selecta un raport de aspect prestabilit pentru mai mult control.
Cum să faci o imagine mai mică în MB pe Mac?
Pentru a face o imagine mai mică în MB pe Mac, utilizați aplicația Previzualizare pentru compresie, unde puteți reduce rezoluția și dimensiunile imaginii pentru a reduce dimensiunea fișierului. Dar rețineți că scăderea calității va reduce dimensiunea fișierului, dar poate afecta ușor aspectul imaginii.
Ce este aplicația de redimensionare a loturilor de imagini pentru Mac?
Batch Photo Resizer este o excelentă aplicație de redimensionare a imaginilor în lot pentru Mac. Oferă un set cuprinzător de funcții, perfecte pentru reducerea dimensiunii imaginilor. Cu acest instrument poți redimensiona în lot imaginile la dimensiunile dorite, asigurând în același timp cea mai bună calitate posibilă.
Concluzie
În concluzie, este important să știi ce instrument să folosești pentru a reduce dimensiunea imaginilor pe un Mac, mai ales atunci când lucrezi cu imagini. Așadar, indiferent de instrumentul sau metoda pe care o vei folosi, oricare dintre ele te poate ajuta să îți comprimi eficient imaginile. Ești pregătit să profiți de toate aceste instrumente pentru a‑ți comprima fotografiile? Începe chiar de astăzi!
-
 Cum să reduceți dimensiunea fișierului foto pe iPhone: pași pentru toate iOS
 Te confrunți cu fișiere de imagine mari pe iPhone și îți este greu să le încarci? Acest articol va fi ghidul dumneavoastră despre cum să reduceți dimensiunea fișierului foto pe iPhone.
-
 Comprimați PNG: 5 cele mai bune metode pe care trebuie să le cunoașteți [2024]
 Vă întrebați ce instrumente sunt cele mai bune pentru a comprima PNG? În acest articol, aflați despre 5 dintre ele și fiți îndrumat cu privire la modul în care le puteți micșora, menținându-le în același timp imaginile.
-
 Fotografie de compresie a raportului: Ce trebuie să știu? [Recenzie]
 Aflați ce este raportul de compresie a fotografiilor și cum afectează acesta calitatea imaginii. De asemenea, fiți îndrumat cu privire la modul de modificare a acestui raport de compresie atunci când este făcut incorect.