


Een volledige review voor u: comprimeert Google Drive foto's?
Sommige websites hebben beperkingen op de breedte en hoogte van de ingevoegde afbeeldingen. Het is daarom onvermijdelijk dat je een situatie tegenkomt waarin je een afbeelding moet vergroten of verkleinen. Als je met afbeeldingen werkt, denk je waarschijnlijk meteen aan de expert in deze branche: Photoshop. Photoshop staat bekend om zijn vele functies. Voor professionals is Photoshop ongetwijfeld de ideale keuze voor het verkleinen van afbeeldingen. Maar als je een beginner bent, kan het zijn dat je de bijbehorende functies niet kunt vinden.
Dat is geen probleem; wij hebben je gedekt met onze meest gedetailleerde gids over het verkleinen van een afbeelding in Photoshop. Als je een urgentere taak hebt, kun je een van de andere afbeeldingsbewerkingstools overwegen die we in dit artikel hebben aanbevolen.
Deel 1. Een afbeelding in Photoshop verkleinen
Laten we eerst eens kijken wat u kunt doen om de grootte van een afbeelding te wijzigen met behulp van Photoshop.
Houd er rekening mee dat de stappen voor het wijzigen en verkleinen van een afbeelding enigszins kunnen verschillen. Daarom splitsen we de stapsgewijze handleiding in twee delen. Specifieke richtlijnen voor het verkleinen van afbeeldingen vindt u in het volgende gedeelte.
Stap 1. Open Photoshop en ga vervolgens naar Bestand > Openen om de afbeelding te selecteren die je wilt schalen.
Stap 2. Ga naar Afbeelding > Afbeeldingsgrootte.
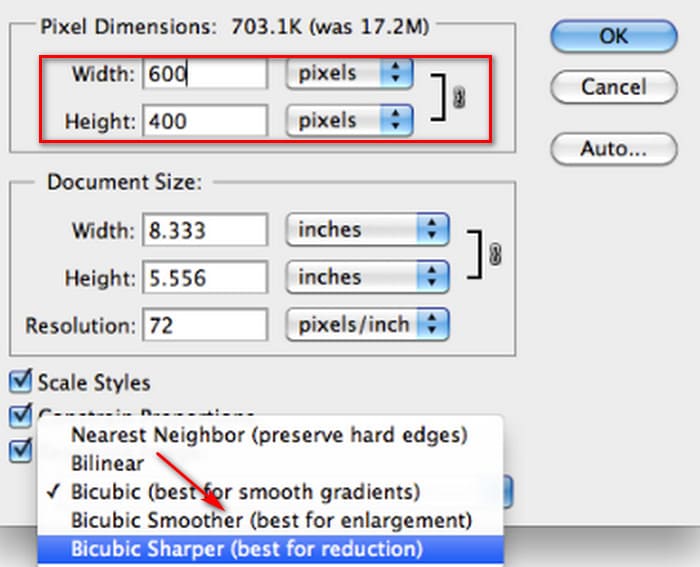
Stap 3. Voer je gewenste pixeldimensies, documentgrootte of resolutie in in het dialoogvenster Afbeeldingsgrootte.
Stap 4. Kies een Hersamplingmethode voordat je bevestigt.
Bicubisch: Ideaal voor vloeiende verlopen; het berekent gemiddelde pixelwaarden voor een hoge nauwkeurigheid.
Bicubisch vloeiender: Het meest geschikt voor het vergroten van afbeeldingen, vooral die met ruis, waardoor een zachter uiterlijk ontstaat.
Stap 5. Klik op OK om de wijzigingen toe te passen.

U hebt nu de breedte en hoogte van uw afbeelding succesvol aangepast. Houd er echter rekening mee dat dit ook de grootte van uw afbeeldingsbestand kan vergroten. Controleer dus, terwijl u de beeldverhouding kent, of de grootte van het afbeeldingsbestand overeenkomt met de vereisten van uw platform.
Deel 2. Een afbeelding verkleinen in Photoshop
In dit gedeelte leggen we uit hoe u de afbeeldingsgrootte in Photoshop kunt verkleinen.
Stap 1. Start Photoshop en ga naar Bestand > Openen om de afbeelding te kiezen die je wilt bewerken.
Stap 2. Ga naar Afbeelding > Afbeeldingsgrootte. Hiermee wordt het dialoogvenster Afbeeldingsgrootte geopend.
Stap 3. Voer de nieuwe waarden in voor pixeldimensies, documentgrootte of resolutie, afhankelijk van je behoeften.
Stap 4. Kies een Hersamplingmethode.
Bicubisch: Ideaal voor vloeiende verlopen; het gebruikt omliggende pixels om nauwkeurige resultaten te genereren.
Bicubisch scherper: Aanbevolen voor het verkleinen van afbeeldingen terwijl scherpe details behouden blijven. Als de afbeelding te scherp wordt, schakel dan terug naar Bicubisch.
Stap 5. Klik op OK om de wijzigingen toe te passen en je afbeelding te verkleinen.
U hebt de originele afbeelding nu succesvol verkleind. Net als in het eerste deel zult u echter ook na voltooiing van de bewerking een aanzienlijke verandering in de bestandsgrootte van de afbeelding opmerken, wat zich voornamelijk uit in het feit dat deze kleiner is gecomprimeerd.
Houd er rekening mee dat de beeldkwaliteit mogelijk is verminderd. Als je vindt dat dit je kijkplezier te veel beïnvloedt, kun je het opnieuw verbeteren met behulp van de beeldverbeteraar.
Deel 3. Hoe u de grootte van afbeeldingen in Photoshop batchgewijs kunt wijzigen
Er zijn nogal wat stappen nodig om een afbeelding te verkleinen met Photoshop. Als je veel afbeeldingen moet verwerken, is het erg tijdrovend en omslachtig om ze één voor één naar Photoshop te slepen om ze te bewerken. Gelukkig is er een andere manier om de grootte van afbeeldingen batchgewijs te verkleinen.
Hier leest u hoe u de afbeeldingsgrootte in Photoshop batchgewijs kunt verkleinen.
Stap 1. Plaats eerst alle foto’s die je in batch wilt comprimeren in één map.
Stap 2. Start Photoshop, ga naar het menu Bestand, selecteer Scripts en kies vervolgens Image Processor.
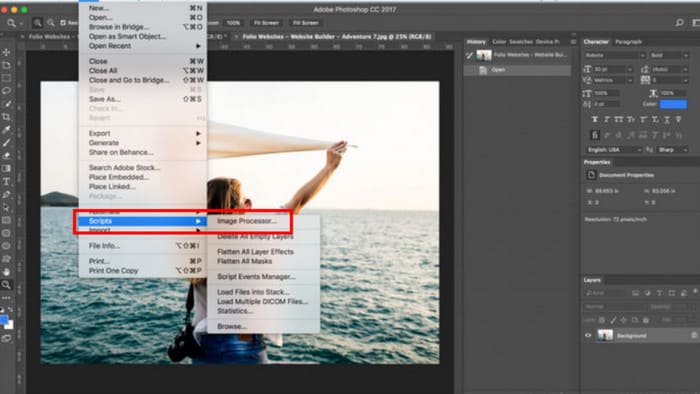
Stap 3. Klik op Map selecteren onder Selecteer de afbeeldingen om te verwerken en importeer de foto’s die je wilt comprimeren.

Stap 4. Photoshop maakt automatisch een nieuwe map binnen de oorspronkelijke map aan om de gecomprimeerde afbeeldingen in op te slaan.
Stap 5. Vink in de sectie Bestandstype de optie Passend schalen aan en geef vervolgens de maximale breedte en hoogte op voor de verkleinde afbeeldingen.

Deel 4. Photoshop-alternatief Online Image Size Reducer - FVC Image Compressor
De interface van Photoshop is nog steeds te ingewikkeld voor beginners en voor iedereen met dringende beeldbewerkingstaken. Bovendien zijn er nogal wat stappen nodig om de grootte van een afbeelding te verkleinen. Er is een handigere alternatieve oplossing: de FVC Free Image Compressor. Het enige wat je hoeft te doen is de afbeelding die je wilt verwerken via je browser te uploaden; vervolgens wordt de bestandsgrootte automatisch voor je gecomprimeerd. Daarnaast kun je handmatig de beeldverhouding aanpassen en de afbeelding op de webpagina roteren of spiegelen.
Er is nog een ander probleem dat we niet kunnen negeren. Regelmatig gebruik van Photoshop vereist een abonnement. Maar het Adobe-productaanbod is duur. De FVC Free Image Compressor is een volledig gratis online tool. Heb je wel eens gedacht aan batchverwerking van afbeeldingen? De ontwikkelaars van de FVC Free Image Compressor hebben dit detail niet over het hoofd gezien. Momenteel kun je tot 40 afbeeldingen batchgewijs verwerken op dit platform.
Stap 1. Ga naar de officiële website van FVC Free Image Compressor.

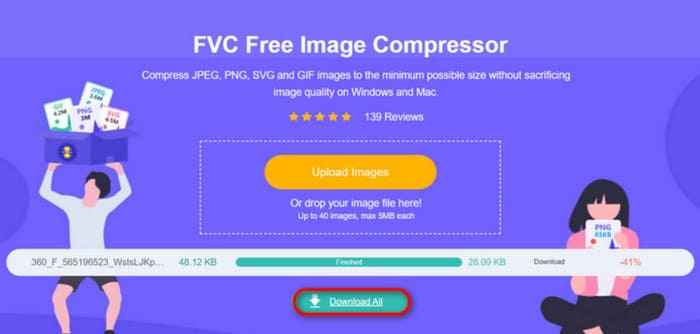
Stap 2. Klik op Afbeeldingen uploaden om de foto’s te kiezen en te uploaden die je wilt comprimeren.
Stap 3. Nadat het compressieproces is voltooid, bekijk je de bijgewerkte bestandsgroottes in de voorvertoning. Klik vervolgens op Alles downloaden om de gecomprimeerde afbeeldingen op je apparaat op te slaan.
Bent u na het verkrijgen van de compressieresultaten verbaasd dat de scherpte van de afbeeldingen niet veel verloren gaat? De FVC Free Image Compressor gebruikt de meest geavanceerde en efficiënte compressietechnieken om de perfecte balans te vinden tussen beeldresolutie en -formaat.
Of u nu een beginner of een professional bent, u zult merken dat FVC Free Image Compressor het beste alternatief is voor Photoshop.
Deel 5. Veelgestelde vragen over het verkleinen van een afbeelding in Photoshop
Hoe kun je een afbeelding in Photoshop verkleinen zonder kwaliteitsverlies?
Om de afbeeldingsgrootte in Photoshop te verkleinen zonder vervorming, is het belangrijk om tijdens de bewerking Resample te selecteren. Het is ook essentieel om veranderingen in scherpte in de gaten te houden bij het aanpassen van de beeldverhouding.
Hoe kun je een foto kleiner maken zonder deze bij te snijden?
Je kunt de foto-resizer gebruiken om de schermgrootte te wijzigen. Overweeg anders de afbeeldingsbestanden te comprimeren; hierdoor worden ze aanzienlijk kleiner.
Hoe maak je een foto kleiner dan 1 MB?
Je kunt een aantal gespecialiseerde beeldcompressoren gebruiken. Tools waarmee je het compressieniveau kunt aanpassen en de grootte van de gecomprimeerde afbeelding kunt bekijken voordat je deze downloadt, zoals Photoshop of FVC Free Image Compressor, zijn met name aan te raden.
Gevolgtrekking
Na het leren hoe je een afbeelding in Photoshop verkleint in de bovenstaande inhoud, kun je het nu zelf proberen. We hebben afbeeldingen voor elke stap toegevoegd zodat je elk detail kunt zien. Als je Photoshop niet apart op je apparaat wilt installeren of wordt afgeschrikt door de ingewikkelde interface, probeer dan FVC Free Image Compressor voor je afbeeldingen. Het is eenvoudig te gebruiken, met duidelijke stappen en een gratis service.
-
 Hoe MXF te comprimeren met Premiere Pro en gratis online
 Hoe MXF comprimeren met een kleinere bestandsgrootte? Hoe MXF-bestanden te comprimeren in Adobe Premiere Pro? Dit bericht deelt 2 manieren om MXF-bestanden te comprimeren.
-
 Hoe u MOV-bestanden eenvoudig kunt comprimeren: 6 gratis opties voor u
 Om MOV te comprimeren, kunt u de 6 opties in dit artikel gebruiken, waaronder 3 desktopsoftware en 3 online platforms. We laten u hier zien hoe u ze kunt gebruiken.
-
 Hoe een MP4-video naar een kleiner formaat te comprimeren
 MP4-video is te groot om te uploaden? Wilt u het videoformaat verkleinen? Hier zijn 3 efficiënte manieren om een MP4-bestand onbeperkt naar een kleiner formaat te comprimeren.