


Fotocompressieverhouding: comprimeer uw afbeeldingen efficiënt
Als het gaat om beeldcompressie, is het belangrijk om het concept achter compressieverhouding te begrijpen. Hoewel het een veelgebruikte term is, wordt het altijd verkeerd begrepen en anders opgevat in een andere context. Gebruikers gaan er bijvoorbeeld van uit dat ze altijd dezelfde kwaliteit output van een gecomprimeerde afbeelding kunnen bereiken en kunnen een aanzienlijk verlies in grootte verwachten bij gebruik van een lage compressieverhouding. Het punt is dat het afhangt van de compressieverhouding en het type compressie dat wordt gebruikt.
Om een volledig inzicht te krijgen in fotocompressieverhoudingen en effectieve compressiemethoden, lees dit artikel en verdiep je in wat wordt bedoeld met de fotocompressieverhouding, evenals de methoden om deze te wijzigen. Bereid je voor en leer hoe je je afbeeldingen efficiënt kunt comprimeren.

Deel 1. Wat is fotocompressieverhouding?
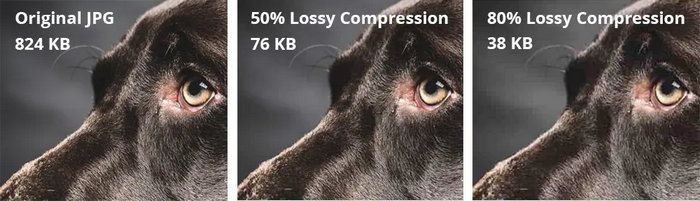
De fotocompressieverhouding is de verhouding van het aantal bytes in de ongecomprimeerde foto tot het aantal bytes wanneer gecomprimeerd. In de eenvoudigste uitleg verwijst het naar hoeveel kleiner een fotobestand wordt vergeleken met de oorspronkelijke grootte. Dus, wanneer een foto een hoge compressieverhouding heeft, betekent dit dat de foto kan worden verkleind tot een kleiner formaat, waardoor deze er wazig of gepixeld uit kan zien. Terwijl, wanneer een foto een lage compressieverhouding heeft, de foto slechts een kleine verkleining van de gecomprimeerde foto had. Om dit beter te begrijpen, volgt hier een vergelijking van wat lossy versus lossless compressie is.
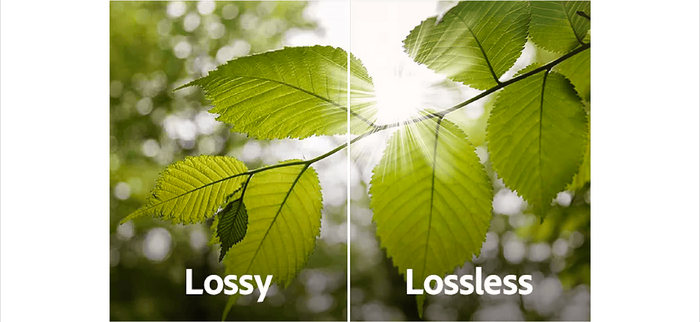
Lossy-compressie
Dit is een type beeldcompressie waarbij een foto zijn grootte en kwaliteit aanzienlijk kan verminderen. Het betekent dat de foto een hoge compressieverhouding heeft. Bijvoorbeeld, wanneer een foto een originele grootte van 10 MB heeft en gecomprimeerd is tot 500 KB, betekent dit dat deze een fotocompressieverhouding van 20:1 heeft bereikt.
Voordelen:
• Vermindert de bestandsgrootte aanzienlijk.
• Ideaal voor gebruik op het web.
Nadelen:
• Verlies van beeldkwaliteit, vooral bij hoge compressieniveaus.
• Niet geschikt voor afbeeldingen die een exacte reproductie van de originele gegevens vereisen.
Lossless-compressie
In vergelijking met lossy compressie is er bij dit type compressie geen sprake van gegevensverlies en blijft de beeldkwaliteit exact gelijk aan het origineel.
Voordelen:
• Geen significante vermindering van de beeldkwaliteit.
• Geschikt voor afbeeldingen die een hoge nauwkeurigheid/fideliteit vereisen.
Nadelen:
• Minder vermindering van de bestandsgrootte.
Deel 2. Hoe de compressieverhouding van een foto te wijzigen
Door de compressieverhouding van een afbeelding aan te passen, kunt u de juiste balans bereiken tussen de kwaliteit en de bestandsgrootte, zodat de afbeelding er geweldig uitziet en minder ruimte inneemt. Om dit te bereiken, kunt u Photoshop gebruiken. Met deze tool kunnen gebruikers een breed scala aan beeldbewerkingstaken uitvoeren, waaronder het aanpassen van de compressieverhouding van de foto. Met deze specifieke functie kunt u de beeldkwaliteit nauwkeurig afstemmen op specifieke vereisten. Zo kunt u Photoshop gebruiken om de compressieverhouding van uw foto te wijzigen:
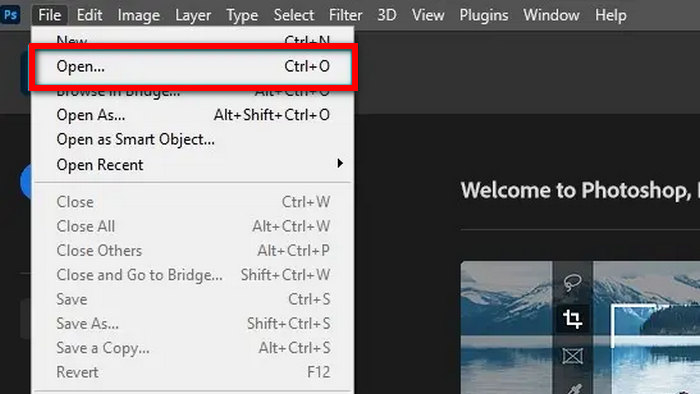
Stap 1. Importeer eerst het afbeeldingsbestand waarvan je de compressieverhouding wilt wijzigen door naar het tabblad Bestand te gaan en op de optie Openen te klikken.
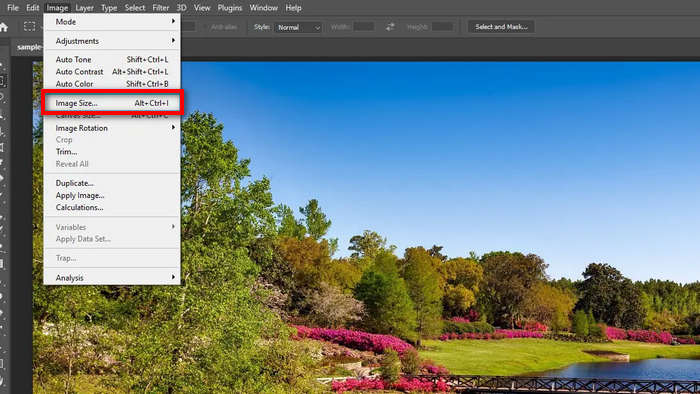
Stap 2. Zodra je foto is geïmporteerd in Photoshop, ga je naar het tabblad Afbeelding en klik je op Afbeeldingsgrootte.
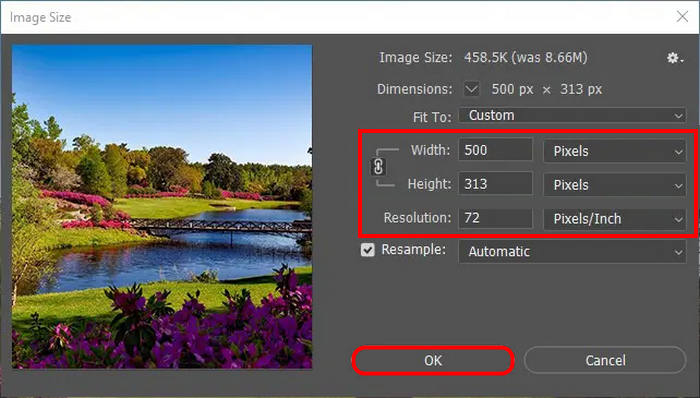
Stap 3. Stel nu in het dialoogvenster Afbeeldingsgrootte je gewenste resolutie in. Stel daarna je gewenste waarden voor Hoogte en Breedte in. Let erop dat dit in pixels is. Als je klaar bent, klik je gewoon op de knop OK.
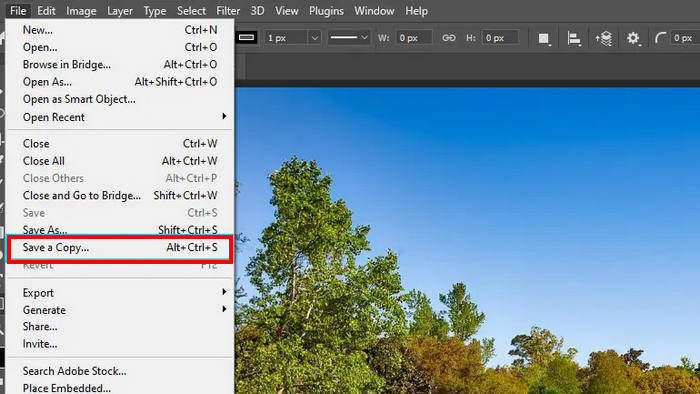
Stap 4. Om je bestand op te slaan, ga je naar het tabblad Bestand en kies je in het menu Kopie opslaan.
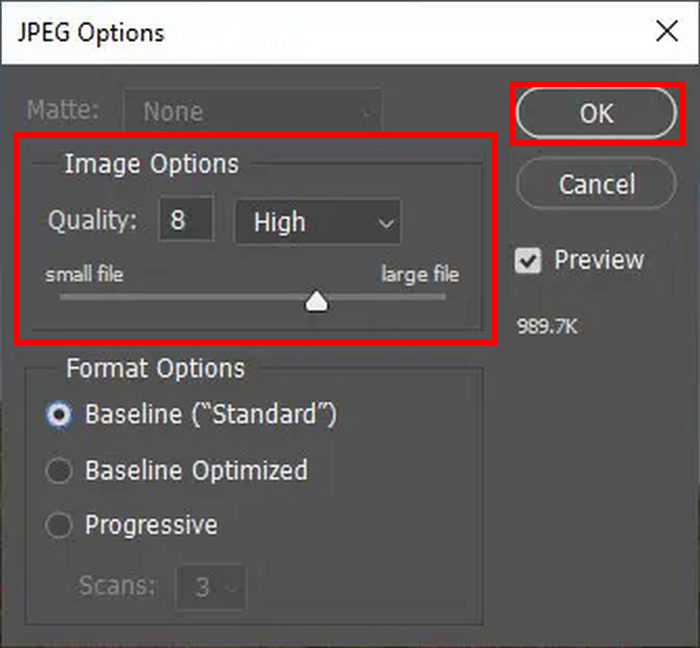
Stap 5. Na het klikken op de knop Opslaan verschijnt er een JPEG-optiesvenster. Van daaruit kun je de beeldkwaliteit van je afbeelding eenvoudig aanpassen door de schuifregelaar in het gedeelte Beeldopties te verschuiven. Als je klaar bent, klik je op OK om op te slaan.
Met deze methode kunt u eenvoudig de compressieverhouding van uw foto wijzigen. Dit kan echter voor sommigen wat ingewikkeld zijn en nieuwe gebruikers moeten een abonnement afsluiten om van alle functies te kunnen genieten.
Deel 3. Bonus: Comprimeer een afbeelding zonder kwaliteitsverlies
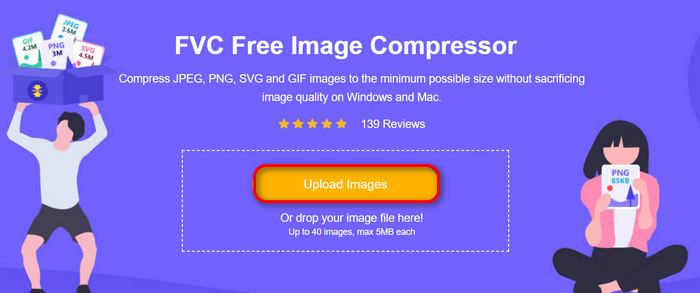
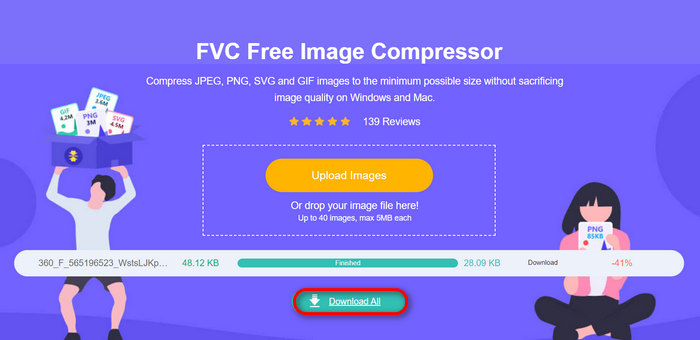
FVC Free Image Compressor is een gratis online tool voor beeldcompressie die de afbeeldingsgrootte verkleint zonder zichtbaar kwaliteitsverlies in het resultaat. In vergelijking met sommige andere compressietools beschikt deze over uitstekende optimalisatie- en compressie-algoritmen, wat de best mogelijke kwaliteit en resolutie van de gecomprimeerde foto garandeert.
Hier leest u hoe u foto's kunt comprimeren met behulp van FVC Free Image Compressor
Stap 1. Ga eerst naar de officiële website van FVC Free Image Compressor.
Stap 2. Klik daarna op Afbeeldingen uploaden om de foto’s te importeren die je wilt comprimeren. Deze tool comprimeert je foto’s automatisch.
Stap 3. Wacht tot het compressieproces is voltooid. Zodra dit klaar is, zie je een statusbalk waarop staat dat het proces is afgerond, evenals informatie over de bestandsgrootte vóór en na de compressie. Klik daarna op Alles downloaden om je afbeelding op te slaan.
Als u uw foto's eenvoudig wilt comprimeren, is het gebruik van een FVC Free Image compressor tool een geweldig alternatief. U hoeft slechts één keer te klikken om ze te comprimeren, en alles is verzekerd dat uw foto's goed gecomprimeerd zijn in grootte en kwaliteit.
Deel 4. Veelgestelde vragen over fotocompressieverhouding
Hoe comprimeer ik een foto tot een verhouding van 20:1?
Om een foto te comprimeren tot een verhouding van 20:1, kunt u een beeldbewerkingstool gebruiken zoals Photoshop of een online compressor. Pas in Photoshop de instellingen voor beeldkwaliteit en resolutie aan totdat u de gewenste compressieverhouding bereikt. Er zijn ook online tools die vaak een optie bieden om de doelbestandsgrootte of het compressieniveau op te geven, zoals compress or die. Maar als het op gemak aankomt, kan de FVC Free Image Compressor-tool ook een geweldige tool zijn om een foto te comprimeren met een verhouding van 20:1.
Hoe vind ik de compressieverhouding van een foto?
Om de compressieverhouding van de foto te vinden, deelt u de oorspronkelijke bestandsgrootte door de gecomprimeerde bestandsgrootte. Bijvoorbeeld, als de originele foto 10 MB is en de gecomprimeerde foto 0,5 MB, dan is de compressieverhouding 10 MB / 0,5 MB = 20:1.
Wat is de compressieverhouding van een JPG-bestand?
De fotocompressieverhouding van een JPG-bestand varieert afhankelijk van de kwaliteitsinstellingen die tijdens de compressie worden gebruikt. Hoge compressie resulteert in kleinere bestandsgroottes maar lagere beeldkwaliteit, terwijl lage compressie een hogere beeldkwaliteit behoudt bij grotere bestandsgroottes. Typische JPG-compressieverhoudingen variëren van 10:1 tot 20:1 voor webgebruik.
Is er een limiet aan hoe ver je een foto kunt comprimeren?
Ja, er zijn praktische grenzen aan hoeveel u een foto kunt comprimeren voordat er een significant kwaliteitsverlies optreedt. Hogere compressieverhoudingen resulteren vaak in zichtbare artefacten zoals pixelvorming of wazigheid, vooral in afbeeldingen met complexe details of gradiënten.
Gevolgtrekking
Het begrijpen en aanpassen van de fotocompressieverhouding is essentieel om afbeeldingen te optimaliseren met een goede balans tussen kwaliteit en bestandsgrootte. Adobe Photoshop biedt een krachtige manier om dit te beheren, met zeer nauwkeurige controle over de beeldkwaliteit. Voor wie op zoek is naar eenvoudigere oplossingen, bieden tools zoals FVC Free Image Compressor efficiënte alternatieven.
Neem nu de controle over uw beeldoptimalisatie! Probeer Adobe Photoshop voor geavanceerde bewerking of gebruik FVC Free Image Compressor voor snelle en eenvoudige compressie.
-
 3 Methoden om de grootte van een afbeelding te wijzigen naar 20 KB: Naadloze compressie
 Bezorgd over hoe je een 20KB-formaat voor je afbeeldingsbestand kunt bereiken? Dit artikel leert je 3 methoden om snel en naadloos de grootte van een afbeelding naar 20KB te wijzigen.
-
 Te gecomprimeerde foto: zo los je ze eenvoudig op
 Vraagt u zich af wat u moet doen als uw afbeelding te gecomprimeerd is? Lees dit artikel en ontdek waarom dit afbeeldingsprobleem optreedt en leer 2 methoden om het op te lossen.
-
 Hoe u JPEG comprimeert op Windows en Mac [Ultieme handleiding]
 Op zoek naar een efficiënte tool om JPEG-bestanden te comprimeren op uw Windows- en Mac-apparaten? Lees nu dit artikel en leer vijf methoden voor naadloze compressie.