


Hoe u audio professioneel kunt vervagen in Premiere Pro [2024]
Perfecte audiotiming is essentieel voor een video. Het is spannend wanneer de audio op de juiste manier in- en uitfadet in de video. Daarom werken veel gebruikers, van professionele editors tot liefhebbers, nauwgezet om ervoor te zorgen dat hun audio perfect past bij de timing van elke scène. In deze gids laten we je zien hoe je audio in Premiere kunt vervagen Pro, helpt u bij het maken van professionele video's met een vlekkeloos geluid. Laten we beginnen.

Deel 1: Wat zijn de Fade Out- en Fade In-effecten in Premiere Pro?
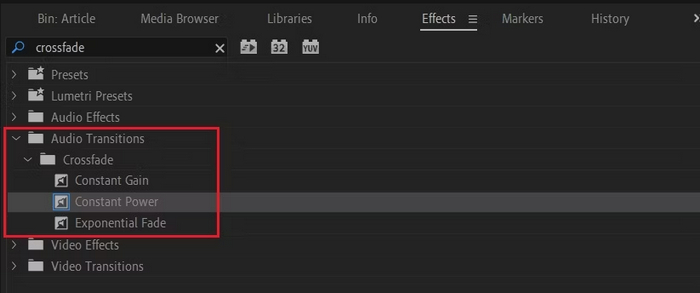
Er zijn verschillende fade-in en fade-out effecten in Premiere Pro, en het begrijpen van elk is essentieel om elk uniek doel te onderscheiden. Hier verkennen we drie primaire fade-effecten: Constant Gain, Constant Power en Exponential Fade.
Constante winst
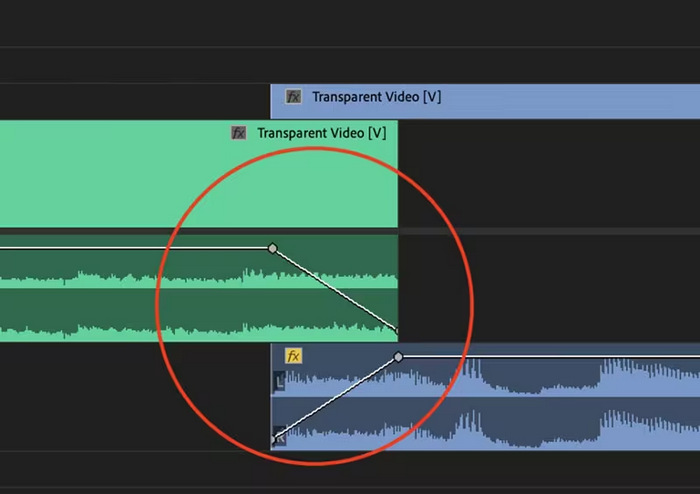
De Constant Gain verandert de audio met een constante snelheid terwijl deze in- en uitfadet tijdens de overgang tussen clips. Deze methode kan soms resulteren in een abrupte verandering, omdat het geen vloeiende overgang creëert. Normaal gesproken worden deze overgangen handmatig aangepast met behulp van keyframes om het fade-in- en fade-outproces beter te kunnen regelen.
Constante kracht
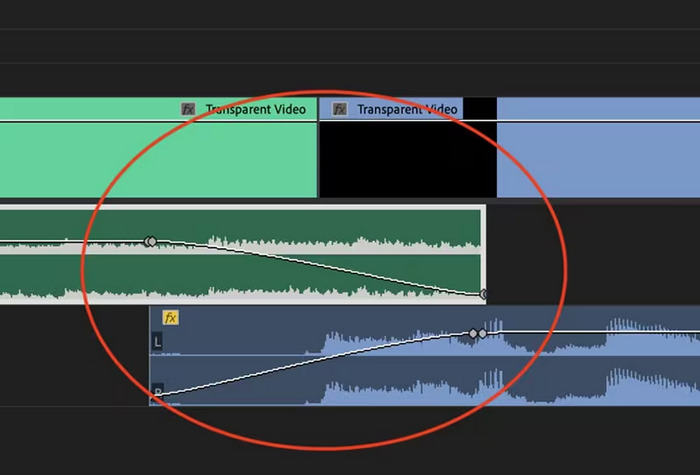
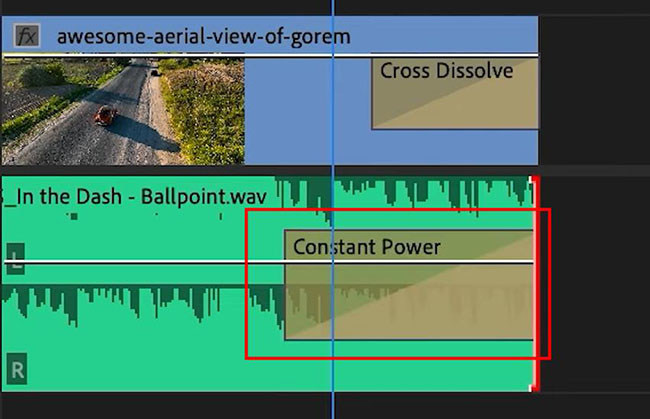
De Constant Power crossfade creëert een vloeiend, geleidelijk overgangseffect, vergelijkbaar met een visuele overvloeiing tussen clips. Deze methode fadet audio eerst uit en fadet het vervolgens uit aan het einde van de clip. Zoals geïllustreerd, nemen keyframes geleidelijk af in de eerste clip en nemen ze gestaag toe in de tweede clip. Vergeleken met andere crossfades wordt Constant Power vaak beschouwd als de beste voor audio-overgangen vanwege het vermogen om een vloeiender effect en een geleidelijkere verschuiving in gain tussen clips te bieden, zonder merkbare veranderingen tijdens de overgang.
Exponentiële vervaging
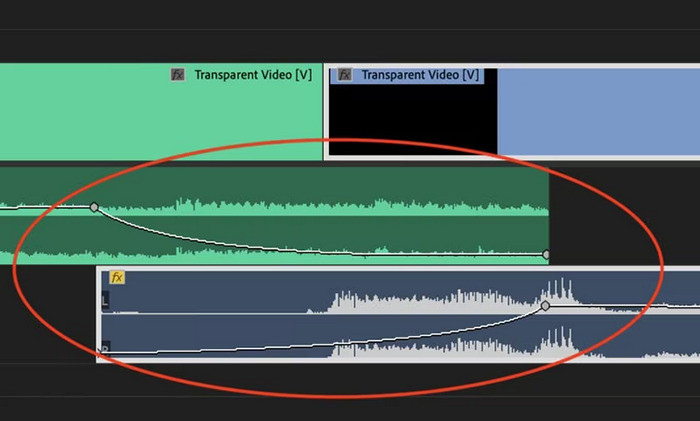
De Exponential Fade crossfade is het tegenovergestelde van Constant Power. Het fade-out in de eerste clip en fade-out in de tweede clip, waardoor een vloeiende, logaritmische curve ontstaat. Dit type fade biedt een andere auditieve ervaring, waardoor het bruikbaar is voor verschillende audio-overgangen. Het biedt een naadloze en natuurlijk klinkende fade, wat met name effectief is voor complexere audiotracks.
Deel 2: Hoe u audio in- of uitfadet in Premiere Pro
Nu we de verschillende fade-in- en fade-outeffecten in Premiere Pro kennen, gaan we kijken hoe je ze kunt gebruiken.
Zo fade je audio in Premiere Pro:
Stap 1. Om de audioclip te importeren die u in de tijdlijn wilt laten vervagen, gaat u naar de Importeren tabblad in de Tabblad Bestand of sleep het bestand eenvoudigweg naar de hoofdinterface van de tool.
Stap 2. Ga naar de Effect paneel en vouw de audio-overgangsmap uit om één crossfade-effect te kiezen. U kunt kiezen Constante winst, Constante kracht, of Exponentiële vervaging.
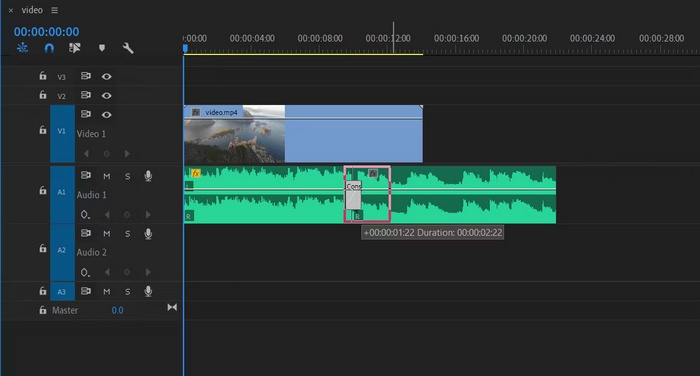
Stap 3. Om het gewenste fade-type toe te passen, klikt of sleept u het type dat u hebt gekozen naar de tijdlijn.
Stap 4. Typ een duur voor het vervagen in het pop-upvenster dat verschijnt en klik OK.
De verschillende opties van Premiere Pro voor het in- en uitfaden van audio maken het een go-to tool voor degenen die op zoek zijn naar een professionele manier om plotselinge starts en stops in hun audio te voorkomen. Deze functies zorgen voor vloeiende overgangen, wat de algehele auditieve ervaring van elk project verbetert. Bovendien biedt deze tool flexibiliteit en precisie, waardoor het geschikt is voor nieuwe en gevorderde gebruikers. Het gebruik van deze specifieke tool kan echter tijdrovende handmatige aanpassingen vereisen, waarbij beginners bepaalde effecten misschien complex vinden om te gebruiken. Niettemin is dit nog steeds een van de beste tools om professioneel fade-out en fade-in toe te voegen.
Deel 3: Eenvoudiger Premiere Pro-alternatief voor het in- of uitfaden van audio
Als u op zoek bent naar een alternatieve tool vanwege de complexe interface van Premiere Pro, dan is de door FVC gekozen Video Converter Ultimate is de beste keuze. Deze alles-in-één video- en audioconverter heeft een zeer gebruiksvriendelijke en intuïtieve interface, waardoor het voor gebruikers eenvoudig en efficiënt is om audio in of uit te faden. Bovendien ondersteunt deze tool een breed scala aan audioformaten, waardoor het minder stressvol is in termen van compatibiliteitsproblemen.
Zo kunt u audio vervagen met Video Converter Ultimate:
Stap 1Installeer Video Converter Ultimate op uw computer.
Gratis downloadVoor Windows 7 of hogerVeilige download
Gratis downloadVoor MacOS 10.7 of hogerVeilige download
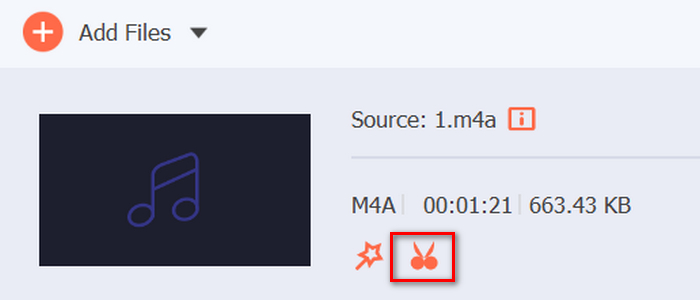
Stap 2. Om vervolgens het audiobestand te importeren dat u wilt wijzigen, klikt u op de Bestanden toevoegen knop.

Stap 3. Klik nu op de Besnoeiing knop. Hiermee gaat u naar een ander venster waar u de fade-in en fade-out van uw audiobestand kunt instellen.
Stap 4Klik op de vakjes voor Infaden en Uitfaden opties en stel de duur van elk effect in volgens uw voorkeur.
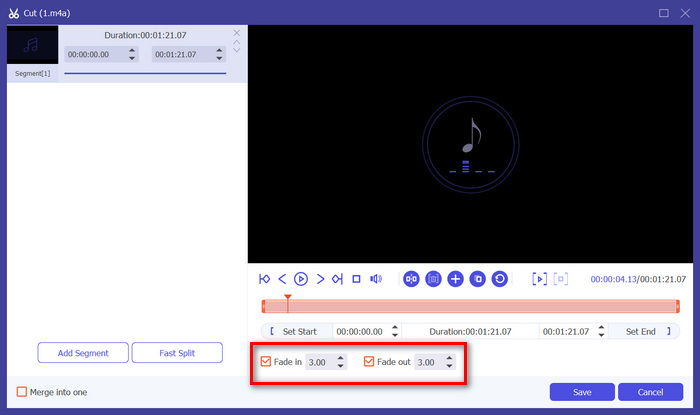
Stap 5Zodra u klaar bent, kunt u een voorvertoning van uw audio beluisteren door deze af te spelen. Zo kunt u controleren of de wijzigingen die u hebt aangebracht, nauwkeurig en accuraat zijn.
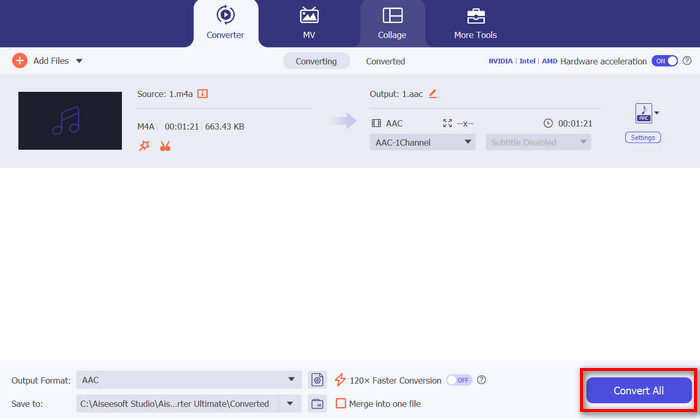
Stap 6. Klik ten slotte op de Opslaan knop. Dit brengt u terug naar de hoofdinterface, waar u op de knop Alles omzetten knop om het audiobestand te exporteren.
Wat Video Converter Ultimate de beste alternatieve tool maakt om audio in of uit te faden, is het gebruiksgemak en de efficiëntie. Het stelt gebruikers in staat om snel soepele, professionele audio-overgangen te bereiken, zonder de complexiteit van geavanceerdere software. Dit maakt het een betrouwbare en gebruiksvriendelijke keuze voor iedereen die zijn audiobewerkingsproces wil verbeteren. Daarnaast biedt het ook andere audiobewerkingsfuncties zoals audio comprimeren, audio knippen, audio versnellen/vertragen en meer voordat u een gewenst audiobestand exporteert.
Deel 4: Veelgestelde vragen over het vervagen van audio in Premiere Pro
Wat zijn fade-in en fade-out in audio?
Fade in en out zijn beide audiobewerkingstechnieken die worden gebruikt om het volume van een audiotrack te verhogen of te verlagen voor een vloeiende overgang. Een fade-in-effect begint met stilte en neemt geleidelijk toe tot het volledige volume, terwijl een fade-out-effect begint met het volledige volume en geleidelijk afneemt tot stilte.
Wat is de sneltoets voor fade-out in Premiere Pro?
Voor Mac is de sneltoets voor Premiere Pro Shift+Command+D, en voor Windows Shift+Ctrl+D.
Hoe kan ik audio op de iPhone laten vervagen?
Om audio op een iPhone te laten vervagen, kunt u de iMovie-app gebruiken.
Zo doe je dat:
Stap 1. Open iMovie en laad uw project.
Stap 2. Klik met de rechtermuisknop op de audio in de tijdlijn.
Stap 3. Tik op de knop Audio.
Stap 4. Tik op Fade om de fade-handgrepen aan het begin en einde van uw clip weer te geven.
Stap 5. Versleep de fade-hendel aan het einde van de clip om de duur van de fade-out in te stellen.
Gevolgtrekking
Premiere Pro is inderdaad een veelzijdige tool, die het voor gebruikers gemakkelijk maakt om hun audiobestanden te wijzigen. Nu u weet hoe je audio in Premiere kunt vervagen, is er geen reden om te stoppen met het maken van naadloze en professionele overgangen voor uw projecten. U kunt ook de Video Converter Ultimate proberen als alternatief als u deze tool lastig vindt om te gebruiken voor een gebruiksvriendelijkere ervaring. Op naar soepele audio-overgangen!
-
 Beste 10 GIF-compressoren voor desktop- en onlinegebruikers
 In dit bericht leer je over de beste GIF-compressoren waarmee je je probleem met grote GIF-bestanden kunt oplossen. Bekijk ze en krijg de beste inzichten.
-
 5 Meest gekozen audiorecorder-apps op Android en iOS [2023 bijgewerkt]
 Weet u niet welke audiorecorder-app u moet gebruiken? Als dit het geval is, helpt dit artikel u bij het kiezen van de app die u zal helpen bij uw audio-opnametaak.
-
 Geweldige MP4 naar MP3 Converter Tools die u zou moeten overwegen te gebruiken
 Ontgrendel de kracht van audioveelzijdigheid met onze best beoordeelde MP4 naar MP3-converters. Ervaar naadloze conversie, uitzonderlijke geluidskwaliteit en razendsnelle verwerking.