


Mac에서 이미지 크기를 쉽게 줄이는 방법 [궁극의 가이드]
Mac에서 큰 이미지 파일을 다룰 때 걱정하지 마세요! 이 문제를 해결할 방법이 있습니다.
이미지 압축의 필요성을 이해하고 있습니다. 압축을 통해 이미지를 더 쉽게 관리하고 편리하게 사용할 수 있기 때문입니다. 종종 살펴보면, 일부 시스템은 특정 파일 크기의 이미지 파일 업로드를 요구하고, 일부 웹사이트는 로딩 속도가 느리며, 이메일로 이미지 파일을 전송하는 데 시간이 걸리기도 합니다. 이러한 문제들은 모두 큰 이미지 파일에서 비롯됩니다. 이에 따라, 이 글에서는 Mac에서 쉽게 이미지 크기를 줄이는 방법 세 가지를 자세히 살펴보겠습니다. 이는 작업 흐름을 최적화하고 이미지가 누구나 접근 가능하며 빠르게 로드될 수 있도록 할 때 특히 유용합니다.

1부. 픽셀을 줄여 Mac에서 이미지 크기 줄이기
Mac 기기는 내장 도구를 사용하여 이미지를 줄이는 훌륭한 방법을 가지고 있습니다. 이를 통해 Mac 사용자는 자신의 기기에서 바로 사진을 쉽고 자유롭게 압축할 수 있습니다.
Preview는 내장된 이미지 및 PDF 뷰어 도구입니다. 이 도구를 사용하면 사용자는 이미지와 PDF 파일을 보는 기능을 즐길 수 있을 뿐만 아니라 Mac에서 이미지 크기를 쉽게 줄일 수 있는 편집 기능을 활용할 수도 있습니다. 게다가 매우 편리하고 무료로 사용할 수 있어 누구나 사용할 수 있습니다. 이를 위해 아래 단계를 따르세요.
1단계. 먼저 Mac 기기에서 미리보기(Preview) 앱을 엽니다.
2단계. 그런 다음, 상단의 파일(File) 탭으로 이동해 열기(Open) 버튼을 클릭하여 크기를 압축하려는 이미지 파일을 엽니다.
3단계. 이제 상단 메뉴의 도구(Tools) 탭으로 이동한 후 크기 조정(Adjust Size)을 클릭합니다.

4단계. 이미지 파일의 크기를 줄이려면 이미지 다시 샘플링(Resample Image)을 선택합니다.

5단계. 이제 해상도(Resolution) 값을 변경합니다. 값을 변경하면 하단에 새로운 파일 크기가 표시됩니다.
Mac에서 이미지 크기를 줄이면서 가능한 한 최고의 화질을 유지하려면, 이미지에 가장 잘 맞는 해상도 설정을 여러 번 시도해 보는 것이 좋습니다. 이때, 처음에는 해상도를 조금만 낮추는 것부터 시작해, 이미지 품질과 파일 크기 사이에서 적절한 균형을 찾을 때까지 점차 감소 폭을 늘려가는 것이 중요합니다.
2부. 단축키로 Mac에서 이미지 크기 압축하기
Mac에서 이미지 크기를 압축하는 더 쉬운 방법이 필요할 때 빠른 작업을 사용하여 이미지 압축 프로세스를 간소화할 수 있습니다. 이를 통해 응용 프로그램을 열지 않고도 Finder에서 직접 다양한 작업을 수행할 수 있습니다. 여기에는 이미지 크기를 빠르고 효율적으로 조정할 수 있는 기능이 포함됩니다. 게다가 크기 조정과 같은 기본 이미지 편집 작업을 처리하는 편리한 프로세스를 제공하여 여러 이미지를 빠르게 처리해야 하는 사용자에게 유용합니다.
다음은 Mac에서 빠른 동작(Quick Actions)을 사용해 이미지 크기를 압축하는 방법입니다:
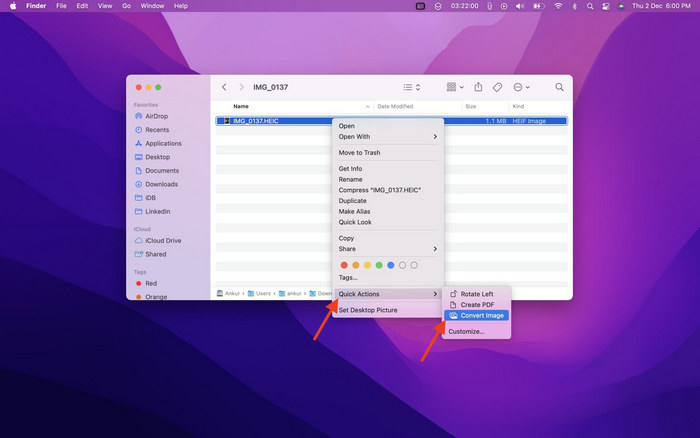
1단계. 크기를 줄이고 싶은 이미지를 마우스 오른쪽 버튼으로 클릭합니다.
2단계. 나타나는 컨텍스트 메뉴에서 빠른 동작(Quick Actions)을 선택한 후 이미지 변환(Convert Image)을 클릭합니다.
3단계. 이미지 크기(Image Size) 항목을 클릭하고, 드롭다운 메뉴에서 해당 예상 파일 크기가 함께 표시되는 작게(Small), 중간(Medium), 크게(Large) 중 하나를 선택합니다.
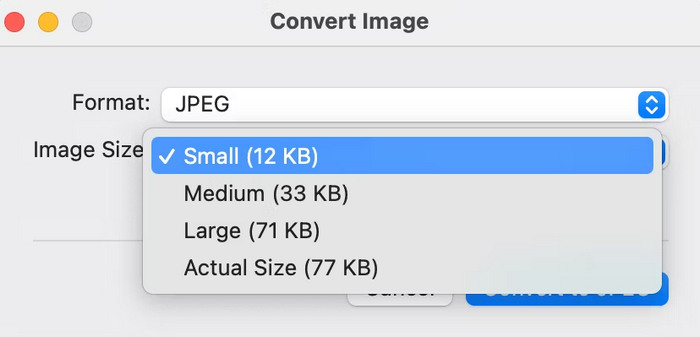
4단계. 이미지의 모든 정보를 유지하려면 메타데이터 유지(Preserve Metadata)에 체크합니다.
빠른 작업을 사용자 지정하고 가장 자주 사용하는 크기 조정 옵션에 포함하려면 확장 프로그램 아래의 시스템 환경 설정을 통해 수행할 수 있습니다. 또한 Mac에서 일괄 압축을 위해 이미지를 줄이려면 빠른 작업을 적용하기 전에 여러 이미지를 선택하기만 하면 시간을 절약할 수 있습니다.
3부. Mac에서 이미지를 압축하는 가장 빠른 방법 [최대 40개 이미지 한 번에]
Mac에서 이미지 크기를 줄일 수 있는 다른 도구를 찾고 있다면, FVC Free Image Compressor를 사용해 볼 수 있습니다. 이 도구는 완전히 무료이며, 한 번에 최대 40개의 이미지를 일괄 압축(batch compression)할 수 있습니다. 또한, 최적의 최적화 및 압축 알고리즘을 사용해 압축된 사진의 품질을 최대한 보존합니다. 사용 편의성 측면에서도 초보자에게 적합한데, 두 단계만 거치면 압축이 자동으로 진행되기 때문입니다.
다음은 FVC Free Image Compressor를 사용해 JPEG를 압축하는 방법입니다
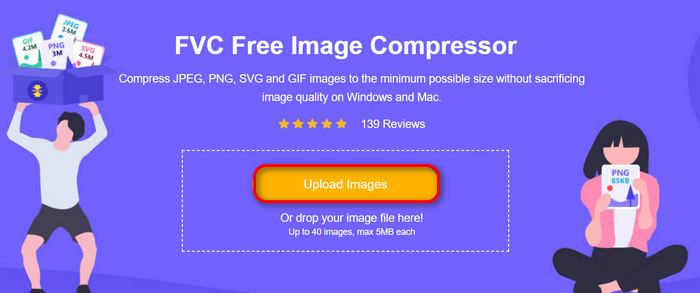
1단계. 먼저 브라우저에서 FVC Free Image Compressor를 검색해 공식 웹사이트에 접속합니다.
2단계. 다음으로, Upload Images를 클릭하여 Mac에서 압축하려는 사진을 불러옵니다. 도구가 이미지를 자동으로 압축해 줍니다.
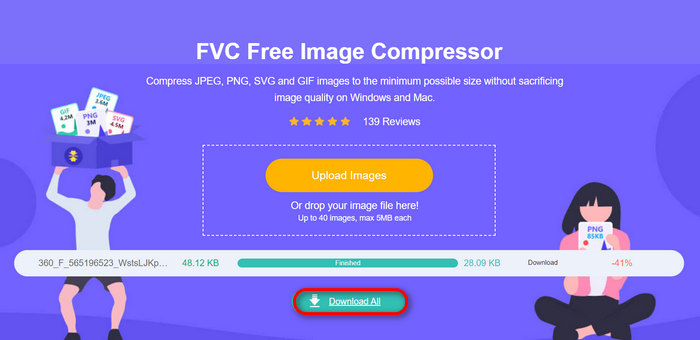
3단계. 압축이 완료되면, 압축된 이미지 파일의 새로운 크기를 미리 볼 수 있습니다. 마지막으로 Download All을 클릭해 이미지를 저장합니다.
FVC 무료 이미지 압축기를 사용하면 Mac에서 이미지 크기를 쉽게 줄이고, 고품질의 출력을 보장하고, 다양한 이미지 파일 형식을 지원하고, 일괄 압축과 같은 다른 중요한 기능을 사용할 수 있습니다.
이 도구의 일괄 압축 기능을 이용하면 시간을 절약할 수 있습니다. 특히 압축할 이미지가 많은 경우 더욱 그렇습니다. 도구로 동시에 가져오기만 하면 됩니다. 하지만 최대 40개의 이미지를 한 번에 압축할 수 있으므로 프로세스가 더 빠르고 효율적입니다.
4부. Mac에서 이미지 크기 줄이기에 대한 FAQ
Apple 사진에서 이미지 크기를 어떻게 조절하나요?
Apple Photos에서 이미지 크기를 조정하려면 사진을 잘라낼 수 있는 내장 편집 기능을 사용할 수 있습니다. 이를 위해 앱에서 사진을 열고 편집 버튼을 탭합니다. 그런 다음 자르기 도구를 탭하고 이미지의 보이는 영역을 조정합니다. 또한 자르기 상자의 모서리를 드래그하여 사진의 보이는 영역의 크기를 조정하거나 사전 설정된 종횡비를 선택하여 더 많은 제어를 할 수 있습니다.
Mac에서 이미지를 MB 단위로 더 작게 만드는 방법은 무엇입니까?
Mac에서 이미지를 MB 단위로 더 작게 만들려면 압축을 위한 Preview 앱을 사용하세요. 여기서 이미지의 해상도와 크기를 줄여 파일 크기를 줄일 수 있습니다. 하지만 품질을 낮추면 파일 크기는 줄어들지만 이미지 모양에 약간의 영향을 미칠 수 있다는 점에 유의하세요.
Mac용 일괄 이미지 크기 조절 앱은 무엇입니까?
Batch Photo Resizer는 Mac용 일괄 이미지 크기 조절 앱으로 매우 뛰어난 프로그램입니다. 이미지 크기를 줄이는 데 최적화된 다양한 기능을 제공하며, 이를 통해 원하는 해상도와 크기로 여러 이미지를 한 번에 조절하면서도 가능한 한 높은 화질을 유지할 수 있습니다.
결론
정리하자면, Mac에서 이미지 크기를 줄이는 데 어떤 도구를 사용할지 알고 있는 것은, 특히 이미지를 자주 다루는 경우 매우 중요합니다. 어떤 도구나 방법을 사용하든, 위에 소개한 방법들은 모두 이미지를 효과적으로 압축하는 데 도움이 됩니다. 이제 이 모든 도구를 활용해 사진을 압축해 볼 준비가 되었나요? 지금 바로 시작해 보세요!
-
 iPhone에서 사진 파일 크기를 줄이는 방법: 모든 iOS에 대한 단계
 iPhone에서 큰 이미지 파일을 처리하고 업로드하기 어려우신가요? 이 글은 iPhone에서 사진 파일 크기를 줄이는 방법에 대한 가이드입니다.
-
 PNG 압축: 꼭 알아야 할 5가지 최고의 방법 [2024]
 PNG를 압축하는 데 가장 좋은 도구가 무엇인지 궁금하세요? 이 기사에서는 그중 5가지에 대해 알아보고 시각적인 요소를 유지하면서 축소하는 방법에 대해 안내합니다.
-
 비율 압축 사진: 무엇을 알아야 하나요?[리뷰]
 사진 압축률이 무엇이고 이미지 품질에 어떤 영향을 미치는지 알아보세요. 또한, 이 압축률이 잘못되었을 때 변경하는 방법에 대한 안내를 받으세요.