


이메일에 사진을 쉽게 압축하는 3가지 방법 [가이드]
이메일은 사진 첨부 파일과 필요한 다른 파일이 있는 메시지를 보내기에 좋은 플랫폼입니다. 그러나 일부 사용자는 큰 파일 사진을 보내는 데 어려움을 겪습니다. 업로드 시간이 느리거나, 배달이 실패하거나, 이메일 제공자가 부과한 첨부 파일 크기 제한을 초과하기 때문입니다. 이러한 문제를 피하려면 사진을 보내기 전에 크기를 조정하는 것이 필수적입니다.
이를 통해 이 글에서는 3가지 방법을 안내해드리겠습니다. 이메일로 사진을 압축하는 방법품질 저하 없이 사진 첨부 파일을 쉽게 보내고 받을 수 있도록 보장합니다.

1부. 이메일용 사진 압축의 이점
일반적으로 사진을 압축하는 것은 이메일 사용을 포함하여 많은 이점이 있습니다. 이메일에 사용할 사진 크기를 조정할 때 즐길 수 있는 것은 다음과 같습니다.
• 이미지 압축은 사진의 크기를 더 작은 크기로 조정하는 것을 의미하므로 압축되지 않은 사진에 비해 여러 장의 사진을 첨부하여 이메일로 쉽게 보낼 수 있습니다.
• 이메일 제공자는 종종 보낼 수 있는 첨부 파일의 크기에 제한을 둡니다. 이메일에 사진을 압축하면 이러한 제한 내에 머물 수 있으므로 이메일이 문제 없이 전달됩니다. 이는 여러 수신자에게 이메일을 보내거나 사진과 함께 다른 유형의 첨부 파일을 포함할 때 유용합니다.
• 사진을 압축하면 차지하는 공간이 줄어들어 이메일 저장 공간 할당량을 더 효율적으로 활용할 수 있습니다.
• 대용량 이메일 첨부 파일은 때때로 이메일 서버에서 플래그가 지정되어 배달 실패나 이메일이 스팸으로 표시될 수 있습니다. 이메일용 사진을 압축하면 이러한 문제를 피하는 데 도움이 되며, 이메일 첨부 파일이 문제 없이 의도한 수신자에게 도달합니다.
• 사용자가 모바일을 사용하여 이메일을 확인하는 특정 시나리오에서. 압축된 사진을 보내면 압축되지 않은 사진보다 모바일 기기에서 다운로드하고 보는 것이 더 쉽습니다.
2부. 이미지 포맷 변환을 통한 이메일용 사진 압축
이메일로 사진을 압축하고 싶다면, 시도할 수 있는 첫 번째 방법은 이미지 변환 도구를 사용하는 것입니다. 이 도구를 사용하면 이미지를 원하는 형식으로 변환하고, 변환 프로세스도 사진을 바람직하고 관리하기 쉬운 크기로 최적화합니다.
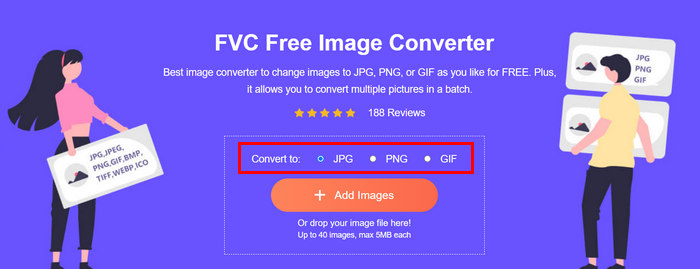
FVC 무료 이미지 변환기 는 사용자가 사진을 JPG, PNG, GIF와 같은 다양한 이미지 파일 형식으로 변환할 수 있는 무료 변환 도구입니다. 따라서 더 많은 데이터를 보관하는 형식으로 이메일로 이미지 파일을 보내 파일 크기를 늘리는 경우 이 도구를 확실히 활용할 수 있습니다. 게다가 최대 40개의 이미지를 한 번에 일괄 변환할 수 있으므로 여러 개의 큰 파일을 보내려는 경우에 이상적입니다. 이 도구를 사용하여 사진을 이메일로 압축하는 방법은 다음과 같습니다.
1 단계. 먼저 브라우저에서 FVC Free Image Converter를 검색하여 온라인 도구에 접속하세요.
2 단계다음으로, 원하는 출력 파일 형식을 선택하십시오. 로 변환하다 선택권. 그 후 이미지 추가 변환하려는 이미지를 가져오려면 버튼을 클릭하세요.
3 단계. 완료되면 클릭하세요 모두 다운로드 단추.
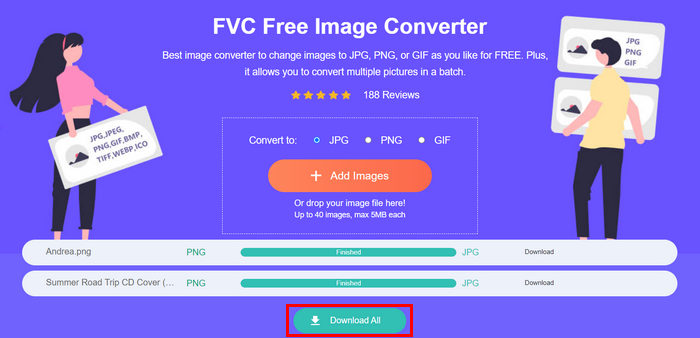 FVC 무료 이미지 변환기 도구를 사용하면 변환된 사진이 압축되어 크기가 줄어들어 이메일로 사용하기에 완벽합니다.
 3부. 온라인 압축 도구를 사용하여 이메일용 사진 축소
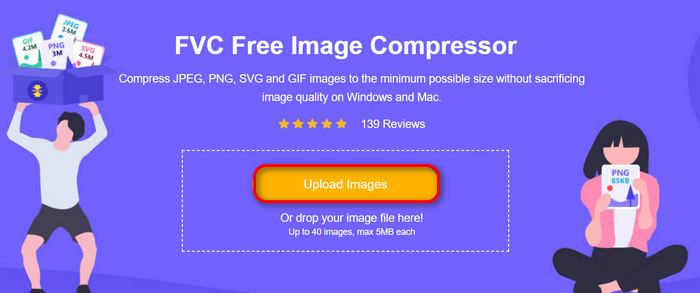
FVC 무료 이미지 압축기 는 이메일용 사진을 압축하는 과정을 간소화하는 무료 온라인 압축 도구입니다. 이미지 파일을 업로드하거나 가져오기만 하면 도구가 자동으로 압축합니다. 품질 저하가 걱정된다면 이 도구는 최상의 최적화 및 고급 압축 알고리즘을 활용합니다. 이렇게 하면 이메일로 압축할 때 이미지 품질이 유지됩니다.
또한 이미지를 일괄 압축해야 하는 경우 이 도구를 사용하면 40개의 이미지를 동시에 압축할 수 있습니다. 마지막으로 JPEG, PNG, SVG, 애니메이션 GIF와 같은 다양한 인기 있는 이미지 형식을 지원합니다.
1 단계브라우저에서 공식 웹사이트에 접속하세요.
2 단계. 그 후, 클릭하세요 이미지 업로드 웹에 압축하려는 이미지를 가져오려면 이 도구를 사용하세요. 사진을 선택하고 열기를 클릭하면 이 도구가 자동으로 사진을 압축한다는 점에 유의하세요.
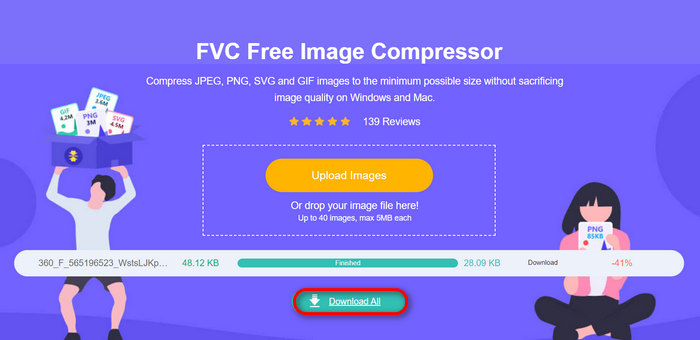
3 단계. 이미지를 압축한 후 압축 후의 새 크기를 검토하여 이미지를 미리 볼 수 있습니다. 마지막으로 클릭하세요. 모두 다운로드 이미지를 저장하려면.
이 방법은 복잡한 단계와 가입비를 들이지 않고도 이메일용 사진을 압축하는 데 큰 도움이 될 수 있습니다. 게다가 사용자 친화적이고 직관적인 인터페이스는 모든 수준의 사용자에게 이상적인 도구입니다. 따라서 이메일 사용을 위해 사진을 최적화하려면 지금 이 방법을 시도해 보세요.
4부. 이메일용 사진 크기를 지정된 크기로 조정
이메일용 사진의 크기를 지정된 크기로 조정하려면 IMGonline 도구를 사용해 보세요. 이 이미지 압축기 도구를 사용하면 원하는 크기로 이미지 크기를 조정할 수 있습니다. 방법은 다음과 같습니다.
1 단계. 웹사이트에서 다음을 클릭하세요. 파일을 선택 압축하려는 사진을 추가하려면 버튼을 클릭하세요.

2 단계. 다음으로 JPEG 파일 압축 설정을 설정합니다. 선택에 따라 원하는 크기를 KB 또는 MB로 입력합니다.

3 단계. 에서 메가픽셀 단위로 크기 줄이기 메뉴에서 사진을 얼마나 압축할지 또는 사진 압축을 얼마나 제한할지 선택합니다.
4 단계. 그 후, 다음 중에서 선택하세요 표준 JPG 또는 프로그레시브 JPG.
5 단계. 완료되면 클릭하기만 하면 됩니다. 확인 단추.
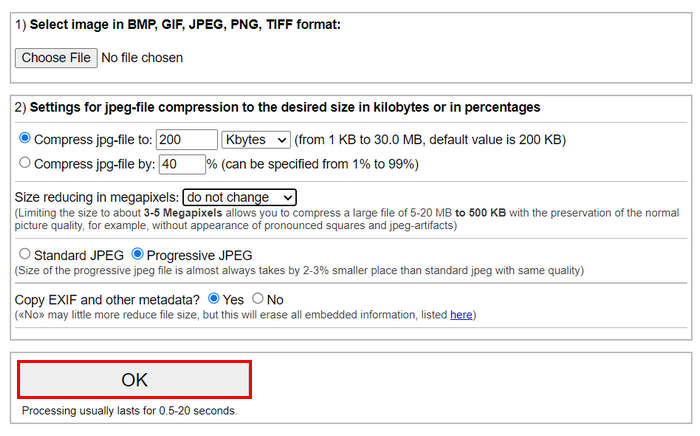
표준 JPG와 프로그레시브 JPG 중 하나를 선택할 때, 프로그레시브 JPEG 파일의 크기는 항상 동일한 품질을 가진 표준 JPEG보다 2-3% 더 작다는 점을 명심하세요.
5부. 이메일용 사진 압축에 대한 FAQ
이메일로 보낼 사진의 크기를 얼마로 조절해야 하나요?
이메일로 사진을 보내는 데 이상적인 크기에 관해서는 제한이 없지만 일반적으로 최대 1024x768픽셀로 사진 크기를 조정하는 것이 좋습니다. 또한 이미지 크기를 1MB 미만으로 유지하면 첨부 파일 제한 문제를 피하는 데 도움이 되고 수신자가 이미지를 다운로드하고 보는 것이 더 쉬워집니다.
Gmail에서 이미지를 압축하는 방법은?
Gmail용 이미지 압축은 다양한 방법을 사용하여 수행할 수 있습니다. 가장 쉬운 방법 중 하나는 FVC 무료와 같은 온라인 압축 도구를 사용하는 것입니다. 이미지 압축 도구이 기능을 사용하려면 이미지 파일을 업로드하기만 하면 자동으로 압축됩니다.
이메일에는 어떤 이미지 유형이 가장 적합합니까?
이메일에 가장 적합한 이미지 유형은 다음과 같습니다. JPEG 및 PNG. JPEG는 압축률이 좋고 파일 크기와 품질이 균형을 이루기 때문에 널리 사용되며, 다양한 색상이 있는 사진과 이미지에 이상적입니다. PNG는 투명성이 필요하거나 날카로운 모서리가 있는 텍스트, 로고 또는 그래픽이 있는 이미지에 선호되는데, 이러한 요소에 대해 더 높은 품질을 유지하지만 파일 크기가 JPEG보다 클 수 있기 때문입니다.
결론
정말 어떻게 하는지 아는 것이 중요합니다 이메일로 사진을 압축하다 느린 업로드 시간, 배달 실패, 첨부 파일 크기 제한을 피하세요. 이 문서에서 포괄적으로 설명한 방법을 따르면 사진 첨부 파일을 관리하기 쉽고 빠르게 보내고 받을 수 있습니다.
무엇을 기다리고 계신가요? 오늘 이 3가지 간단한 방법으로 이메일 첨부 파일을 최적화하기 시작하세요.
-
 과도하게 압축된 사진: 이를 쉽게 수정하는 방법
 이미지가 과도하게 압축되었을 때 어떻게 해야 할지 궁금하세요? 이 기사를 읽고 이 이미지 문제가 발생하는 이유와 이를 해결하는 두 가지 방법을 알아보세요.
-
 이미지를 100KB로 크기 조정: 효율적인 압축을 위한 3가지 최고의 방법
 이미지를 100KB로 리사이즈하는 데 도움이 되는 도구를 찾고 계신가요? 이 기사를 읽고 이미지를 원하는 파일 크기로 줄이는 3가지 방법을 알아보세요.
-
 Word에서 그림을 압축하는 방법 [Windows 및 Mac]
 Word를 이미지 압축에 어떻게 활용할 수 있을지 궁금하세요? 이 가이드에서는 Word에서 이미지를 압축하여 원활한 압축을 하는 방법을 알려드립니다.