


사진 압축 비율: 이미지를 효율적으로 압축하세요
이미지 압축에 관해서는 압축률의 개념을 이해하는 것이 중요합니다. 일반적인 용어일 수 있지만, 항상 오해받고 다른 맥락에서 다르게 받아들여집니다. 예를 들어, 사용자는 항상 압축된 이미지의 동일한 품질 출력을 얻을 수 있다고 가정하고 낮은 압축률을 사용할 때 크기가 상당히 손실될 것으로 예상할 수 있습니다. 문제는 압축률과 사용되는 압축 유형에 따라 달라진다는 것입니다.
사진 압축 비율과 효과적인 압축 방식에 대해 종합적으로 이해하려면, 이 글을 읽고 사진 압축 비율이 의미하는 바와 이를 변경하는 방법에 대해 충분히 숙지해 보세요. 미리 준비하여 이미지를 효율적으로 압축하는 방법을 배워 봅시다.

1부. 사진 압축률이란 무엇인가
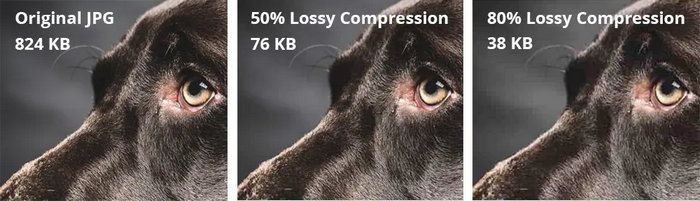
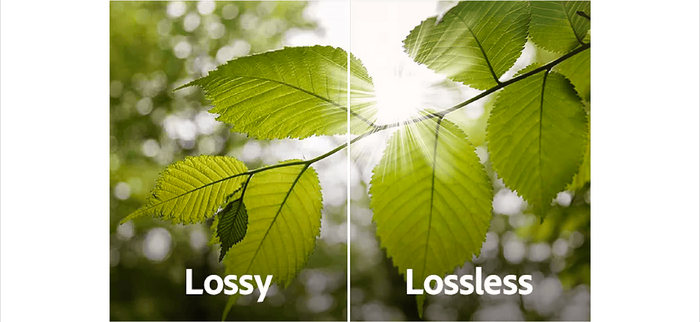
사진 압축률은 압축되지 않은 사진의 바이트 수와 압축된 바이트 수의 비율입니다. 가장 간단한 설명으로, 사진 파일이 원래 크기에 비해 얼마나 작아지는지를 말합니다. 따라서 사진의 압축률이 높으면 사진을 더 작은 크기로 줄일 수 있어 흐릿하거나 픽셀화되어 보일 수 있습니다. 반면, 사진의 압축률이 낮으면 압축된 사진의 크기가 약간만 줄었습니다. 이를 더 잘 이해하기 위해 손실 압축과 무손실 압축을 비교해 보겠습니다.
손실 압축
이것은 사진의 크기와 품질을 크게 줄일 수 있는 이미지 압축 유형입니다. 즉, 사진의 압축률이 높다는 의미입니다. 예를 들어, 사진의 원래 크기가 10MB이고 500KB로 압축된 경우 20:1의 사진 압축률을 달성했다는 의미입니다.
장점:
• 파일 크기를 크게 줄일 수 있습니다.
• 웹 사용에 이상적입니다.
단점:
• 특히 높은 압축률에서는 이미지 품질이 저하됩니다.
• 원본 데이터를 정확히 재현해야 하는 이미지에는 적합하지 않습니다.
무손실 압축
손실 압축과 비교해 이 유형의 압축은 정보 손실이 없고 이미지 품질이 원본과 정확히 동일하게 유지됩니다.
장점:
• 이미지 품질의 손실이 거의 없습니다.
• 높은 정확도가 필요한 이미지에 적합합니다.
단점:
• 파일 크기 감소
2부. 사진의 압축 비율을 변경하는 방법
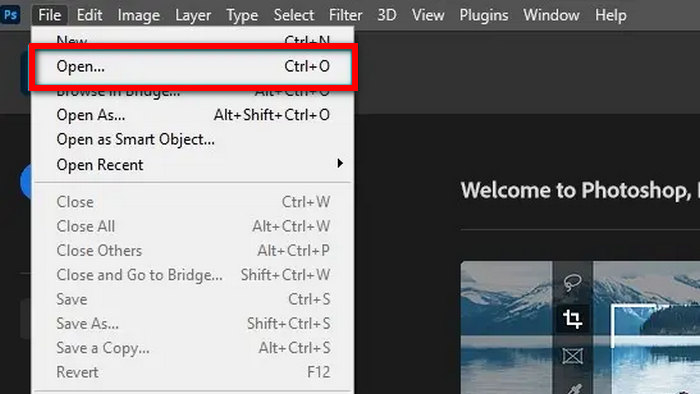
이미지의 압축 비율을 조정하면 품질과 파일 크기 간의 적절한 균형을 달성하여 공간을 덜 차지하면서도 멋지게 보이게 할 수 있습니다. 이를 위해 Photoshop을 사용할 수 있습니다. 이 도구를 사용하면 사용자가 사진 압축 비율 조정을 포함한 광범위한 이미지 편집 작업을 수행할 수 있습니다. 이 특정 기능을 사용하면 특정 요구 사항을 충족하도록 이미지 품질을 미세 조정할 수 있습니다. Photoshop을 사용하여 사진의 압축 비율을 변경하는 방법은 다음과 같습니다.
1단계. 먼저, 상단의 파일(File) 탭으로 이동해 열기(Open) 옵션을 클릭하여 압축 비율을 변경하려는 이미지 파일을 가져옵니다.
2단계. Photoshop에 사진을 불러온 뒤, 이미지(Image) 탭으로 이동해 이미지 크기(Image Size)를 클릭합니다.
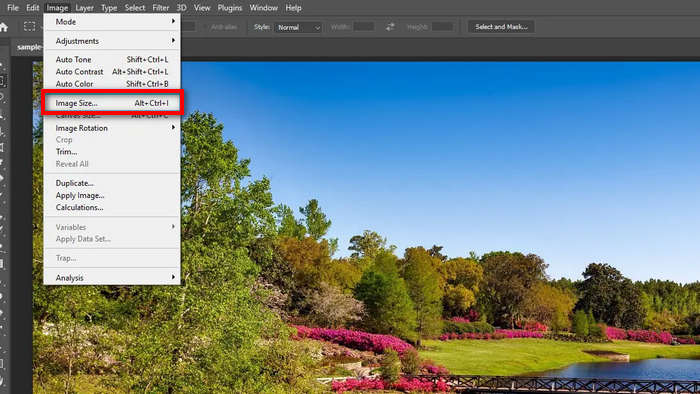
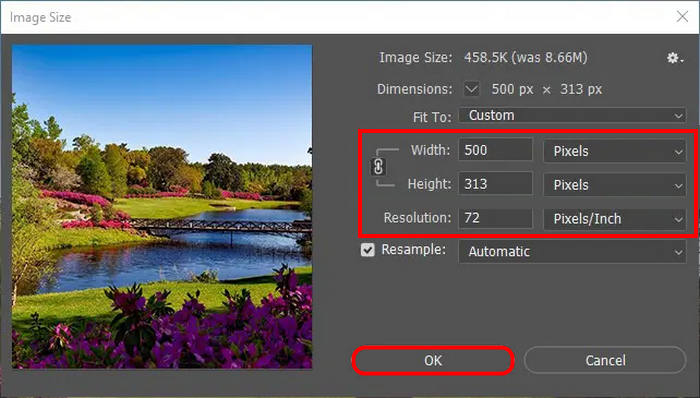
3단계. 이제 이미지 대화 상자에서 원하는 해상도를 설정합니다. 그다음 목표 높이(Height)와 너비(Width) 값을 입력합니다. 이 값이 픽셀 단위라는 점을 유의하세요. 설정을 마쳤으면 확인(OK) 버튼을 클릭합니다.
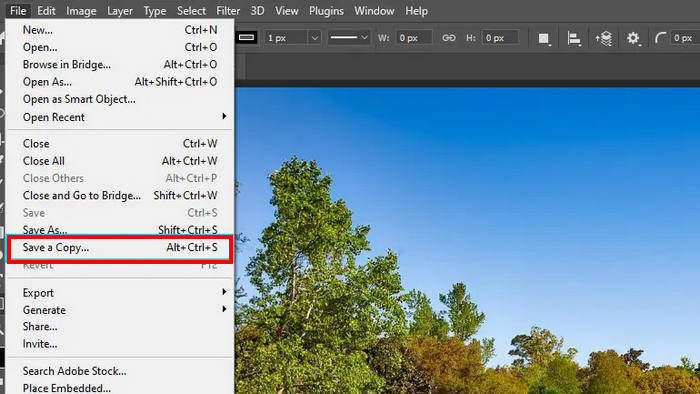
4단계. 파일을 저장하려면 파일(File) 탭으로 가서 메뉴에서 사본 저장(Save a copy)을 선택합니다.
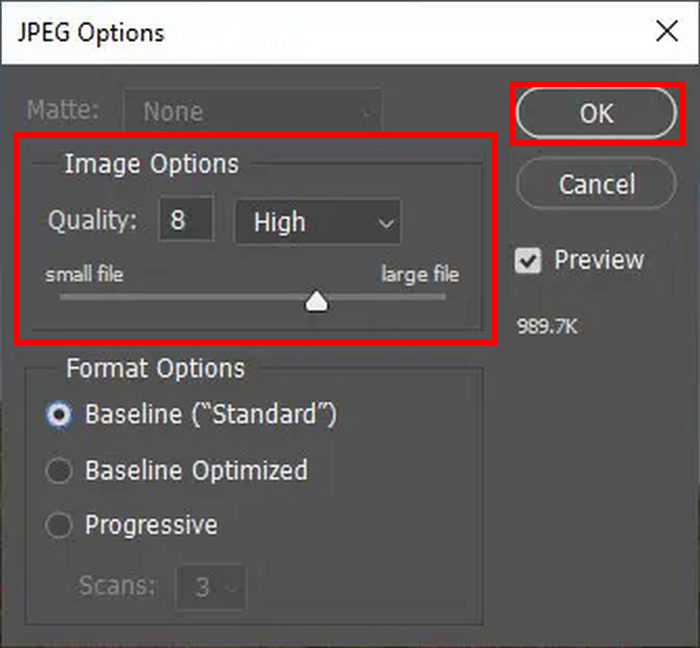
5단계. 저장 버튼을 클릭하면 JPEG 옵션 창이 나타납니다. 여기서 이미지 옵션(Image Options) 섹션의 슬라이더를 조절해 이미지 품질을 손쉽게 설정할 수 있습니다. 완료되면 확인(OK)을 클릭해 저장합니다.
이 방법을 사용하면 사진의 압축률을 쉽게 변경할 수 있습니다. 그러나 일부 사용자에게는 약간 복잡할 수 있으며, 새로운 사용자는 모든 기능을 사용하려면 구독을 이용해야 합니다.
3부. 보너스: 품질 저하 없이 이미지 압축
FVC Free Image Compressor는 이미지 용량을 줄이면서도 결과물의 품질 저하가 거의 눈에 띄지 않게 해 주는 무료 온라인 이미지 압축 도구입니다. 일부 다른 압축 도구와 비교했을 때, 이 도구는 뛰어난 최적화 및 압축 알고리즘을 갖추고 있어 압축된 사진의 해상도와 품질을 최대한 보장합니다.
FVC 무료 이미지 압축기를 사용하여 사진을 압축하는 방법은 다음과 같습니다.
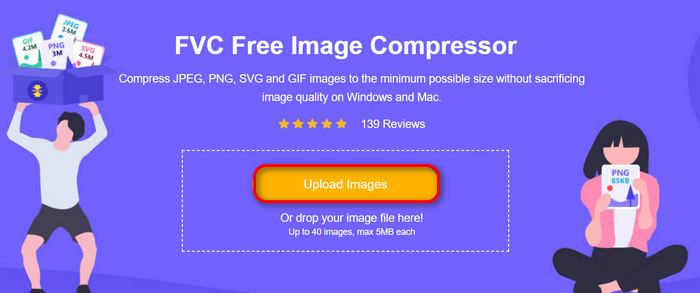
1단계. 먼저 FVC Free Image Compressor 공식 웹사이트에 접속합니다.
2단계. 그다음 Upload Images를 클릭해 압축할 사진을 불러옵니다. 이 도구는 사진을 자동으로 압축합니다.
3단계. 압축 과정이 완료될 때까지 기다립니다. 완료되면 상태 표시줄을 통해 완료 여부와 함께 압축 전·후의 이미지 용량 정보를 확인할 수 있습니다. 이후 Download All을 클릭해 이미지를 저장합니다.
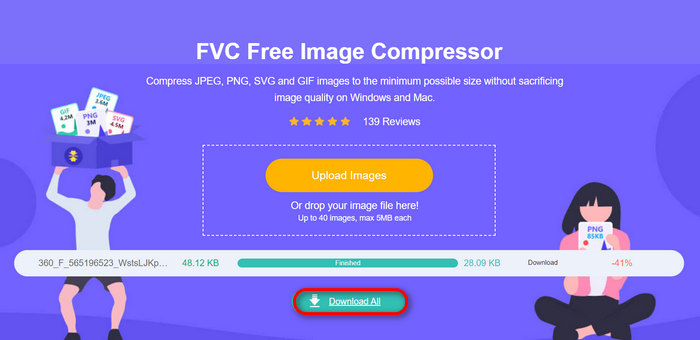
사진을 쉽게 압축하고 싶다면 FVC 무료 이미지 압축 도구를 사용하는 것이 좋은 대안입니다. 압축하려면 클릭 한 번만 하면 되고, 모든 것이 사진의 크기와 품질이 잘 압축되도록 보장됩니다.
4부. 사진 압축률에 대한 FAQ
사진을 20:1 비율로 압축하는 방법은?
사진을 20:1 비율로 압축하려면 Photoshop이나 온라인 압축기와 같은 이미지 편집 도구를 사용할 수 있습니다. Photoshop에서 원하는 압축 비율을 얻을 때까지 이미지 품질 설정과 해상도를 조정합니다. 또한, 압축이나 다이와 같이 대상 파일 크기나 압축 수준을 지정하는 옵션을 제공하는 온라인 도구도 있습니다. 하지만 편의성 측면에서 FVC Free Image Compressor 도구는 사진을 20:1 비율로 압축하는 데도 좋은 도구가 될 수 있습니다.
사진의 압축률은 어떻게 찾을 수 있나요?
사진 압축률을 찾으려면 원본 파일 크기를 압축 파일 크기로 나눕니다. 예를 들어, 원본 사진이 10MB이고 압축된 사진이 0.5MB인 경우 압축률은 10MB / 0.5MB = 20:1입니다.
JPG 파일의 압축률은 얼마인가요?
JPG 파일의 사진 압축률은 압축 시 사용된 품질 설정에 따라 다릅니다. 고압축은 파일 크기는 작지만 이미지 품질은 낮고, 저압축은 파일 크기는 크지만 이미지 품질은 높습니다. 일반적인 JPG 압축률은 웹 사용 시 10:1에서 20:1 사이입니다.
사진을 압축할 수 있는 한계가 있나요?
네, 상당한 품질 손실이 발생하기 전에 사진을 얼마나 압축할 수 있는지에 대한 실질적인 한계가 있습니다. 압축률이 높을수록 픽셀화나 흐릿함과 같은 눈에 띄는 아티팩트가 발생하는 경우가 많으며, 특히 복잡한 세부 사항이나 그라디언트가 있는 이미지에서 그렇습니다.
결론
사진 압축 비율을 이해하고 조절하는 것은 이미지의 품질과 파일 크기 사이에서 최적의 균형을 맞추는 데 필수적입니다. Adobe Photoshop은 이를 정밀하게 제어할 수 있는 강력한 기능을 제공하며, 보다 간단한 방법을 원하는 사용자에게는 FVC Free Image Compressor와 같은 도구가 효율적인 대안이 될 수 있습니다.
지금 이미지 최적화를 제어하세요! 고급 편집을 위해 Adobe Photoshop을 사용하거나 빠르고 쉬운 압축을 위해 FVC Free Image Compressor를 사용하세요.
-
 이미지를 20KB로 크기 조정하는 3가지 방법: 원활한 압축
 이미지 파일의 크기를 20KB로 만드는 방법에 대해 걱정되시나요? 이 글에서는 이미지를 빠르고 매끄럽게 20KB로 조정하는 3가지 방법을 알려드립니다.
-
 과도하게 압축된 사진: 이를 쉽게 수정하는 방법
 이미지가 과도하게 압축되었을 때 어떻게 해야 할지 궁금하세요? 이 기사를 읽고 이 이미지 문제가 발생하는 이유와 이를 해결하는 두 가지 방법을 알아보세요.
-
 Windows 및 Mac에서 JPEG를 압축하는 방법 [궁극의 가이드]
 Windows 및 Mac 기기에서 JPEG 파일을 압축할 효율적인 도구를 찾고 계신가요? 지금 이 기사를 읽고 원활한 압축을 위한 다섯 가지 방법을 알아보세요.