


FaceTime スクリーンショットの撮り方に関する究極ガイド [2025]
FaceTimeは、Appleが開発した、iPhone・iPad・Macでリアルタイムのビデオ通話を行うための、広く利用されているビデオチャットアプリケーションです。FaceTime通話中にスクリーンショットを撮ることは、特に相手としばらく会えないときなどに、会話の相手との大切な瞬間を残しておくのに最適な方法です。通話中の貴重なひとときを保存したいなら、この記事がお役に立ちます。ぜひ読んで、簡単にFaceTimeのスクリーンショットを撮る3つの方法を学んでください。では始めましょう!

パート 1: iPhone/iPad/Mac で FaceTime スクリーンショットを撮る究極の方法
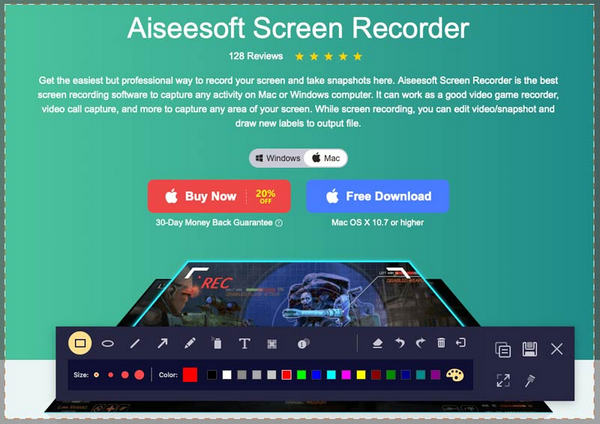
Appleデバイスで簡単にFaceTimeのスクリーンショットを撮る究極の方法は、FVC Screen Recorderを使うことです。このサードパーティ製の画面録画ツールは、iPhone・iPad・Macでスクリーンショットを撮るのに最適なように設計されています。これらのいずれかを使っていて、家族や友人、恋人などとFaceTimeビデオ通話をしているときにスクリーンショットを撮りたい場合、そのスナップショット機能とスマホ録画機能が大いに役立ちます。さらに、このツールはインターフェースがわかりやすく、どんなユーザーでも簡単に操作できます。最後に、FaceTimeのスクリーンショットをよりクリエイティブに仕上げたい方は、自由にカスタマイズできる編集機能もきっと楽しめるでしょう。
方法1: Macの場合
ステップ1.まず、FVC Screen RecorderをMacにダウンロードしてインストールします。このソフトウェアは、最新のmacOS 14 Sonomaを含む、ほとんどのmacOSバージョンに対応しています。
無料ダウンロードWindows 7以降に対応安全なダウンロード
無料ダウンロードMacOS 10.7以降に対応安全なダウンロード
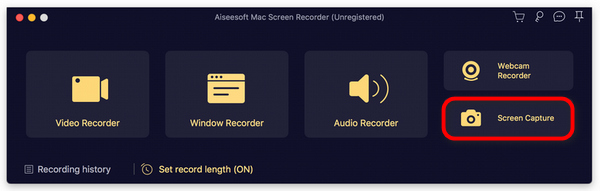
ステップ2.次に、ツールを起動します。
ステップ3.MacでFaceTimeビデオ通話をしている最中に、ツールのインターフェースのフローティングウィンドウにあるスクリーンキャプチャボタンをクリックします。
ステップ4.これは任意ですが、下部にある複数の編集ツールを使って、FaceTimeのスクリーンショット画像を編集できます。
ステップ5.最後に、保存をクリックして、画像をMacに保存します。
方法2: iPhoneとiPadの場合
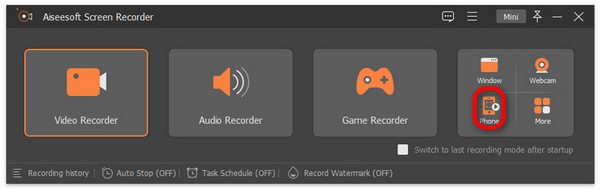
ステップ1.今度はWindowsパソコンにFVC Screen Recorderをダウンロードして起動します。
ステップ2.ツールをインストールしたら開き、フローティングウィンドウの右側にある3つのオプションと並んだスマホオプションをクリックします。
ステップ3.続いて、iOSレコーダーオプションをクリックします。
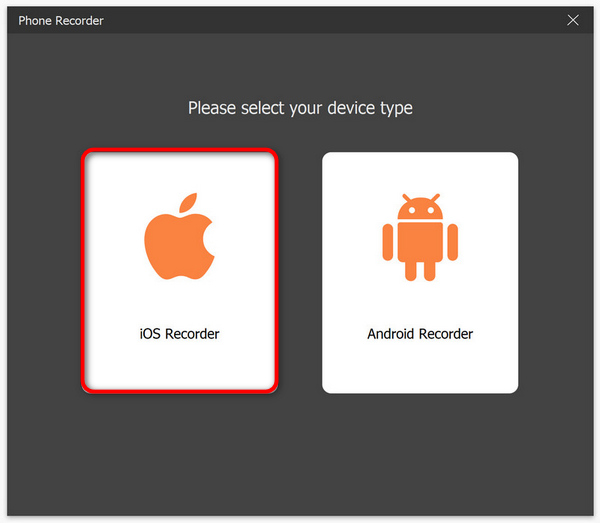
ステップ4.すると新しいウィンドウが表示され、画面上の手順とともに、画面ミラーリングか音声ミラーリングのどちらかを選ぶよう求められます。この場合は、画面ミラーリングを選択してください。
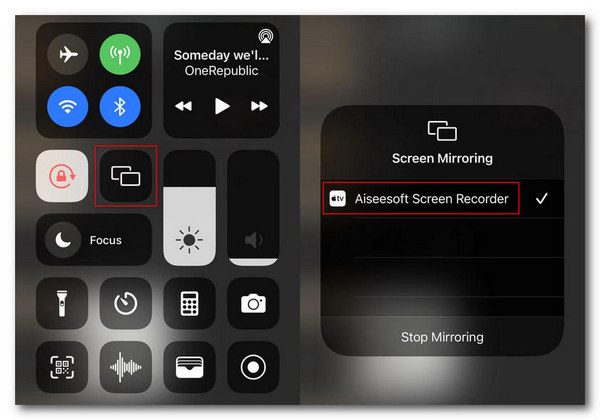
ステップ5.次に、iPhoneまたはiPadでコントロールセンターを開き、画面ミラーリングをタップします。その後、表示される一覧からAiseesoft Screen Recorderを選択して、iPhoneまたはiPadをパソコンに接続します。
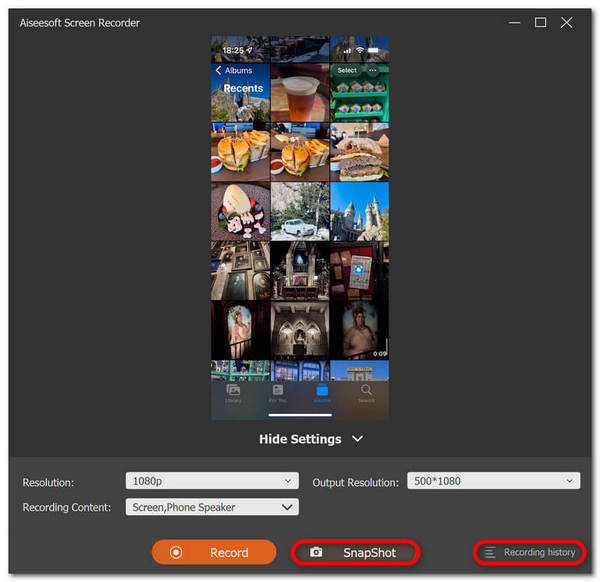
ステップ6.最後に、iPhoneまたはiPadの画面をスクリーンショットしたいときは、スナップショットのアイコンをクリックするだけです。
FVC スクリーン レコーダーは、スクリーンショットを撮るという点では実に多機能なツールです。1 つのツールで複数の iOS デバイスをサポートできると想像してみてください。信じられないかもしれませんが、本当にそうなのです。そのため、どの iOS デバイスを使用しているかに関係なく、このスクリーン レコーディング ツールを使用すると、ビデオ通話中に FaceTime のスクリーンショットを撮ることができます。
パート2:iPhone / iPadでFaceTimeスクリーンショットを撮る方法
iPhone または iPad で FaceTime スクリーンショットを撮ることは、内蔵のスクリーンショット機能を使用してシームレスに行うことができます。
ステップ1.FaceTimeビデオ通話中に使用しているiOSまたはiPadOSデバイスを確認します。
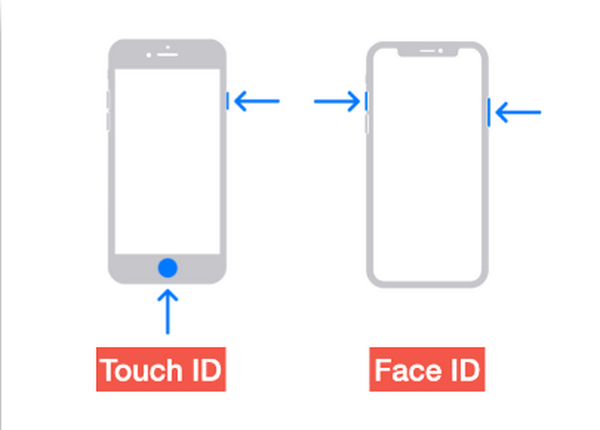
ステップ2.Touch ID搭載デバイスの場合は、ホームボタンと電源ボタンを同時に押して、FaceTimeビデオ通話のスクリーンショットを撮ります。一方、iPhoneやiPadがFace ID搭載の場合は、音量を上げるボタンと電源ボタンを同時に押すことで、FaceTime通話のスクリーンショットを撮ることができます。
ステップ3.撮影したスクリーンショットは、写真アプリのスクリーンショットフォルダから確認できます。
iPhone や iPad にはスクリーンショット機能が組み込まれているため、FaceTime スクリーンショットを撮るのは簡単です。ただし、アクティブな FaceTime 通話中に必要なボタンを押すと、通話を終了したり、知らないうちに音量をオフにしたりするなど、誤って中断されるリスクがあるため、注意が必要です。
パート3:MacでFaceTimeのスクリーンショットを撮る方法
Mac で FaceTime ビデオ通話をしているときに、最も簡単な方法は、ホットキーを使用して FaceTime のスクリーンショットを撮ることです。
ステップ1.まず、MacでFaceTimeビデオ通話を開始します。
ステップ2.ビデオ通話中に、ショートカットキーを使ってFaceTimeのスクリーンショットを撮ります。
注意: FaceTimeビデオ通話の画面全体をスクリーンショットとして保存したい場合は、Commandキー、Shiftキー、3キーを同時に押します。一部だけをキャプチャしたい場合は、Commandキー、Shiftキー、4キーを同時に押してください。最後に、FaceTimeウィンドウだけをキャプチャしたい場合は、Commandキー、Shiftキー、4キー、スペースバーを同時に押します。
ステップ3.スクリーンショットはデスクトップに直接保存されます。
Mac で FaceTime スクリーンショットを撮るときにホットキーを使用する場合の唯一の欠点は、スクリーンショット画像をカスタマイズしたい場合に編集できないことです。とはいえ、スクリーンショットを撮りたいだけなら問題ありませんが、クリエイティブになりたい場合は、FVC スクリーン レコーダーなどのサードパーティ ツールを使用できます。
パート4: FaceTimeスクリーンショットの撮影に関するよくある質問
FaceTime のスクリーンショットはどこに保存されますか?
FaceTime のスクリーンショットには、デバイスの写真アプリからアクセスできます。通常、FaceTime 通話中にスクリーンショットを撮ると、そのスクリーンショットは直接、そのアプリのスクリーンショット フォルダに保存されます。
FaceTime は誰かがスクリーンショットを撮ったときに通知しますか?
いいえ。FaceTime には、FaceTime ビデオ通話中にスクリーンショットを撮った相手に通知する機能はありません。そのため、FaceTime 通話中に誰かがスクリーンショットを撮っても、通知は届きません。
FaceTime のスクリーンショットが保存されない?
FaceTime のスクリーンショットが iOS デバイスに保存されないという問題が発生している場合は、いくつかの理由が考えられます。まず、デバイスのストレージがいっぱいになっていないことを確認する必要があります。これが FaceTime のスクリーンショットが保存されない主な理由である可能性があります。基本的に、これでは新しいスクリーンショットが保存されません。さらに、写真アプリにスクリーンショットを保存する権限がない可能性があるため、デバイスのプライバシー設定を確認してください。問題が解決しない場合は、デバイスを再起動するか、ソフトウェアを更新すると問題が解決する場合があります。
結論
まとめると、ビデオ通話中にFaceTimeのスクリーンショットを撮ることは、離れている大切な人との思い出深い瞬間を残す、最も手軽な方法のひとつです。iOSデバイスの標準機能を使う場合でも、FVC Screen Recorderのようなサードパーティツールを使う場合でも、こうした瞬間を簡単にキャプチャするための方法はいくつも用意されています。これらのツールや機能を活用して、FaceTimeならではの時間を最大限に楽しんでください。今すぐ大切な人にFaceTimeをかけて、その瞬間をスクリーンショットで残しておきましょう。
-
 iPhoneでスクリーンショットが機能しない問題を解決する方法 [2025]
 iPhone でスクリーンショットを撮るのに問題がありますか? 大丈夫です! iPhone でスクリーンショットが撮れない問題を素早く簡単に解決するための包括的なガイドをご覧ください。
-
 Windows で Print Screen なしでスクリーンショットを撮る方法 [2025 ガイド]
 Windows でプリント スクリーンを使わずにスクリーンショットを撮る方法をお探しですか? この記事は簡単です。今すぐこれを読んで、楽に画面をキャプチャしましょう!
-
 相手に知られずにSnapchatでスクリーンショットを撮る4つの方法
 相手に知られずに Snapchat でスクリーンショットを撮りたいですか? この記事には、あなたにぴったりの 4 つの効果的な方法があります。今すぐチェックして、自分で試してみてください!