再生中のビデオをオーディオ付きでコンピューターに記録する場合は、スクリーン レコーダーを使用できます。さらに、このソフトウェアを使用して、コンピューターでゲームプレイをキャプチャすることもできます。これらとは別に、スクリーンレコーダーの電話レコーダー機能を使用すると、iPhone および Android の電話画面をコンピューターに記録できます。
このページの無料ダウンロードボタンをクリックして、まずインストールパッケージをパソコンにダウンロードしてください。その後、パッケージをクリックして開き、お使いのデバイスに Screen Recorder をインストールします。
3 分以上のビデオを録画する必要がある場合、または録画したビデオをトリミングしたい場合は、スクリーン レコーダーに登録する必要があります。
ステップ1:Screen Recorder を起動したら、登録アイコンをクリックしてください。
ステップ2:本ソフトウェアを購入し、登録コードを受け取っている場合は、このウィンドウに登録コードとメールアドレスを直接入力し、有効化ボタンをクリックしてください。

Screen Recorder の環境設定を行いたい場合は、メニューアイコンをクリックし、環境設定を選択してください。

1. 録画
このウィンドウでは、録画の前・録画中・録画後の動作を設定できます。例えば、録画中にデスクトップアイコンを非表示にする、などの設定が可能です。

2. 出力
出力形式、保存パス、録画ビデオ、オーディオ、スクリーンショットの品質を変更する場合は、このウィンドウで調整できます。

3. サウンド
ここでは、システム サウンドとマイク サウンドの音量を制御できます。

4. マウス
このウィンドウでは、マウスカーソルを表示するかどうかを選択できます。また、記録時にマウス クリックの色と領域を選択できます。

5. ホットキー
記録プロセスをより便利にしたい場合は、ここでホットキーを設定できます。

6. その他
ここでは、スクリーン キャプチャ モードの選択、ハードウェア アクセラレーションの有効化または無効化、更新チェックの設定の調整などを行うことができます。

| 対応OS | CPU/プロセッサ | 羊 | |
| ウィンドウズ | Windows 11/10/8.1/8/7 | 1GHz Intel/AMD CPU以上 | 1GB以上のRAM |
| マック | Mac OS X 10.12 以降 | 1GHz Intel® プロセッサと Apple M1/M2 チップ | 512MB以上 |
| サポートされている形式 | |
| ビデオ | MP4、WMV、MOV、F4V、TS、WebM |
| オーディオ | MP3、WMA、M4A、AAC |
| 画像 | PNG、JPG/JPEG、BMP、GIF、TIFF |
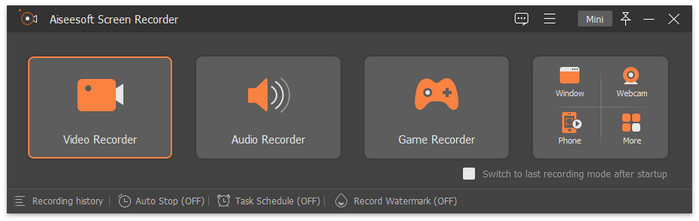
ステップ1:動画レコーダーを選択
パソコン上の動画を録画するには、動画レコーダーボタンを選択してください。
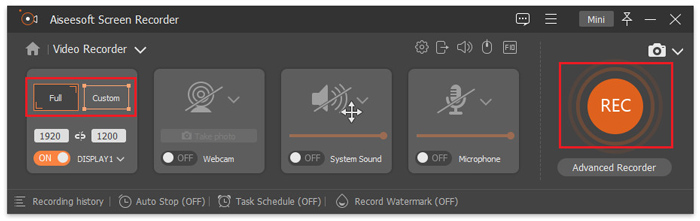
ステップ2:録画範囲を選択
パソコンの画面全体を録画したい場合は、フルアイコンをクリックしてください。動画の特定エリアのみを録画したい場合は、カスタムアイコンをクリックし、枠線をドラッグしてお好みの録画範囲に調整します。

ステップ3:動画録画設定の調整
デスクトップ動画を録画しながらウェブカメラの映像も録画したい場合は、Webcamをオンに切り替えてください。
動画と一緒にパソコンの音声やマイクの音声も録音したい場合は、システム音とマイクをオンにしてください。

さらに、自動停止をオンにして、録画を自動的に停止させることもできます。このウィンドウでは、録画時間、録画ファイルサイズ、終了時間を調整して自動停止条件を設定できます。

録画の開始時間と終了時間を設定する必要がある場合は、タスクスケジュールをオンにして、新しいタスクを追加ボタンをクリックし、録画用のタスクを作成してください。

さらに、動画をウォーターマーク付きで録画するかどうかも選択できます。管理ボタンをクリックすると、独自のウォーターマークを作成したり、必要に応じてウォーターマークの位置を変更したりできます。

ステップ4:録画を開始
すべての設定が完了したら、RECボタンをクリックして、パソコン上の動画の録画を開始します。
録画中に、スナップショットアイコンをクリックすると、動画のスクリーンショットを撮って友人と共有できます。

録画中に重要な内容を長方形でマークしたい場合は、編集アイコンをクリックし、長方形アイコンを選択してください。

楕円、ペン、矢印など他のツールでマークしたい場合は、編集アイコンとプルダウンアイコンをクリックし、使用したいツールを選択してください。

録画中の動画にテキストを追加する必要がある場合は、編集アイコンをクリックし、テキストアイコンを選択してから、追加ボタンをクリックして動画上に文字を配置します。

パソコン画面を録画しながら内容に番号を振りたい場合は、編集アイコンをクリックし、吹き出しアイコンを選択して、番号を振りたい箇所をマウスでクリックしてください。

動画を録画している最中に画像を画面に追加したい場合は、編集アイコンをクリックし、画像アイコンを選択してから、画像を追加ボタンをクリックします。

録画中の動画の一部を拡大表示する必要がある場合は、編集アイコンをクリックし、拡大鏡アイコンを選択してください。

設定アイコンをクリックし、固定モード、マウス周辺、マウス追従の中から録画モードを選択します。

ステップ5:録画を終了
最後に、停止アイコンをクリックして録画を完了します。

録画を停止すると、録画ファイルをプレビューできるウィンドウがポップアップ表示されます。新しく動画を録画したい場合は、戻るボタンをクリックして、動画レコーダー機能に戻ってください。あるいは、>完了をクリックすることもできます。
ステップ1:音声レコーダーを選択
パソコンで Screen Recorder を起動し、音声レコーダーボタンを選択してください。

ステップ2:音声録音設定の調整
その後、バーを動かしてシステム音の音量を調整できます。また、自分の声も録音したい場合は、マイクをオンにしてください。

ステップ3:音声録音を開始
次に、RECボタンをクリックして、コンピューターでオーディオの録音を開始できます。
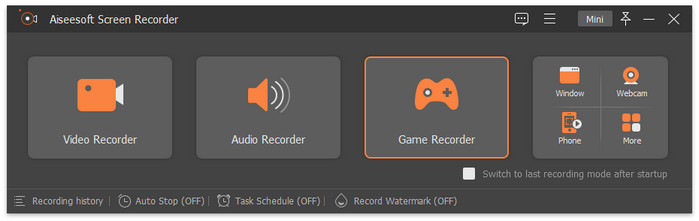
ステップ1:ゲームレコーダーを選択
パソコンでゲーム画面を録画したい場合は、ゲームレコーダーボタンをクリックして開始してください。
ステップ2:ゲームプロセスを選択
その後、ゲームを選択ボタンをクリックして、録画したいゲームのプロセスを選択する必要があります。

ウェブカメラ、システム サウンド、マイクをオンにして、ゲームプレイを音楽、顔、声とともに記録することもできます。
ステップ3:ゲーム録画を開始
最後に、RECボタンをクリックして、パソコン上のゲームプレイの録画を開始します。
ステップ1:ウィンドウレコーダーを選択
コンピューターで複数のウィンドウを開き、ウィンドウのみを記録したい場合は、[ウィンドウ] ボタンをクリックします。

ステップ2:ウィンドウを選択
後で、プルダウン アイコンをクリックして、キャプチャするウィンドウを選択できます。

ステップ3:ウィンドウ録画を開始
ウィンドウを選択したら、録画開始ボタンをクリックして録画を始めてください。
ステップ1:Webcam レコーダーを選択
パソコンのウェブカメラ画面を録画したい場合は、Webcam Recorder ボタンを選択します。

ステップ2. 設定を調整
その後、パソコン上にウェブカメラの映像が表示されるウィンドウが開きます。ここで Settings アイコンをクリックして、カメラソースや解像度などを選択できます。

ステップ3. ウェブカメラ録画を開始
プレビュー画面上部の Record ボタンをクリックして録画を開始します。
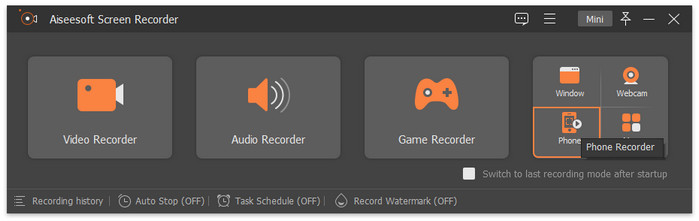
ステップ1. Phone Recorder を選択
より大きな画面でスマホ画面を録画したい場合は、Phone Recorder ボタンをクリックします。
ステップ2. スマホをPCに接続
iOSユーザーの場合は、まず iOS Recorder を選択してください。

その後、画面の指示に従ってiOSデバイスを接続します。iOSデバイスとパソコンが同じLANに接続されていることを確認し、iOSデバイスで下または上にスワイプして コントロールセンター(Control Center) を開き、画面ミラーリング(Screen Mirroring) をタップして、Screen Recorder を選択し、接続が完了するまで待ちます。

Androidユーザーの場合は、Android Recorder を選択してください。

その後、WiFi または USB 経由で Android デバイスをコンピュータに接続できます。まず、AndroidにFoneLab Mirrorをダウンロードしてインストールしてください。
Wi-Fiで接続したい場合は、Androidデバイスとパソコンが同じLANに接続されている必要があります。接続方法は Detect、PIN Code、QR Code の3種類から選択できます。

ネットワーク接続がない場合は、USB Connection に切り替えます。画面の指示に従い、AndroidスマホをUSBでPCに接続し、スマホの 設定(Settings) から USBデバッグ(USB debugging) をオンにします。その後、パソコン側で Complete ボタンをクリックし、Androidスマホで Allow または Start Now をタップして接続を完了します。

ステップ3. スマホ録画の設定を調整
正常に接続すると、下の写真のように、スクリーン レコーダーを使用してコンピューターで電話の画面を見ることができます。
ここでは、デバイス、4K、2Kなどから画面解像度を選択し、出力解像度と記録内容を選択できます。

ステップ4. スマホ画面の録画を開始
次に、Record ボタンをクリックして、パソコン上でスマホ画面の録画を開始します。
画面、ビデオ、またはオーディオをデバイスに記録した後、[記録履歴] ウィンドウに移動して、記録したファイルをトリミング、圧縮、マージ、および変換したり、記録したファイルのメディア メタデータを編集したりできます。

ステップ1. まずカットしたいファイルを選択し、More Tools アイコンをクリックして Video Cutter オプションを選びます。
ステップ2. 次に、ビデオカット用のウィンドウが表示されます。このウィンドウで、バー上の開始点と終了点を中央側へドラッグすることで録画ファイルを短くできます。編集内容に満足したら、Trim ボタンをクリックして保存します。

ステップ1. 編集したい録画ファイルをクリックし、Editing Tools セクションで Media Metadata Editor オプションを選択します。
ステップ2. その後、録画ファイルの名前、タイトル、アーティスト、アルバム、作曲者、ジャンル、年、コメントを直接変更・編集できます。最後に Complete ボタンをクリックして保存します。

ステップ1. 録画ファイルを複数のクリップに分割したい場合は、Advanced Trimmer 機能を利用できます。この機能に入るには、Recording History ウィンドウでトリミングしたい録画ファイルを選択し、Editing Tools セクションの Advanced Trimmer をクリックします。
ステップ2. 録画ファイルを分割するには、ポインターをスライドさせて Split アイコンをクリックします。素早く分割したい場合は、Fast Split ボタンをクリックし、クリップ数を設定できます。最後に Trim ボタンをクリックして編集内容を保存します。

ステップ1. 録画後、動画のファイルサイズが大きすぎると感じた場合は、Editing Tools セクションの Video Compressor ボタンをクリックしてサイズを縮小できます。
ステップ2. すると、録画動画は自動的に圧縮されます。また、Size バー上のポイントをスライドさせて、ニーズに応じて動画サイズをさらに調整することもできます。調整後、Compress ボタンをクリックして保存します。

ステップ1. 録画ファイルとローカルファイルを1つのファイルに結合したい場合は、File Merger 機能を利用できます。
ステップ2. File Merger を選択した後、Add ボタンをクリックして、既存の録画ファイルやローカルファイルから動画や画像を追加でインポートできます。また、Forward または Backward をクリックして各ファイルの順序を調整できます。最後に Export ボタンをクリックします。

ステップ1. 録画ファイルの形式を変更したい場合は、ファイルを選択して File Converter ボタンをクリックします。
ステップ2. 録画動画を別の動画形式に変更したい場合は、Video Export セクションで出力形式を選択し、Convert ボタンをクリックします。録画動画を音声ファイルに変換したい場合は、Audio Export セクションに移動し、音声形式を選択して Convert ボタンをクリックします。

再生中のビデオをオーディオ付きでコンピューターに記録する場合は、スクリーン レコーダーを使用できます。さらに、このソフトウェアを使用して、コンピューターでゲームプレイをキャプチャすることもできます。これらとは別に、スクリーンレコーダーの電話レコーダー機能を使用すると、iPhone および Android の電話画面をコンピューターに記録できます。
このページの無料ダウンロードボタンをクリックして、まずインストールパッケージをパソコンにダウンロードしてください。その後、パッケージをクリックして開き、お使いのデバイスに Screen Recorder をインストールします。
3 分以上のビデオを録画する必要がある場合、または録画したビデオをトリミングしたい場合は、スクリーン レコーダーに登録する必要があります。
ステップ1:Screen Recorder を起動したら、登録アイコンをクリックしてください。
ステップ2. このソフトを購入しており、登録コードを受け取っている場合は、このウィンドウに登録コードとメールアドレスを直接入力し、Register ボタンをクリックします。

Screen Recorder の環境設定を行いたい場合は、Aiseesoft Mac Screen Recorder をクリックし、Preference を選択してください。

1. Recording
このウィンドウでは、録画の前・録画中・録画後の動作を設定できます。例えば、録画中にデスクトップアイコンを非表示にする、などの設定が可能です。

2. Output
出力形式、保存パス、録画ビデオ、オーディオ、スクリーンショットの品質を変更する場合は、このウィンドウで調整できます。

3. Moused
このウィンドウでは、マウスカーソルを表示するかどうかを選択できます。また、記録時にマウス クリックの色と領域を選択できます。

4. Hotkeys
記録プロセスをより便利にしたい場合は、ここでホットキーを設定できます。

5. Others
ここでは、更新チェックの設定を調整できます。

| 対応OS | CPU/プロセッサ | 羊 | |
| ウィンドウズ | Windows 11/10/8.1/8/7 | 1GHz Intel/AMD CPU以上 | 1GB以上のRAM |
| マック | Mac OS X 10.12 以降 | 1GHz Intel® プロセッサと Apple M1/M2 チップ | 512MB以上 |
| サポートされている形式 | |
| ビデオ | MP4、WMV、MOV、F4V、TS、WebM |
| オーディオ | MP3、WMA、M4A、AAC |
| 画像 | PNG、JPG/JPEG、BMP、GIF、TIFF |
ステップ1:動画レコーダーを選択
パソコン上の動画を録画するには、動画レコーダーボタンを選択してください。

ステップ2:録画範囲を選択
コンピューターの画面全体をキャプチャする場合は、 満杯 アイコン。ビデオの特定の領域のみを録画したい場合は、 カスタム アイコンをクリックして境界線を移動し、キャプチャ領域を自由にカスタマイズします。
ステップ3:動画録画設定の調整
デスクトップ動画を録画しながらウェブカメラの映像も録画したい場合は、Webcamをオンに切り替えてください。
動画と一緒にパソコンの音声やマイクの音声も録音したい場合は、システム音とマイクをオンにしてください。

録画の開始時間と終了時間を設定する必要がある場合は、タスクスケジュールをオンにして、新しいタスクを追加ボタンをクリックし、録画用のタスクを作成してください。

さらに、動画をウォーターマーク付きで録画するかどうかも選択できます。管理ボタンをクリックすると、独自のウォーターマークを作成したり、必要に応じてウォーターマークの位置を変更したりできます。

ステップ4:録画を開始
すべての設定が完了したら、RECボタンをクリックして、パソコン上の動画の録画を開始します。

録画中に、スナップショットアイコンをクリックすると、動画のスクリーンショットを撮って友人と共有できます。

録画中に重要な部分を長方形でマークしたい場合は、Edit アイコンをクリックし、Rectangle アイコンを選択します。ほかにも、楕円、ペン、矢印などのツールを使って強調表示できます。

録画中の動画にテキストを追加する必要がある場合は、編集アイコンをクリックし、テキストアイコンを選択してから、追加ボタンをクリックして動画上に文字を配置します。

パソコン画面を録画しながら内容に番号を振りたい場合は、編集アイコンをクリックし、吹き出しアイコンを選択して、番号を振りたい箇所をマウスでクリックしてください。

ステップ5:録画を終了
最後に、停止アイコンをクリックして録画を完了します。

録画を停止すると、録画ファイルをプレビューできるウィンドウがポップアップ表示されます。新しい動画を録画したい場合は、Back ボタンをクリックして Video Recorder 機能に戻ります。録画動画を保存する場合は、>Done ボタンをクリックします。

ステップ1:音声レコーダーを選択
パソコンで Screen Recorder を起動し、音声レコーダーボタンを選択してください。

ステップ2. 音声録音の設定を調整
その後、バーを動かしてシステム音の音量を調整できます。また、自分の声も録音したい場合は、マイクをオンにしてください。

ステップ3:音声録音を開始
次に、REC ボタンをクリックしてパソコン上の音声の録音を開始します。
ステップ1:ウィンドウレコーダーを選択
パソコンで複数のウィンドウを開いていて、特定のウィンドウだけを録画したい場合は、Window ボタンをクリックします。

ステップ2:ウィンドウを選択
後で、プルダウン アイコンをクリックして、キャプチャするウィンドウを選択できます。

ステップ3:ウィンドウ録画を開始
ウィンドウを選択したら、録画開始ボタンをクリックして録画を始めてください。
ステップ1:Webcam レコーダーを選択
パソコンのウェブカメラ画面を録画したい場合は、Webcam Recorder ボタンを選択します。

ステップ2. ウェブカメラ録画を開始
プレビュー画面上部の Record ボタンをクリックして録画を開始します。
Screen Capture ボタンを選択し、スクリーンショットを撮りたい範囲を指定します。


 安全なお支払い
 30日間の返金保証
 48時間以内に問題を解決