


使用する 3 つの最適なソリューションを使用して画像のピクセル化をすばやく解除する方法
「画像のピクセルを戻す(Unpixelate image)」とは、ピクセル化してしまった画像、あるいは細かな四角いマス目(ビットマップ)が目立つ画像に、見た目の「メイクオーバー(お直し)」を施すための手段です。多くのユーザーにとって、画像の修正・調整・変更・強調は面倒に感じられますし、実際これまでは大変な作業でした。しかしそれはもう過去の話です。いま私たちが利用できる先進技術のおかげで、適切なツールさえ使えば、この作業は簡単に解決できるようになりました。
写真のピクセレーションを除去する適切なツールがありませんか?幸いなことに、この記事では、写真のピクセル化を編集するのに役立つことがわかった 3 つの最高のソフトウェアと、それぞれの問題を解決するためのチュートリアルを紹介します。
パート 1. Best Choice Photo Editor [推奨] を使用してオンラインで画像のピクセル化を解除する方法
「FVC Free Image Upscaler」は、画像のピクセル化をオンラインで無料かつ自動的に改善できるウェブツールです。お手元のどのウェブブラウザからでも開け、専用ランチャーのダウンロードは不要なので、アクセスしたらすぐに使い始めることができます。ウェブアプリでありながら、ピクセルを滑らかに復元する処理のパワーと性能は、オンライン・オフラインを問わず、プロ仕様の画像編集ソフトに匹敵します。「操作が難しいのでは」と思うかもしれませんが、その心配は不要です。それでもまだ不安な場合は、以下のチュートリアルを読んで、手順に沿って操作してみてください。このツールの使い方をわかりやすく把握できます。
ステップ1:お使いのデバイスの任意のウェブブラウザで本ツール名を検索するか、こちらのリンクをクリックして公式サイトを開きます。
ステップ2:サイトを開いたら、Add Image(画像を追加)をクリックして、ピクセル化している画像を読み込みます。画面にファイルフォルダが表示されるので、ローカルドライブに保存してある目的の画像を探し、Open(開く)を押してアップロードします。
ステップ3:次に、画像に適用したい拡大倍率(magnification)を選択します。これにより表示が滑らかになり、細かな四角いマス目が目立たない状態に整えられます。
ステップ4:あとは簡単で、Save(保存)をクリックして、ピクセルが整えられた画像をローカルドライブにダウンロードします。
パート 2. Windows と Mac で 2 つの方法を使用してオフラインで画像のピクセル化を解除する方法 [簡単]
Pixbim - Windows で写真のピクセル化を解除
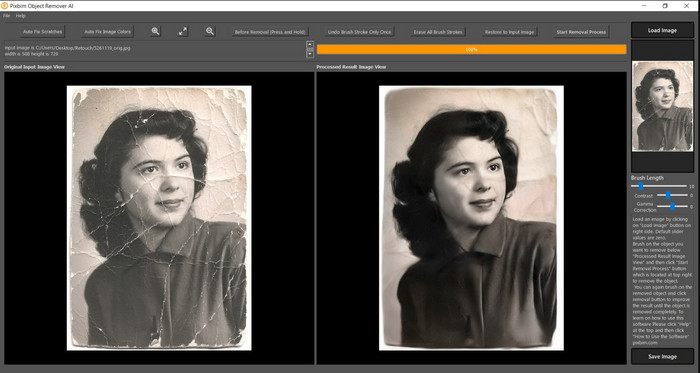
Pixbimは、Windows にインストールして使える、高性能な AI 搭載タイプの「ピクセル修復(アンピクセル化)」ソフトのひとつです。ピクセル化した画像を素早く、かつ高い精度で修正できることから、本記事でも取り上げるに値する編集ツールと言えるでしょう。本ソフトでは、AI がパラメータを自動調整してくれるため、難しい設定に悩まされずに使えます。その高度な機能と性能ゆえに、無料トライアル期間の後も継続して利用するにはライセンスキーの購入が必要です。価格は、PC で本格的に使いたいと考えている方の中でも、高く感じられる場合があるかもしれません。
ステップ1:ソフトウェアのダウンロードが完了したら、起動して次のステップへ進みます。
ステップ2:Load Image(画像を読み込む)をクリックして、ピクセル化を改善したい画像を追加します。
ステップ3:続いて、スライダー(sliders)をドラッグしながら、お好みの仕上がりになるよう各種パラメータを調整します。
ステップ4:画像の調整が終わったら、結果を保存して書き出します。
Movavi Photo Editor [Windows & Mac]
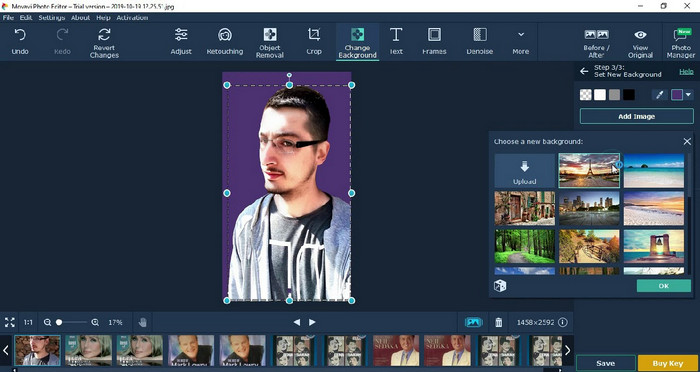
多くのユーザーは、その高い汎用性から、すでにMovavi Photo Editorを試しています。Pixbim と同様に、このソフトも AI のニューラルネットワーク機能を利用して、失われた画素情報を補い、画像のピクセルを復元することができます。このエディターさえあれば、トリミング(切り抜き)、回転、フィルター追加、ピクセル修正など、基本から応用まで幅広い編集を行えます。ただし、これらの機能をすべてフルに使うには、デスクトップ版のプレミアムバージョンを購入する必要があります。
多くの人にとって非常に高価なPixbimとほぼ同じ価格です.しかし、エディターを購入する予算がある場合は、これが必要な場合があります。手順に従って、このアプリで画像のピクセル化を解除する方法を学びます。
ステップ1:Windows または Mac OS にアプリケーションをダウンロードします。
ステップ2:ソフトを起動し、ピクセルを整えたい写真をここにアップロードします。
ステップ3:画像をアップロードしたら、Magic Enhanceをクリックし、AI による自動補正で画像を改善します。
ステップ4:画像を書き出して、仕上がりを確認・お楽しみください。
パート 3. 画像のピクセル化を解除する方法に関する FAQ
エクスポートされたピクセル化されていない画像に透かしがあるのはなぜですか?
アプリケーションの無料試用版を使用している場合、エクスポート時に透かしが残る可能性があります。したがって、透かしなしで画像をエクスポートする場合は、アプリケーションのライセンスを購入するか、FVC Free Image Upscaler を使用できます。これは、エクスポートされた画像に透かしを残さないためです。
ぼやけたとピクセル化されたの違いは何ですか?
多くの記事は、いくつかの要因により、ぼやけたものとピクセル化されたものが同じではないことを証明しています.ぼやけた画像は、高速モーションをキャプチャしたり、ブレたカメラで写真を撮ったりする理由です。ピクセル化されている間にスナップショットを拡大すると、ピクセル化が開始され、小さな正方形のビットマップが表示されます。
画像がピクセル化する要因は何ですか?
いくつかの理由で画像がピクセルに変換されます。一般的な原因は、ラスター イメージを拡大する場合です。 PNG、JPG、GIF などのラスター形式は、これらのコンテナーに格納されているオブジェクトの外観を構築する小さな正方形で構成されています。通常、画像を拡大すると、視覚的に表示されるカラー データを含むピクセルと呼ばれる正方形があることがわかります。特にピクセル化が発生した場合、多くの編集者にとって問題になる可能性があります。
画像のノイズを修正するにはどうすればよいですか?
撮影した画像でよく起こる、もうひとつの一般的な問題が「ノイズ」です。その解決策も本記事内で紹介しています。こちらのリンクをクリックして、簡単に読み進めながら、画像ノイズの除去方法を学び、実際に問題を解決してみてください。
結論
ここまでの手順どおりに行えば、オンラインツールでもダウンロード型の高機能エディターでも、簡単に画像のピクセル化を改善できるようになります。この問題はもう解決可能です。今後もし画像のピクセル化で困った場合は、本記事を頼りにしてください。あなたにとって最適なツール——たとえばFVC Free Image Upscaler——がここで見つかり、すぐに役立てられるはずです。見た目のピクセル化を修正しておけば、誰の目にも粗さが気にならない美しい状態で表示できます。このオンライン画像エディターを使って、ピクセル化とはもうお別れしましょう。
-
 すべての画像を強化および改善するために使用できる 7 つの画像アップスケーラー [2022]
 画像アップスケーラーが必要ですか?幸いなことに、この記事では、デスクトップにアクセスしてダウンロードできる最高のソフトウェアについて説明します.
-
 この2022年に使用する必要がある5つの画像解像度エンハンサー[最新のおすすめ]
 どの画像解像度エンハンサーを使用すればよいかわかりませんか?この記事を読んで、画像の解像度を使用および向上させる 5 つのツールを確認してください。
-
 モバイル デバイスの画像解像度を上げる 4 つのアプリ [最良の選択]
 1080p や 4k などを達成したい場合は、写真の解像度を上げるためのアプリが必要になります。以下のリストを使用すると、簡単に実行できます。