

Photoshop で画像のサイズを変更する 3 つの簡単な方法
Photoshopで画像サイズを変更することは、デジタルメディア、写真、デザインに携わる人にとって基本的なスキルです。強力な画像編集ソフトであるAdobe Photoshopには、画質を損なわずに画像の寸法を変更できるさまざまな方法が用意されています。本包括的ガイドでは、Photoshopで画像サイズを変更する3つの効率的な方法と、一括リサイズのコツを解説します。さらに、代替手段を探している方のために、使いやすいツールを2つ紹介し、それぞれの機能と手順を詳しく説明します。
今すぐビジュアル ジャーニーを最適化し、デジタル環境の可能性を探ってください。

パート 1. Photoshop で画像のサイズを変更するにはどうすればよいですか?
Photoshopで画像のサイズを変更する方法はたくさんあります。画像サイズをピクセル、インチ、パーセンテージで変更することでサイズを変更できます。これら 3 つの方法は実際に画像のサイズを変更できます。ただし、それぞれの方法は、特に必要な品質に対応している必要があります。ただし、Photoshop で画像のサイズを変更する 3 つの方法は次のとおりです。
方法 1: 画像サイズをピクセル単位で変更する
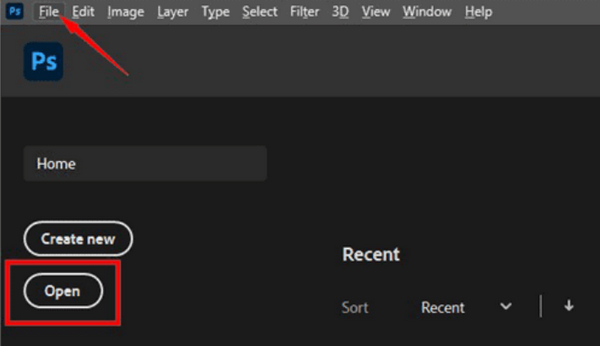
ステップ1. Photoshopで画像を開きます。開くをクリックするか、ファイルメニューから画像を選択します。
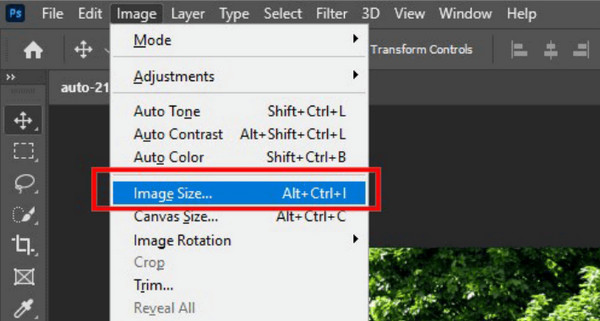
ステップ2. 画面上部のイメージタブに移動し、「画像解像度(Image Size)」を選択します。
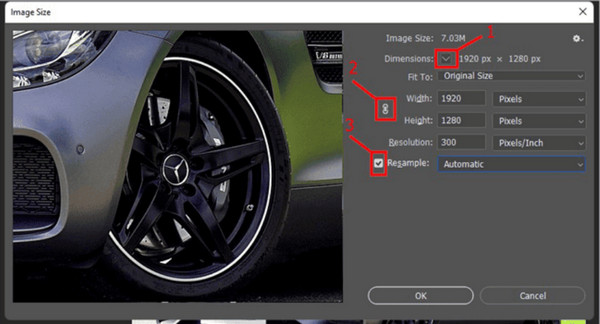
ステップ3. 画像解像度(Image Size)ダイアログボックスで、ドロップダウンメニューからピクセルを選びます。特定のサイズに設定したい場合は、幅と高さのテキストボックスに数値を入力し、OKをクリックして画像をリサイズします。
ステップ4. 最後に、別名で保存ボタンをクリックして、ファイルメニューから最終的な画像を保存します。
Photoshopで画像をシャープにしたい場合は、パーセンテージを高めに調整します。
PSDファイルを保存する際は忘れずにJPEGとして保存してください。
方法 2: 画像サイズをインチ単位で変更する
この 2 番目の方法は方法 1 とまったく同じで、サイズをピクセル単位ではなくインチ単位で変更することだけが必要です。ただし、画像サイズをインチ単位で変更する方法に関するステップバイステップのガイドは次のとおりです。
ステップ1. Photoshopで画像を開きます。開くをクリックするか、ファイルメニューから画像を選択します。
ステップ2. 画面上部のイメージタブに移動し、「画像解像度(Image Size)」を選択します。
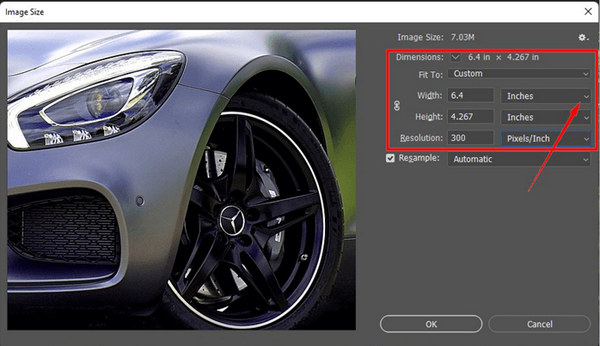
ステップ3. 画像解像度(Image Size)ダイアログボックスで、ドロップダウンメニューからインチを選びます。特定のサイズに設定したい場合は、幅と高さのテキストボックスに数値を入力し、OKをクリックして画像をリサイズします。
ステップ4. 最後に、別名で保存ボタンをクリックして、ファイルメニューから最終的な画像を保存します。
Photoshop で画像のサイズをインチ単位で変更します (方法 1 と同じアプローチに従います。画像の鮮明さと高解像度を確保するために、選択した方法で一貫性を維持することを忘れないでください。ピクセルまたはインチであっても)。この均一性は、プロフェッショナルで一貫性のある画像を実現するための鍵となります。結果。
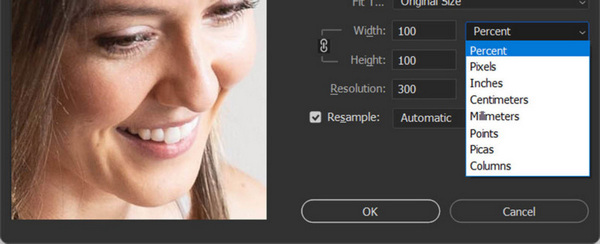
方法 3: 画像サイズをパーセンテージで変更する
この方法はあまり使われません。しかし、パーセンテージで画像サイズを変更する手順自体は、方法1と2と同じで、画像解像度ダイアログボックスで変更するのは、ピクセルやインチではなくパーセンテージを選ぶ点だけです。
画像のサイズを変更する際に使用する方法は、必要な方法に応じて対応する必要があります。変更すると画像の解像度が低下する可能性があります。
Photoshop でバッチ画像のサイズを変更する方法に関するヒント?
実際に、Photoshop で一括画像のサイズを変更するには、方法 1 ~ 3 を実行します。ただし、これを行うにはいくつかのことを行う必要があります。
ヒント1. まず画像をまとめる必要があります。ナビゲーションしやすいように、1つのフォルダーにまとめておきましょう。
ヒント2. 保存してサイズを変更する際は、拡大しない(Don’t Enlarge)にチェックが入っていることを確認してください。
ヒント3. リサイズした画像は、新しい別のフォルダーに保存し、元画像と混ざらないようにしましょう。
そこにいるのです!この投稿で提供されている任意の方法から、Photoshop で画像のサイズを変更する方法のステップバイステップ ガイドに従うことができます。必ずヒントに従ってください。
パート 2. Photoshop [代替] で品質を損なうことなく画像のサイズを変更する方法?
Photoshop で画像のサイズを変更する方法がわからない場合、または画像にアクセスできない場合に使用できる代替ツールがあります。これらのツールはユーザーフレンドリーなインターフェイスと多様な機能を提供し、高度な写真編集ソフトウェアを必要とせずに高品質の結果を達成できます。
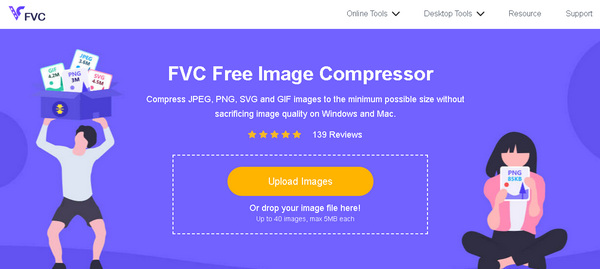
FVCフリーイメージ圧縮
FVC Free Image Compressorは、高速かつユーザーフレンドリーなツールで、画質を損なわずに写真のファイルサイズを小さくすることに特化しています。JPEG、PNG、SVG、GIFなどさまざまな写真形式の圧縮に優れており、他のソフトウェアと比べて高い圧縮率を提供します。
主な機能:
◆ 複数の画像フォーマットを圧縮します。
◆ バッチ画像圧縮。
◆ ファイルをドラッグ アンド ドロップします。
クイックガイド:
ステップ1. 公式サイトへアクセスします。
ステップ2. Upload Imagesをクリックして、圧縮したい写真を読み込みます。
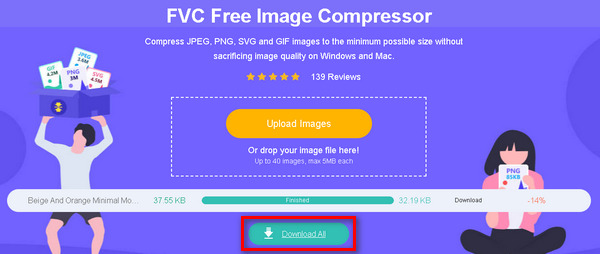
ステップ3. 圧縮処理が終わるまで待ちます。完了すると、処理が終了したことを示すステータスバーと、圧縮前後のファイルサイズ情報が表示されます。Downloadをクリックして画像を保存します。
画像のサイズを小さくしたい場合、FVC Free Image Compressor を使用することは、Photoshop の最良の代替手段の 1 つです。使いやすいだけでなく、お客様のニーズに合った最高の品質を保証します。
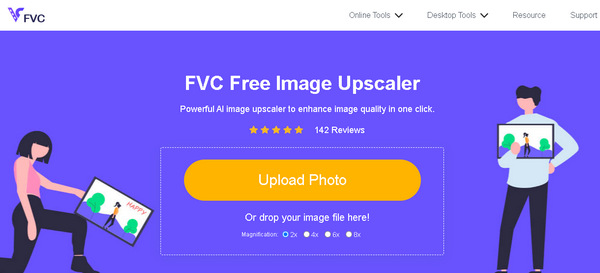
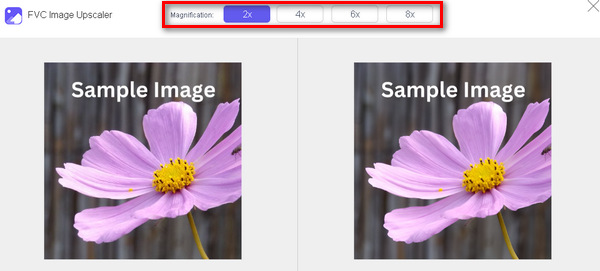
FVC無料画像アップスケーラー
FVC Free Image Upscalerは、AIスーパー解像技術を活用した高性能な画像強化ツールです。このアップスケーラーは、ぼやけた部分を自動的に認識し、失われたピクセルや色、テクスチャ、細部を効果的に補完・強調する精密な調整を行います。特に、ポートレートの特徴を正確に判別して自然に復元できる点が特長で、画像の高解像度化と品質向上において高度な性能を発揮します。
主な機能:
◆ 画像を最大8倍まで高画質に拡大します。
◆ プレビュー効果。
◆複数のフォーマットに対応。
◆ 画像を自動的に補正する AI の統合。
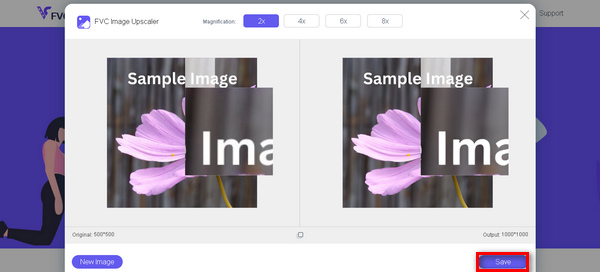
クイックガイド:
ステップ1. 公式サイトにアクセスします。
ステップ2. Upload Photoをクリックし、アップスケールしたい画像を選択します。
ステップ3. ツール上で画像がプレビュー表示されます。Magnifierオプションを使って、画像の品質を確認できます。
ステップ4. Saveをクリックして画像をダウンロードします。
FVC Free Image Upscaler は、画像のアップスケーリングに関してはトップクラスです。また、このツールにより、ユーザーは画像を簡単に強化できるようになりました。複雑なインターフェースはなく、迅速かつ高品質な結果が得られます。
パート 3. Photoshop で画像のサイズを変更する方法に関する FAQ
Photoshop で画像のサイズを変更し、比率を維持するにはどうすればよいですか?
Photoshop でサイズを変更するときに比率を維持するには、アスペクト比の制限オプションが有効になっていることを確認してください。これは通常、幅と高さをリンクするチェーン アイコンによって表されます。そうすることで、一方の寸法を調整すると、もう一方の寸法も自動的に比例して拡大縮小されます。
Photoshop では画像のサイズを変更できますか?
はい。 Photoshop を使用すると、画像のサイズを簡単に変更できます。 [画像] メニューの [画像サイズ] オプションにアクセスして、好みに応じて寸法を調整できます。
Photoshop で画像のサイズを変更するショートカットは何ですか?
Photoshopでサイズ変更を行う際によく使われるショートカットは2つあります。画像解像度(Image Size)ダイアログを開くAlt + Ctrl + I(PC)またはOption + Command + I(Mac)、そしてフリートランスフォームを有効にして手動でサイズ変更できるCtrl + T(PC)またはCommand + T(Mac)です。
Photoshop で画像をリサンプリングすると品質は損なわれますか?
Photoshopでの再サンプリングは、適切に行えば必ずしも画質を損なうわけではありません。リサイズ時に「再サンプル」が選択され、適切に設定されていれば、画質を保つためにピクセル数を調整します。ただし、過度な拡大を行うと細部の損失が発生する場合があります。また、フォトピクセルエンハンサーソフトを使って画像の画質をアップスケールすることもできます。
Photoshop で一括画像のサイズを一度に変更できますか?
はい、Photoshop にはバッチ処理機能が備わっています。画像プロセッサを利用するか、複数の画像を同時にサイズ変更するアクションを作成します。これによりプロセスが合理化され、イメージのバッチ全体で一貫性が確保されます。
結論
現在ではオンラインのAIツールでできることが非常に増えています。そのため、画像リサイズを求めている人、とくにPhotoshopを使ってはいるものの、その機能を十分に活用できていない人にとっては、Photoshopで画像サイズを変更する方法を身につけておくことが重要です。もしPhotoshopを使っておらず、操作が難しそうだと感じるなら、2つの代替ツールを使って画像サイズを変更したり、アップスケールしたりすることもできます。技術の進化に合わせて、その可能性を活用し、デジタル環境を自信と効率性をもって渡り歩きましょう。今こそ、手元のツールを最大限に活かす時です。
-
 2つの異なる方法でIllustratorで画像のサイズを変更する方法
 Illustrator で画像のサイズを変更する最適な方法を学びます。まず、PC に Adobe Illustrator アプリをダウンロードして開き、次の簡単な手順に従います。
-
 FastStone Photo Resizer – 画像のサイズを変更するための強力なアプリ
 FastStone Photo Resizer は、画像のサイズを変更するための優れたアプリです。この投稿をクリックして、FastStone Photo Resizer とツールの最良の代替手段の詳細を確認してください。
-
 Photoshop で画像を切り出すためのステップバイステップガイド
 Photoshop を使用していますか?この記事はあなたのためのものかもしれません。 Photoshop で画像を素早く簡単に切り抜く方法を学びましょう。今すぐ読んで何かを発見してください。