


GIF スプリッター: アニメーション画像を分割およびカスタマイズするためのトップ ツール
GIF の特定の部分を使用したいのに、アニメーション全体で行き詰まってしまったことがあるとしたら、それはあなただけではありません。 GIF は短い時間で感情や反応を伝える能力があることで人気がありますが、メッセージを伝えるためにその一部だけが必要な場合もあります。ここで、GIF ファイルの分割の重要性が発揮されます。
GIF分割ツールを使えば、必要な部分だけを簡単に切り出して、プロジェクトやSNS投稿に利用できます。この記事では、現在市場で利用できる代表的なGIF分割ツールをいくつか紹介します。

パート 1. GIF を分割する簡単な方法
1.FVCビデオコンバーターアルティメット
GIFのごく一部だけをトリミングしたい場合は、FVC Video Converter Ultimateを使うことができます。これは、多彩な機能を備えた動画変換・編集ソフトです。さらに、このツールは幅広い動画形式に対応しており、解像度・ビットレート・フレームレートなどの動画設定も調整できます。GIFファイルを分割する専用機能はありませんが、動画トリマー機能を使うことで同様の作業が可能です。
FVC Video Converter Ultimate は、GIF ファイルを分割するためのシンプルで簡単な方法を探している人にとって価値のあるツールです。直感的なインターフェイスと使いやすいビデオ トリミング機能により、GIF をわずかに編集するだけでよいユーザーに便利なソリューションを提供します。さらに、バッチ処理や GPU アクセラレーションなどのさまざまな機能が付属しており、包括的なビデオ変換および編集ツールとなっています。 GIF をオフラインで分割する方法を知りたい場合は、次の手順に従います。
ステップ1. ソフトを入手する
まずは、以下の無料ダウンロードボタンのリンクから1つ選んでクリックします。その後は画面上の指示に従って、お使いのデバイスにプログラムをインストールしてください。セットアップが完了したら、アプリを起動してメインメニューに入ります。
無料ダウンロードWindows 7 以降対応安全なダウンロード
無料ダウンロードMacOS 10.7 以降に対応安全なダウンロード
ステップ2. GIF画像ファイルを追加する
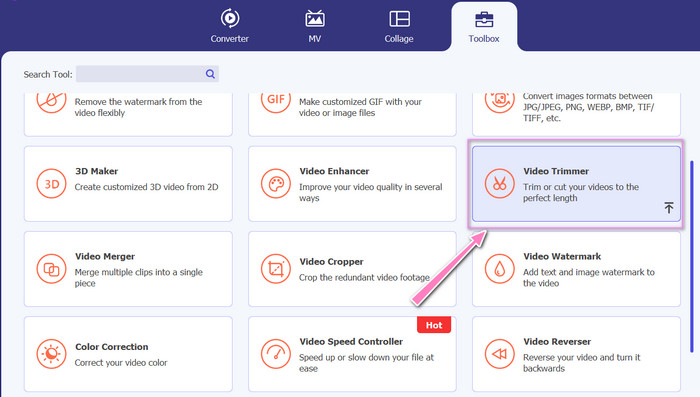
ツールボックスメニューから動画トリマーツールを選択します。選択したら、+ボタンをクリックしてGIFを読み込みます。
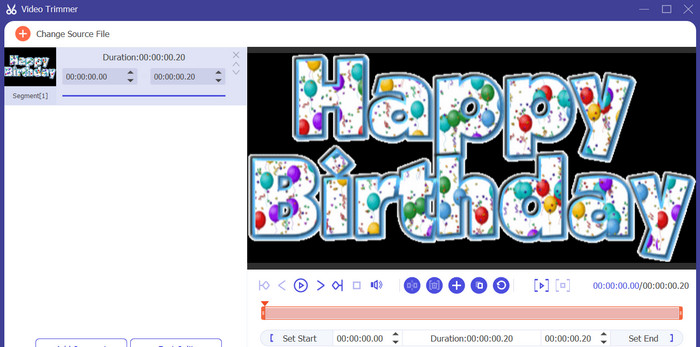
ステップ3. GIFファイルを分割する
GIF がアップロードされると、プログラムのインターフェースに表示され、変更を加えることができます。スライダーを使用して、削除する GIF の開始点と終了点を選択します。
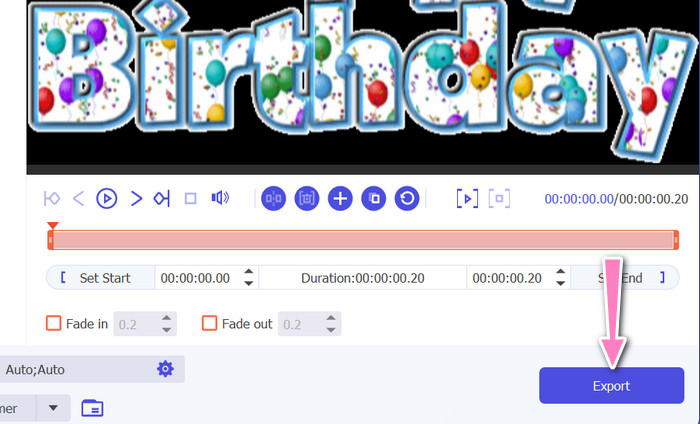
ステップ4. 作成したGIFを保存する
GIFのカスタマイズが完了したら、ツール右下の書き出しボタンをクリックしてレンダリング処理を開始します。
2.EZGIF
EZGIFは、GIFファイルを扱うためのさまざまな機能を備えたオンラインツールです。サイト上では、GIFリサイズ、トリミング、分割など、GIFの作成・編集・最適化のための各種ツールが提供されています。さらにテキストや特殊効果をGIFに追加できるほか、動画や画像をGIF形式に変換することも可能です。そのため、オンラインでGIFをフレームごとに分割したい場合に最適な選択肢です。加えて、EZGIFはダウンロードやインストールが不要な使いやすいプラットフォームであり、任意のWebブラウザから手軽に利用できます。以下の手順を参考に、このツールの使い方を確認してGIFを画像に分割してみましょう。
ステップ1. Ezgifを使ってGIFを分割するには、まずWebブラウザでEZGIFのサイトを開きます。
ステップ2. 画面上部のメニューからSplit(分割)オプションを選択し、必要に応じて設定を調整します。
ステップ3. ファイルを選択ボタンをクリックして、分割したいGIFファイルをアップロードします。あるいは、ファイルをEZGIFの画面上にドラッグ&ドロップすることもできます。
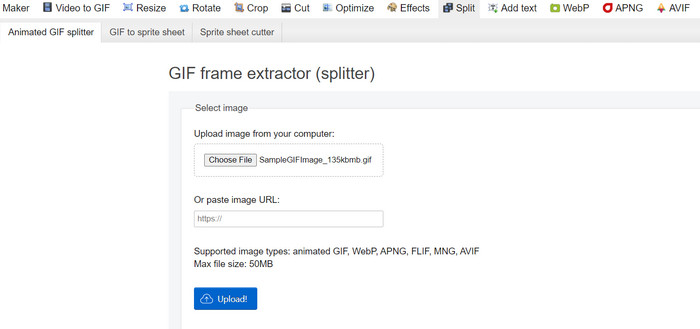
ステップ4. 次に、使用したい分割方法を選びます。指定したフレーム数ごと、指定時間ごと、または保持したいフレームを選択して分割することができます。
ステップ5. 選択した分割方法に応じて設定を調整します。そのうえで、Split to framesボタンをクリックして分割処理を開始します。また、必要に応じてGIFをPNGやJPGに分割出力するオプションも利用できます。

パート 2. GIF ファイルを分割するプロフェッショナルな方法
Photoshopを使えば、GIFをフレームごとに分割することができます。PhotoshopはアニメーションGIFを扱う際に高い柔軟性とコントロールを提供します。PhotoshopではGIFファイルを開き、アニメーションの各フレームを個別に編集できるため、フレームごとに調整を行ったり、フィルターを追加したりできます。これにより、複雑なアニメーションを作成したり、テキストやグラフィックを追加したり、各フレームの表示タイミングを調整して、滑らかで洗練されたアニメーションに仕上げることが可能です。Photoshopで利用できるGIF編集の詳細については、以下の手順を確認してください。
ステップ1. Photoshopを起動し、ファイル > 開くから対象のGIFファイルを選択して開きます。
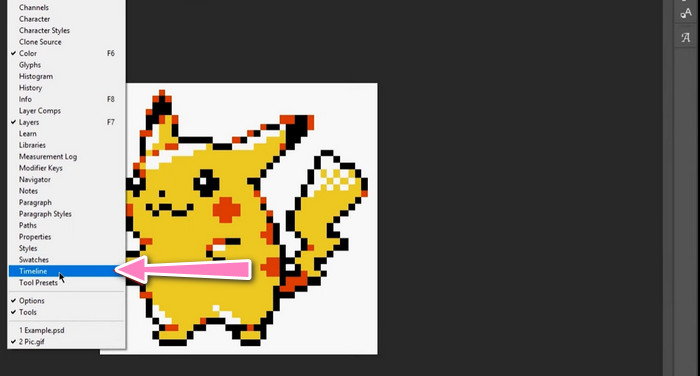
ステップ2. ファイルを開いたら、ウィンドウ > タイムラインを選択してタイムラインパネルを表示します。
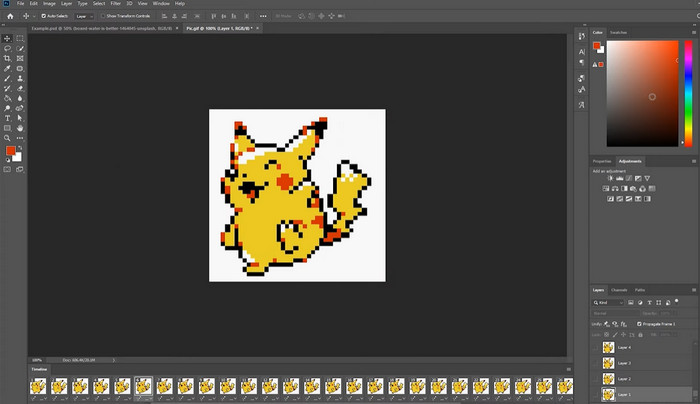
ステップ3. タイムラインパネルには、アニメーションの各フレームが個別のレイヤーとして表示されているはずです。もしタイムラインパネルが表示されない場合は、パネル右上のメニューボタンをクリックし、フレームアニメーションを作成を選択します。
ステップ4. GIFを分割するには、タイムラインパネルのメニューボタンをクリックし、レイヤーからフレームを作成を選択します。これにより、アニメーション内の各レイヤーから個別のフレームが作成されます。
ステップ5. その後、タイムラインパネルで任意のフレームを選択し、必要な編集を行うことで、各フレームを個別に編集できます。
ステップ6. 最後に、ファイル > 書き出し > レイヤーをファイルへを選択して、各フレームを個別のファイルとして書き出します。書き出しダイアログで希望のファイル形式と保存先フォルダを指定し、実行をクリックして書き出しを行います。
パート 3. GIF の分割に関する FAQ
GIF を特定のセクションまたは時間間隔に分割できますか?
はい、オンライン ツールまたは画像編集ソフトウェアを使用して、GIF を特定のセクションまたは時間間隔に分割できます。
ビデオ編集ソフトウェアを使用して GIF を分割できますか?
はい、多くのビデオ編集ソフトウェア アプリケーションを使用して GIF を分割できます。たとえば、FVC Video Converter Ultimate、Adobe Premiere Pro、および Final Cut Pro X が一般的なオプションです。
GIF の個々のフレームのタイミングを調整するにはどうすればよいですか?
オンライン ツールまたは Photoshop などの画像編集ソフトウェアを使用して、GIF の個々のフレームのタイミングを調整できます。
結論
GIFファイルを分割する作業は、新しいアニメーションを作成したり、既存のものを編集したり、特定のフレームや一部分だけを共有したりする際に役立ちます。オンラインツールを使うにせよ、Photoshopのような画像編集ソフトを使うにせよ、GIFを分割する方法はいくつも存在します。本記事で紹介した手順に従い、さまざまなツールを試してみることで、GIFを簡単に分割し、新たなアニメーションを作り出すことができるでしょう。
-
 動画を効果的に分割する優れた方法
 この記事では、動画をパーツに分割する方法について説明します。したがって、興味がある場合は、この投稿をクリックしてください。最も簡単な方法を試すことができます。
-
 画像から GIF を作成する 4 つの方法を学ぶ [オンライン & オフライン]
 画像の編集からGIFを作成する方法を知りたいですか?次に、このリンクをクリックして、次の例を読んでください。
-
 オンラインおよびオフラインでGIFに透かしを追加する最も簡単な3つの方法
 適切なツールを正しく使用すれば、GIFに透かしを追加するのは1-2-3と同じくらい簡単です。市場に出回っているツールは広すぎますが、信頼できる3つのツールを紹介します。