


GIMPを使用して画像のサイズを変更する方法に関する完全なプロセス
画像の編集に関しては、画像のサイズ変更は不可欠です。場合によっては、好みのサイズになるように画像の高さと幅を変更する必要があります。また、画像のサイズを縮小したり、品質を向上させたりするために、他の写真編集者によって画像のサイズ変更が行われます。幸いなことに、画像のサイズを変更できるアプリケーションを見つけました。
GIMP はオンラインで利用できる画像編集ソフトウェアで、画像の編集が行えます。さらに GIMP では、画像の高さや幅を変更して、画像の画質を向上させることもできます。したがって、GIMP で画像サイズを変更したい場合は、今すぐこの記事をチェックしてください。

パート 1. GIMP を使用して画像のサイズを変更する方法
GIMP は、グラフィック デザイナーが優れた出力を作成できるグラフィック操作アプリケーション プラットフォームです。ユーザーは、デザイン要素、スクリプト化された画像、アイコンなどを作成できます。さらに、Windows、Mac、Linux など、ほぼすべてのメディア プラットフォームで使用できる無料のオープン ソース アプリケーションです。多くの人が、Adobe Photoshop の代替を探すときにこのアプリケーションを推奨しています。
また、Photoshop よりも簡単なインターフェイスを備えているにもかかわらず、GIMP を使用するのにまだ苦労している人もいます。 GIMP のさらに興味深い点は、画像のピクセルを編集できることです。また、最適な画像サイズ変更ツールを探している場合は、GIMP を優先することをお勧めします。
このパートでは、GIMP を使用して画像のサイズ変更 (寸法とサイズ) を行う 2 つの方法を紹介します。
GIMP を使用して画像のサイズを変更する方法
ステップ1. まず、お使いのデバイスに GIMP アプリケーションをダウンロードしてインストールします。インストールが完了したら、アプリを起動します。その後、GIMP で編集したい画像を開きます。
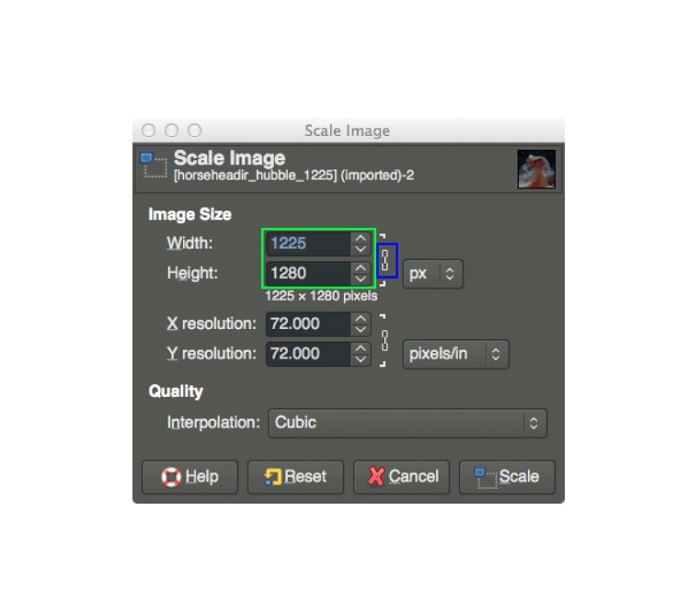
GIMP で画像を開くと、画像全体が画像キャンバスに収まるように画像がズームされることに注意してください。ウィンドウの右上隅に画像の現在のサイズが表示されます。
ステップ2. 画像のサイズ(縦横)を変更するには、メニューの 画像(Image) に進み、画像の拡大・縮小(Scale Image)ダイアログ を選択します。Scale Image ダイアログで、画像の 幅(Width)と高さ(Height) を変更できます。希望するサイズを入力して次のステップに進みます。高さと幅の項目の横には チェーン(鎖) のアイコンがあり、これは高さと幅が互いに連動していることを示しています。高さを変更すると、幅も自動的にそれに合わせて変更されるという意味です。
ステップ3. 画像のサイズ変更が完了したら、画像を書き出します。画像を書き出すには、ファイル(File) > 書き出し(Export) を選択します。新しいファイル名で書き出したい場合は、ファイル(File) > 上書きエクスポート(Overwrite) を選び、ファイル名を入力します。
GIMP を使用して、品質 (ファイル サイズ) を損なうことなく画像のサイズを変更する方法:
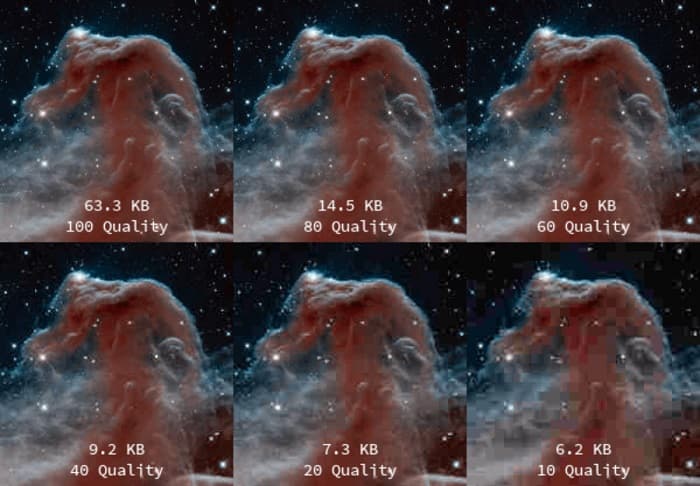
このチュートリアルでは、JPEG 画像を使用します。これは、このタイプの形式が非可逆圧縮であるためです。つまり、この画像のサイズを圧縮すると、その品質がいくらか犠牲になります。しかし、GIMP を使用すると、品質に影響を与えずに画像のサイズを変更できます。
ステップ1. 先ほどと同じ画像を使って、幅を 200px にリサイズし、JPEG の圧縮率を変えながらファイルを書き出していきます。下の例からわかるように、画質設定を 80 にした場合、100 のときよりファイルサイズは小さくなりますが、画質はほとんど同じです。
ステップ2. 画像のサイズ変更が終わったら、出力をエクスポートします。ファイル(File) ボタンをクリックし、書き出し(Export) を選択します。
ステップ3. 画像の書き出し(Export Image) タブで、画像の新しい名前を入力します。出力の保存形式が気になる場合でも、GIMP は自動的に元のファイル形式で書き出します。この例では、出力形式は引き続き .jpg であることがわかります。

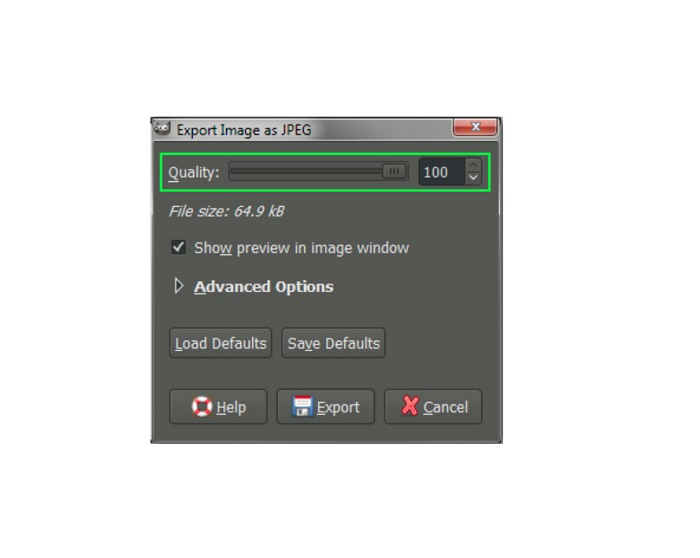
ステップ4. 書き出し(Export) ボタンをクリックすると、JPEG として画像を書き出し(Export Image as JPEG) タブが表示され、ここで書き出す画像の画質を変更できます。画像ウィンドウでプレビューを表示したい場合は、「Show preview in image window」にチェックを入れることで、仕上がりを確認できます。また、ファイルサイズ(File size) の情報も表示されるため、最終的な画像のファイルサイズを把握できます。
ステップ5. 最後に、書き出し(Export) ボタンをクリックして画像をエクスポートし、デバイスに保存します。
以上が、GIMP を使用して画像のサイズとファイル サイズを変更する方法です。画像の回転、写真の反転、画像のトリミングなど、画像をさらに編集できます。画像のサイズを変更したり、写真の品質を向上させるオプションが必要な場合は、次の部分をお読みください。
パート 2. GIMP の代替
GIMP は、多くの専門家が使用する最も標準的な写真編集アプリケーションの 1 つです。ただし、一部のユーザーは、このソフトウェアを使用して画像のサイズ変更などの写真を編集するのが困難です。また、より簡単なアプリケーションを使用したいユーザーの中にいる場合は、ソリューションがあります。
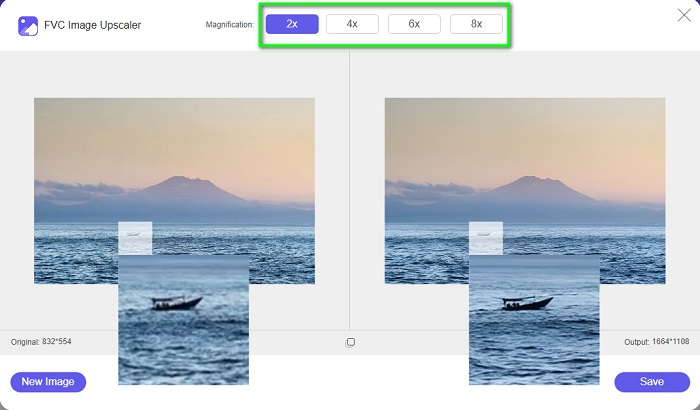
FVC Free Image Upscaler は、シンプルなユーザーインターフェースを備えた無料のオンラインアプリで、画像の画質を向上させるための最適なアップスケーリングツールを探している初心者にも使いやすいツールです。AI アップスケーリング技術を採用しており、画像のぼやけた部分を自動検出して鮮明にします。さらに、最大 8 倍まで拡大して画質を向上させることができます。JPEG、JPG、PNG、BMP など、一般的な画像形式にも対応しています。ほかの編集アプリとは異なり、FVC Free Image Upscaler は画質を落とさずに画像サイズを変更できます。そのため、このツールで画像のサイズ変更と画質の向上を行いたい場合は、以下の簡単な手順に従ってください。
GIMP の代替品の品質を落とさずに画像のサイズを変更する方法:
ステップ1. Web ブラウザーを開き、検索ボックスで FVC Free Image Upscaler を検索します。リンクをクリックして直接メインページへアクセスすることもできます。ソフトウェアのメインインターフェースが表示されたら、写真をアップロード(Upload Photo) ボタンをクリックしてアプリを起動します。
ステップ2. メインインターフェースの 写真をアップロード(Upload Photo) ボタンをクリックし、サイズ変更/アップスケールしたい写真を追加します。
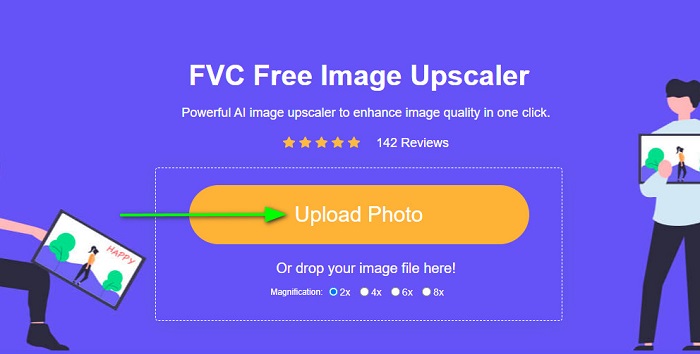
ステップ3. ファイルをアップロードしたら、拡大倍率のプリセットから選択します。2x、4x、6x、8x の中から選べます。その後、画像の上でカーソルをスライドさせると、出力結果のプレビューを確認できます。
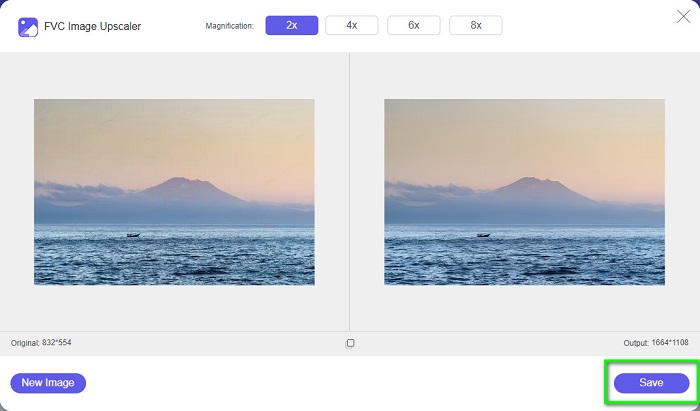
ステップ4. 最後に、インターフェース右下の 保存(Save) ボタンをクリックして、出力ファイルをデバイスに保存します。
関連記事:
Web 用に画像を最適化する方法:おすすめソリューション解説【短時間で完了】
画質を落とさずにTwitter用の画像サイズを変更する3つの方法
パート 3. GIMP を使用して画像のサイズを変更する方法に関する FAQ
GIMP にはオンライン版がありますか?
はい、そうです。 GIMP は単なるオフラインの写真編集アプリケーションではありません。オンライン版もあります。ただし、GIMPオンラインには、デスクトップ版のGIMPのようなすべての機能が含まれているわけではありません.
GIMP は最高のフリー Photoshop ですか?
GIMP は Photoshop に匹敵するものではありません。 Photoshop は今でもデスクトップ向けの最も優れた写真編集ソフトウェアです。それでも、GIMP は Adobe Photoshop の最良の代替手段の 1 つです。
GIMP は PNG ファイルをサポートしていますか?
はい。 GIMP を使用すると、出力を JPEG、JPG、PNG、およびその他の形式で保存できます。
結論
以上が、GIMP で画像サイズを変更する 手順です。GIMP はインターフェースがやや複雑ですが、本記事で紹介した手順に従えば、画像の縦横サイズやファイルサイズを変更できます。一方で、画像の画質を向上させながらサイズ変更できる無料のオンラインリサイズツールを使いたい場合は、FVC Free Image Upscaler を利用してみてください。
-
 Web とオフラインで画像をリサイズする 6 つの方法 [100% の動作]
 ここに追加したチュートリアルを使用すると、好みのサイズに基づいて画像のサイズを簡単に変更できるようになりました。ここでその方法を学びましょう!
-
 2022年に知っておくべき事実のPicResizeレビュー
 PicResize が画像編集に最適なオプションであるかどうかを知りたいですか?この記事を読んで、ツール全体を確認してください。
-
 Waifu2x とその代替品について知っておくべきことすべて
 Waifu2x についてもっと知りたいですか?この記事では、このアプリとその代替で強調する必要がある情報を提供します。