

Scopri tutto il potenziale di Final Cut Pro nella realizzazione di video al rallentatore
Final Cut Pro è un potente strumento di montaggio video per la post‑produzione, disponibile solo per utenti Mac. Con questo programma è possibile effettuare montaggio video e audio, color correction avanzata, inserimento di sottotitoli e molto altro. Come altri software di editing e distribuzione, Final Cut Pro include tutto ciò di cui hai bisogno dall’inizio alla fine. Questo software è inoltre eccellente per creare video al rallentatore, grazie a uno dei suoi strumenti che consente di regolare la velocità di riproduzione del video. Per ottenere l’effetto slow motion che desideri, continua a leggere per scoprire tutti i dettagli su come creare video al rallentatore con Final Cut Pro. Continua a leggere per ulteriori informazioni.

Parte 1. Come realizzare video al rallentatore su Final Cut Pro?
Se utilizzato in video o film, il rallentatore può aiutare ad attirare l'attenzione su un'azione particolare o aumentare l'impatto drammatico o emotivo dell'opera in questione. Ridurre la velocità di una clip sembra interessante, indipendentemente dall'uso che ne farai. Ti mostreremo come creare effetti al rallentatore di Final Cut Pro in pochi semplici passaggi. Procediamoci, vero?
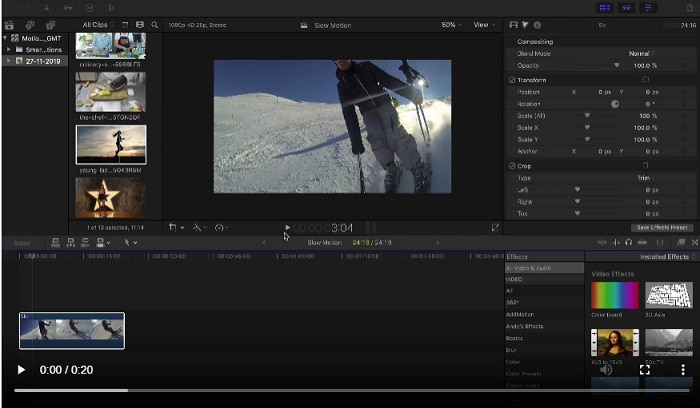
Passaggio 1. Nella Timeline, trova e fai clic sulla clip che vuoi modificare.
Passaggio 2. Per accedere al menu Retime, fai clic sull’icona Speed Meter nella finestra di anteprima oppure premi Command + R sulla tastiera.
Passaggio 3. Seleziona uno dei due livelli di velocità: Slow e Fast. In alternativa, premi Command + R sulla tastiera per far apparire un menu a discesa sopra la tua clip.
Passaggio 4. Modificare il timing della clip è semplice quanto regolare le percentuali di velocità presenti sotto ciascuna opzione. Se aumenti la velocità, la clip verrà accorciata; se la riduci, verrà allungata. La durata della clip cambierà in base alla velocità impostata.
Parte 2. Opzioni eccellenti da utilizzare per creare slow motion su Windows
Metodo 1. Usa Video Converter Ultimate
Se ipotizziamo che Final Cut Pro sia un software molto difficile da usare per creare un video al rallentatore, allora ti consigliamo di utilizzare Video Converter Ultimate. Questo software si può scaricare gratuitamente ed è disponibile sia per Windows che per Mac, quindi non devi preoccuparti del download. Dispone di diversi strumenti che possono modificare il tuo video proprio come fa Final Cut Pro.
Tra questi strumenti è presente un Controllo velocità video che consente di creare video al rallentatore regolando la velocità di riproduzione di un video a velocità normale. A differenza di Final Cut Pro, questo software è facile da usare e non richiede molto tempo per imparare a utilizzare ogni strumento. Inoltre, supporta vari formati video, così non dovrai faticare per trovare il software migliore per il formato video che devi convertire. Ora che hai un’idea di quanto sia valido Video Converter Ultimate, vediamo le procedure per creare uno slow motion con questo software.
Passaggio 1. Prima di poterlo utilizzare, devi prima scaricare e installare il software. Per farlo, ti basta fare clic sul pulsante Download gratuito che si trova qui sotto. Scaricalo sul desktop e avvia l’installazione facendo clic sul pulsante Avvia ora.
Download gratuitoPer Windows 7 o versioni successiveDownload sicuro
Download gratuitoPer MacOS 10.7 o versioni successiveDownload sicuro
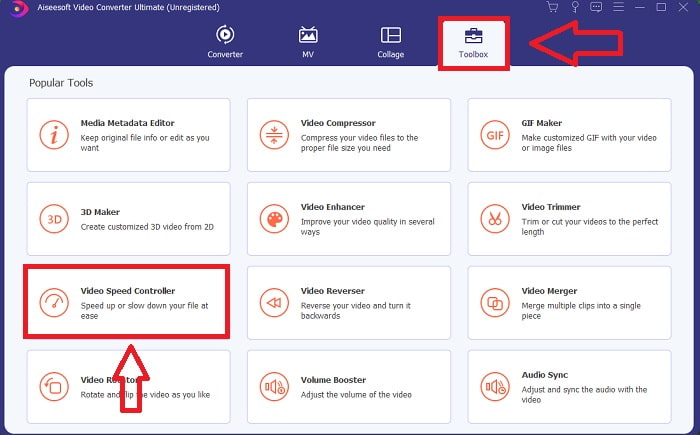
Passaggio 2. Una volta installato il programma, potrai vedere il menu iniziale sull’interfaccia principale del software. Facendo clic sulla scheda Toolbox nella barra dei menu, puoi visualizzare in modo rapido e semplice tutti gli strumenti principali offerti da questo software. Se vuoi rallentare il tuo video o modificarne la velocità, scegli Controllo velocità video dall’elenco degli strumenti disponibili.
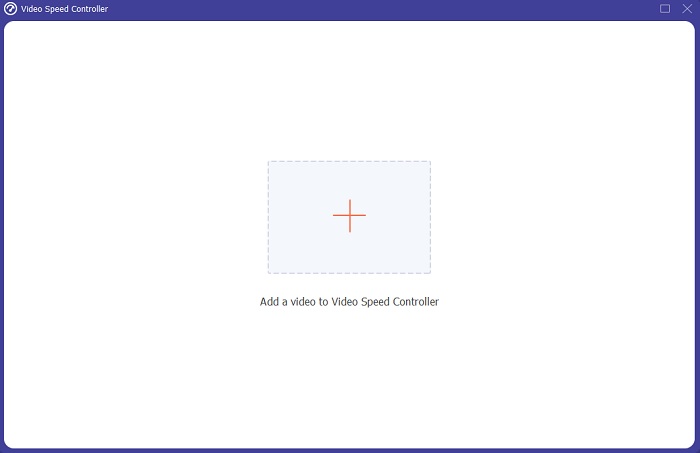
Passaggio 3. Se decidi di procedere, sullo schermo del computer si aprirà un’altra finestra. Puoi iniziare a caricare il tuo video e a modificarne la velocità di riproduzione selezionando il simbolo più +.
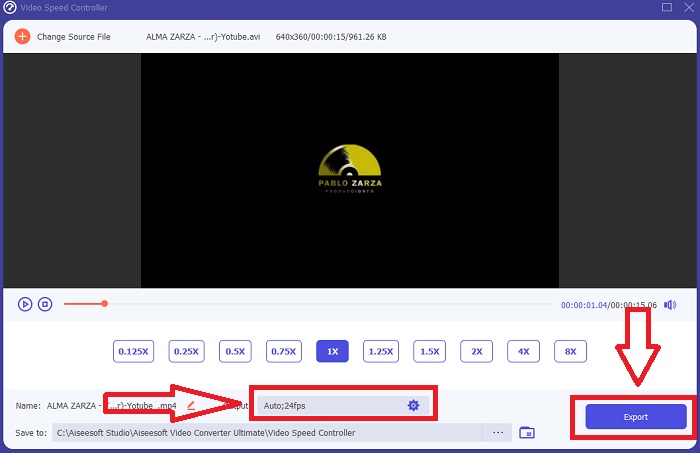
Passaggio 4. A differenza di Final Cut Pro, puoi trasformare un video a velocità normale in slow motion con un solo clic. Per creare un video al rallentatore con questo strumento, devi ora ridurre la velocità di riproduzione del tuo video facendo clic su tutti i valori inferiori a 1; questi valori interi fungeranno da moltiplicatore del livello con cui andrai a ridurre il frame rate del video.
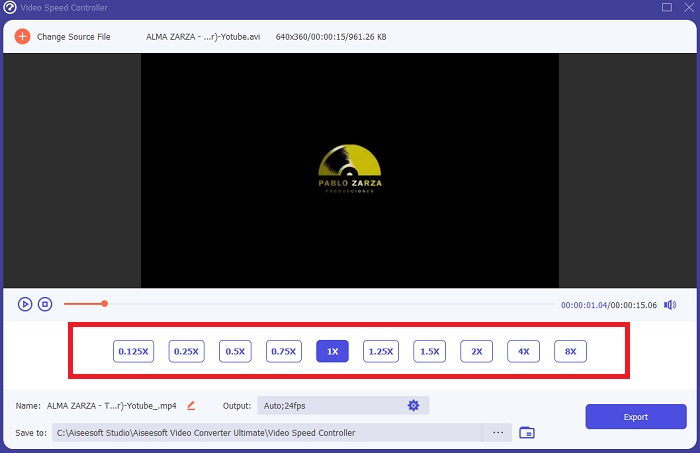
Passaggio 5. Se sei soddisfatto della velocità complessiva, puoi perfezionare la qualità del video regolando formato, risoluzione, frame rate e altri parametri. Inoltre, avrai la possibilità di rinominare il file video in uscita, se lo desideri. Puoi salvare il tuo lavoro selezionando Esporta dal menu File e scegliendo una posizione nel file system del tuo computer.
Metodo 2. Usa il movimento 5
Motion è un potente strumento di grafica animata progettato per gli editor video che semplifica la creazione di titoli cinematografici 2D e 3D, transizioni fluide ed effetti realistici in tempo reale. Motion è progettato per gli editor video. Motion è anche un'altra alternativa a Final Cut Pro nella realizzazione di video al rallentatore poiché è disponibile anche su Mac. Con i suoi utili strumenti, ora puoi realizzare facilmente video al rallentatore. Per saperne di più su come eseguire il rallentatore utilizzando Motion 5, ecco i passaggi forniti.
Passaggio 1. Apri Motion 5 e trascina il file video nella Timeline.
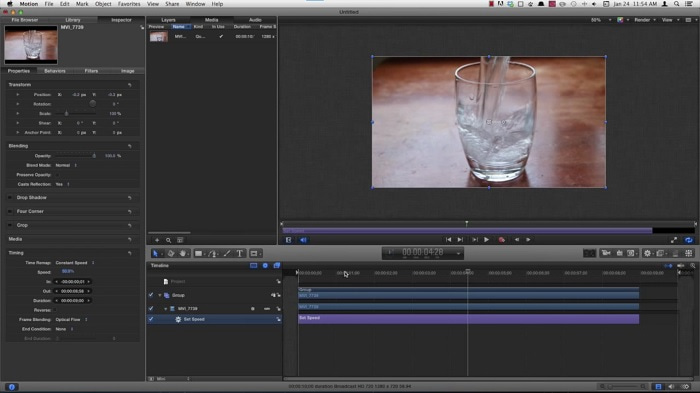
Passaggio 2. Seleziona la clip video e trova l’icona a forma di ingranaggio tra gli strumenti di modifica sopra la traccia video. Quindi fai clic su Retiming e procedi con Set Speed.
Passaggio 3. Dopo aver proceduto, nell’angolo sinistro dell’interfaccia fai clic su Properties e trova la finestra Inspector. Vedrai le impostazioni di Retiming in basso. Imposta la velocità al di sotto di 100 per ottenere l’effetto slow motion. Per fare in modo che il tuo video al rallentatore venga riprodotto in modo fluido, fai clic su Frame Blending e scegli Optical Flow.
Correlato:
Miglior strumento per cambiare la velocità delle GIF
Parte 3. Domande frequenti su Final Cut Pro
Come equalizzare l'audio in Final Cut Pro?
Seleziona il video nella timeline in Final Cut Pro. Seleziona un'impostazione di equalizzazione diversa dal menu a comparsa Equalizzazione nella sezione Miglioramenti audio di Impostazioni audio. Scegli l'opzione Flat se vuoi rimuovere tutti gli equalizzatori.
Come si stabilizzano i video in Final Cut Pro?
È possibile accedere a "Impostazioni video" selezionando una clip nella timeline in Final Cut Pro e facendo clic sul pulsante "Impostazioni". Alterna tra stabilizzazione e tapparella selezionando la casella appropriata. Puoi utilizzare la funzione di stabilizzazione di Final Cut Pro selezionando la casella e Final Cut Pro cercherà il miglior metodo di stabilizzazione in base alla sua analisi.
Come bilanciare l'audio sinistro e destro in Final Cut Pro?
Seleziona Stereo sinistra/destra dal menu a comparsa Modalità nella sezione Pan dell'ispettore Audio. Uno dei seguenti farà sì che il suono si sposti a sinistra oa destra: Pan Amount è dove metti i tuoi soldi. Assicurati solo di non superarlo.
Conclusione
In conclusione, Final Cut Pro è il miglior software disponibile su Mac. Dispone di diversi strumenti che possono rendere il processo di post‑produzione davvero straordinario. Ma essendo disponibile solo su Mac, come puoi creare video al rallentatore se usi Windows? Video Converter Ultimate è la risposta al tuo problema: tutti i dettagli su questo software sono già stati forniti sopra, così come quanto sia valido nel trasformare i tuoi video in slow motion.
-
 3 modi per velocizzare i video su iPhone [Dimostrato]
 Hai problemi a regolare la velocità di riproduzione del tuo video perché stai usando un iPhone? Questo è un ottimo articolo per aiutarti con il tuo problema.
-
 Come rallentare un video: suggerimenti perfetti [Desktop/Cellulare]
 Sei stanco di cercare i migliori strumenti che aiutano a rallentare un video online? Leggi questo particolare articolo per farti illuminare con le informazioni elencate di seguito.
-
 Windows Media Player | Scopri come velocizzare i video [Comprovato]
 Vuoi rallentare il tuo video clip usando Windows Media Player, ma hai problemi con come farlo? Questo articolo è ideale per la lettura e può illuminare il tuo punto di vista su come velocizzare i video utilizzando Windows Media Player.