

Adobe Premiere: esplora il concetto di rallentatore
Il concetto di rallentatore diventa naturale in ogni video non tanto per la riduzione della velocità in sé, quanto per l’obiettivo di mettere in evidenza i dettagli essenziali. È più appagante e rassicurante conoscere tutti i particolari su come qualcosa accadrà o su come è stata realizzata. Con l’aiuto di Adobe Premiere potrai farti un’idea di come modificare e creare effetti di rallentatore, ma per ogni principiante sarà piuttosto impegnativo. Continua a leggere per conoscere tutti i dettagli relativi ad Adobe Premiere.

Parte 1. Come produrre video al rallentatore in Adobe Premiere
Un software di montaggio video come Adobe Premiere Pro è ampiamente utilizzato sia sui computer Mac OS che su quelli Windows. Con Premiere Pro CS6 o versioni successive è possibile montare video, spot pubblicitari, altri filmati, progetti per la televisione e video online. Si tratta di un’applicazione di montaggio video ricca di funzionalità, disponibile anche come parte della suite Adobe Creative Cloud. Premiere Pro viene spesso usato insieme ad altri software come After Effects e Photoshop nei progetti creativi. Adobe Premiere è noto anche per le notevoli migliorie che permette di apportare alle scene, in particolare nella regolazione della velocità di riproduzione di un video. Consente di realizzare ottimi video in rallentatore in diversi modi possibili, producendo risultati di grande qualità. Ma, come detto nell’introduzione, prodotti Adobe come Adobe Premiere possono risultare software complessi per creare video in slow motion, soprattutto per i montatori alle prime armi. Di seguito sono riportate alcune esercitazioni di esempio sulla procedura per realizzare video al rallentatore con questo software.
Passaggio 1: Apri Adobe Premiere, poi fai clic su Import media to start nell’angolo in basso a sinistra dell’interfaccia per trasferire i file video dal computer al software, oppure trascinali semplicemente. In alternativa, puoi individuare la scheda del menu File in alto a sinistra e scegliere Import.
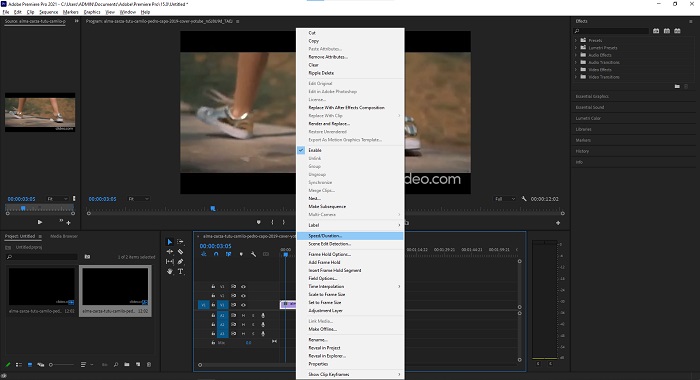
Passaggio 2: Fai doppio clic sui file importati oppure trascinali sulla traccia video. Per regolare la velocità del file video, fai clic con il tasto destro sul file nella traccia video. Individua Speed/Duration e fai clic. Successivamente, imposta il rallentatore diminuendo la percentuale della velocità normale, che è 100.
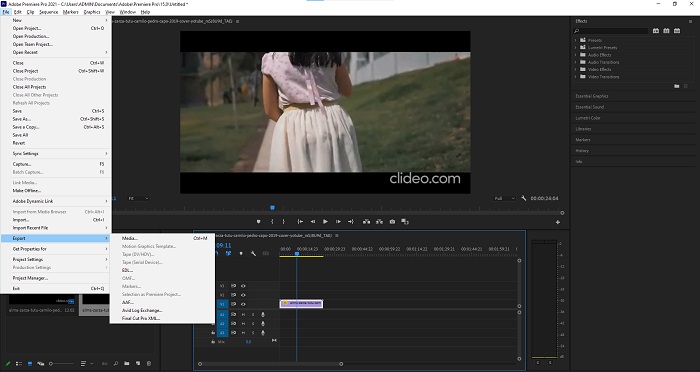
Passaggio 3: Salva il video convertito andando sulla scheda del menu File in alto a sinistra. Poi fai clic su Export e scegli il tipo di file in cui vuoi convertire il tuo video.
Parte 2. Come realizzare video al rallentatore offline utilizzando Video Converter Ultimate
A differenza di Adobe Premiere Pro, che è così complicato da usare a causa dei numerosi strumenti che risultano poco familiari a ogni utente principiante, Video Converter Ultimate è il miglior software facile da usare a disposizione di tutti e offre strumenti incredibili per montare i video. Uno dei suoi strumenti principali, Video Speed Controller, ha la capacità di creare video in rallentatore con un’eccellente qualità in meno di un minuto di tempo di conversione. Per poter fare esperienza con il software più utile in grado di risolvere il tuo problema, ecco i passaggi che devi seguire:
Passaggio 1: Puoi scaricare Video Converter Ultimate facendo clic sul pulsante Free Download. Una volta completato il download, individua il file sul desktop e avvialo.
Download gratuitoPer Windows 7 o versioni successiveDownload sicuro
Download gratuitoPer MacOS 10.7 o versioni successiveDownload sicuro
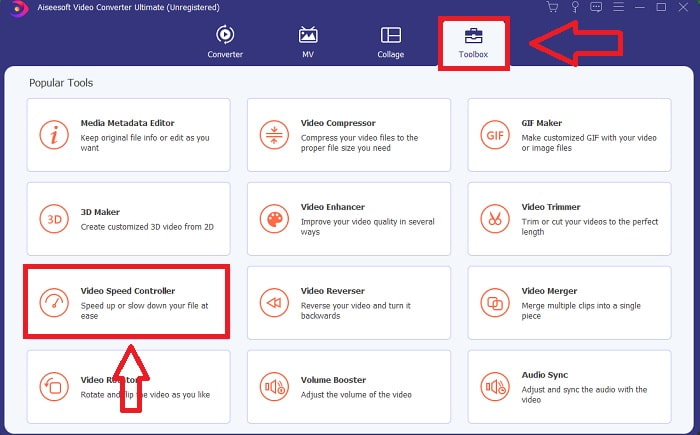
Passaggio 2: Dopo aver installato il software sul desktop del tuo computer, eseguilo. Quando lo avvii per la prima volta, apparirà l’interfaccia del programma. Scegli Video Speed Controller nella scheda Toolbox.
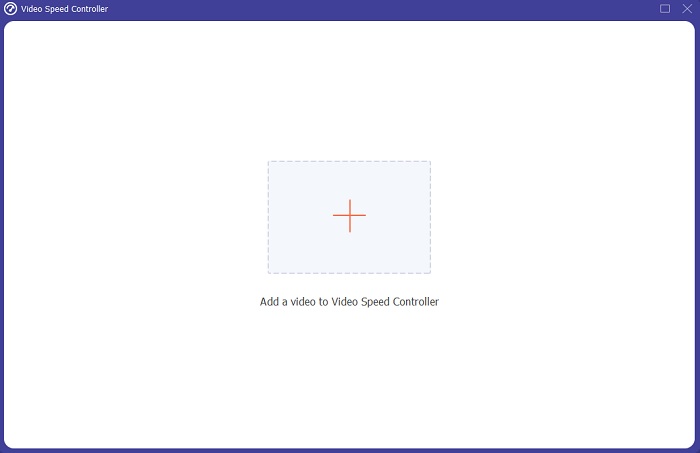
Passaggio 3: Per modificare la velocità di riproduzione della tua clip video, trascina semplicemente il file o fai clic sul pulsante + per aggiungerlo dal tuo computer.
Passaggio 4: Seleziona i tipi di velocità che userai per modificare la velocità di riproduzione della tua clip video o per creare un video in slow motion a partire da un video a velocità normale, per iniziare a modificare la velocità di riproduzione della tua clip.

Passaggio 5: Quando hai terminato di regolare la velocità di riproduzione del video, il file è pronto per il caricamento; prima però puoi valutare di modificare la qualità dell’output regolando la risoluzione, il frame rate, ecc. Fai clic su Export se il file è configurato come desideri.

Correlato:
Parte 3. Come realizzare video al rallentatore online utilizzando Kapwing
Accelera o rallenta rapidamente i video con questo acceleratore video online gratuito. Non hai bisogno di grande esperienza nel montaggio video per creare coinvolgenti video in slo-mo, time-lapse e velocità elevata da pubblicare su YouTube o condividere sui social media. Carica un video o inserisci un URL per iniziare. Oltre ad AVI e MP4, Kapwing supporta anche i formati video MP4, MOV e 3PG. Per i video in rallentatore è disponibile una velocità minima di 0,25x; la velocità massima è 4x. Mettiti comodo e rilassati mentre leggi la procedura su come usare questo strumento online.
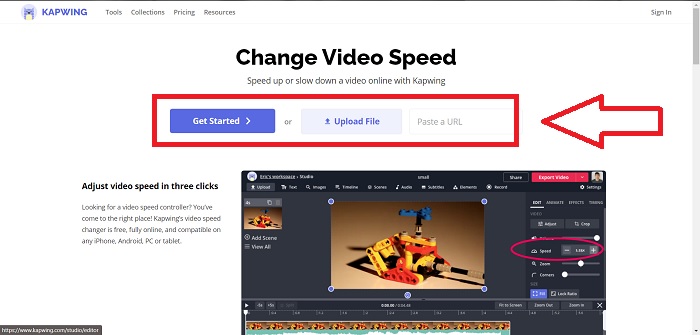
Passaggio 1. Apri un qualsiasi browser online e cerca Kapwing. Nell’interfaccia puoi iniziare facendo clic su Get Started. Oppure puoi procedere selezionando la tua clip video facendo clic su Upload File. C’è anche un’altra opzione che ti permette di inserire link video da altri siti web e procedere poi con il montaggio.
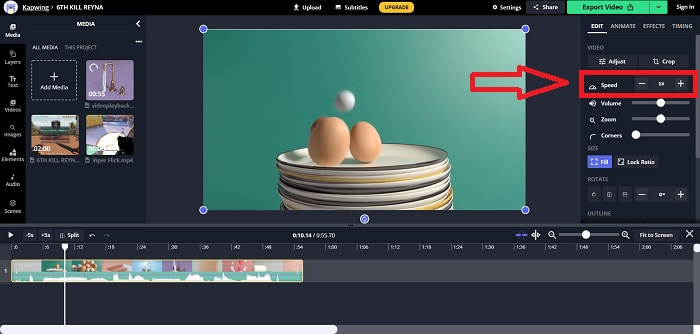
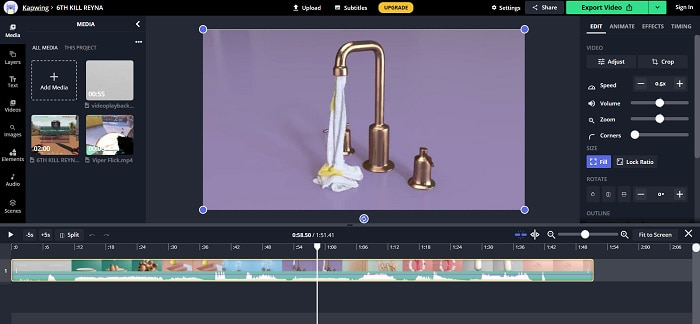
Passaggio 2. Fai clic sul video nella traccia video, vai alla scheda di modifica Speed e imposta il rallentatore facendo clic sul segno -. La velocità del video verrà ridotta di 0,25.
Passaggio 3. Per caricare il video convertito, fai clic su Export Video e trasferiscilo nella cartella desiderata sul tuo computer.
Parte 4. Domande frequenti sulla realizzazione di video al rallentatore in Adobe Premiere
Quali formati sono supportati da Adobe Premiere Pro?
Con Adobe Premiere Pro puoi lavorare con un'ampia gamma di formati video come MP4, AVCHD/H.264/H.265, MPEG-1 e MPEG-2, MOV, FLV e AVI.
60fps va bene per il rallentatore?
Un fattore importante che influenza l'aspetto generale di un video è la frequenza dei fotogrammi, che ha anche un impatto sulla realisticità del video. Questa idea ha una forte connessione con il modo in cui percepiamo naturalmente l'universo. La creazione di video al rallentatore o la registrazione di filmati di videogiochi richiede frame rate superiori a 30 fps. Con l'avanzare della tecnologia, più smartphone sono ora in grado di registrare video a 60 fotogrammi al secondo.
Cosa fare se Adobe Premiere Pro non funziona?
Le preferenze di Premiere Pro possono essere reimpostate sui valori predefiniti per correggere gli arresti anomali, che Adobe consiglia frequentemente. Le tue preferenze vengono "cancellate" quando lo fai. Ciò ripristinerà le impostazioni alle impostazioni di fabbrica originali. Puoi farlo tenendo premuto il tasto Alt durante l'avvio di Premiere Pro.
Conclusione
Tutto sommato, apprendiamo che non importa quanto sia buono Adobe Premiere Pro, non può essere il software consigliato da utilizzare per alcuni utenti che non hanno esperienza di editing. Ti consigliamo di utilizzare Video Converter Ultimate per i suoi strumenti di funzionalità accessibili che possono tagliare, tagliare, inserire filtri, unire, ecc. Uno dei suoi utili strumenti disponibili nel Video Speed Controller è che può realizzare video al rallentatore o regolare la velocità di riproduzione di il video. Gli strumenti online potrebbero essere una piattaforma più facile da usare rispetto ad Adobe Premiere Pro. Tuttavia, non può produrre un output di qualità migliore rispetto a Video Converter Ultimate.
-
 6 migliori fusioni AVI: come unire file video AVI su Windows e Mac
 Quando si desidera unire video AVI per un DVD, è possibile conoscere le funzionalità dei 6 migliori joiner AVI tra cui strumenti online gratuiti e programmi desktop dall'articolo.
-
 [Guida] 2 metodi definitivi per partecipare ai video MXF di Sony X70
 Se hai preso alcuni video MXF da Sony X70, quali sono i metodi migliori per unire file MXF? Ecco i 2 metodi efficienti per combinare i video con l'alta qualità.
-
 Come tagliare e unire brani online - 4 modi migliori che dovresti sapere
 Quando vuoi tagliare e unire brani online per creare un brano musicale, puoi saperne di più sui 4 migliori strumenti online per ritagliare i brani e combinare i file dall'articolo.