


I 3 migliori metodi per ritagliare gli screenshot su Mac nel 2025
Se ti stai chiedendo o stai cercando modi per ritagliare screenshot su Mac con facilità, niente paura! Sappiamo che a volte modificare le immagini degli screenshot, ad esempio ritagliandole, richiede tempo, il che non è l’ideale quando vuoi essere efficiente in ciò che stai facendo. Per questo, questo articolo ti aiuterà a modificare le immagini dei tuoi screenshot su Mac senza sforzo, assicurandoti di poter ritagliare rapidamente ed efficacemente i tuoi screenshot alla perfezione. Dì addio ai metodi di ritaglio noiosi e dai il benvenuto a flussi di lavoro più snelli con questi metodi facili da seguire.

Parte 1. Come acquisire e ritagliare uno screenshot direttamente sul Mac con Screen Recorder
Usare uno strumento di registrazione dello schermo per ritagliare le immagini degli screenshot su Mac è facile e conveniente per diversi motivi. In primo luogo, gli strumenti di registrazione dello schermo sono spesso dotati di interfacce intuitive e controlli semplici, rendendo il processo di ritaglio semplice anche per i principianti. In secondo luogo, questi strumenti offrono solitamente una gamma di funzionalità di modifica, tra cui il ritaglio, il ridimensionamento e l'aggiunta di annotazioni, consentendo agli utenti di personalizzare facilmente i propri screenshot. Inoltre, gli strumenti di registrazione dello schermo consentono agli utenti di acquisire screenshot direttamente dalle registrazioni dello schermo, risparmiando tempo ed eliminando la necessità di strumenti di screenshot separati.
Uno degli strumenti che gli utenti Mac possono utilizzare per ritagliare le immagini degli screenshot è FVC Screen Recorder. Questo strumento rende il ridimensionamento degli screenshot un gioco da ragazzi. Gli utenti possono facilmente catturare qualsiasi parte dello schermo e rifilare lo screenshot alle dimensioni desiderate con pochi clic. Inoltre, questo screen recorder offre funzionalità di modifica aggiuntive, come l’aggiunta di testo, frecce e forme per arricchire ulteriormente lo screenshot.
Per utilizzare questo strumento, attenersi alla seguente procedura:
Passaggio 1. Per prima cosa, scarica e installa Aiseesoft Screen Recorder.
Download gratuitoPer Windows 7 o versioni successiveDownload sicuro
Download gratuitoPer macOS 10.7 o versioni successiveDownload sicuro
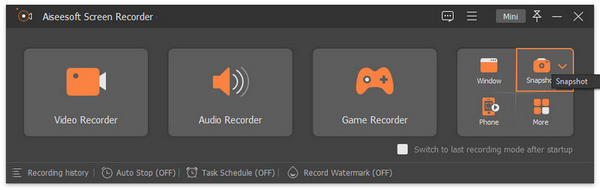
Passaggio 2. Dopo il download, avvia lo strumento e fai clic sul pulsante Snapshot nell’angolo destro. Quindi seleziona Screen Capture.
Passaggio 3. Ora trascina il cursore per selezionare l’area dello schermo del tuo Mac che vuoi catturare.
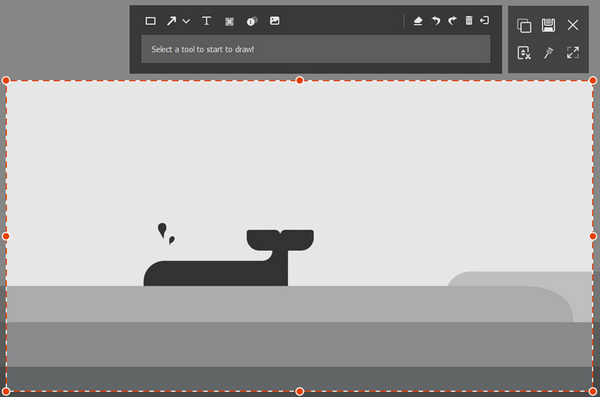
Passaggio 4. Personalizza le dimensioni del ritaglio. Inoltre, puoi aggiungere testo, disegnare e altro ancora.
Passaggio 5. Una volta terminato, fai clic sul pulsante Save.
L'uso di FVC Screen Recorder può infatti aiutare gli utenti a ritagliare facilmente le immagini degli screenshot su Mac. Oltre a questo, possono anche usufruire di molte funzionalità di questo strumento.
Parte 2. Come ritagliare uno screenshot su Mac con uno strumento integrato
Un altro modo per ritagliare uno screenshot su Mac è utilizzare il suo strumento integrato. Per fare ciò, seguire i passaggi seguenti:
Passaggio 1. Per catturare lo schermo del tuo Mac, premi semplicemente Shift + Command + 3 sulla tastiera, e verrà effettuato uno screenshot dell’intero schermo.
Passaggio 2. Una volta che l’immagine è stata salvata sul dispositivo, vai all’app Foto per trovare lo screenshot.
Passaggio 3. Fai doppio clic sullo screenshot che desideri ritagliare, quindi fai clic sul pulsante Modifica.
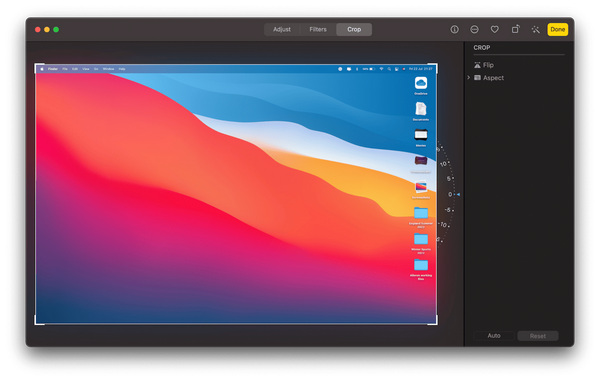
Passaggio 4. Nella barra degli strumenti in alto, seleziona l’opzione Ritaglia e regola la selezione per ritagliare lo screenshot del Mac come desideri.
Passaggio 5. Infine, fai clic sul pulsante Fine per salvare lo screenshot ritagliato sul Mac.
L'utilizzo dello strumento integrato sul tuo Mac garantisce un modo rapido ed efficiente per ritagliare gli screenshot mantenendo la sicurezza e la compatibilità del tuo sistema.
Parte 3. Come ritagliare uno screenshot su Mac con anteprima
Usare Anteprima per ritagliare screenshot su Mac è anche una delle cose migliori che puoi fare perché è già incluso in macOS, rendendolo comodo e compatibile con il tuo sistema. Inoltre, l'anteprima è intuitiva e diretta, consentendo a chiunque di ritagliare rapidamente gli screenshot. Offre inoltre strumenti di modifica aggiuntivi e supporta vari formati di immagine, fornendo versatilità e flessibilità nella modifica e nel salvataggio degli screenshot ritagliati.
Passaggio 1. Inizia facendo clic sull’immagine dello screenshot che desideri visualizzare per aprirla con lo strumento Anteprima.
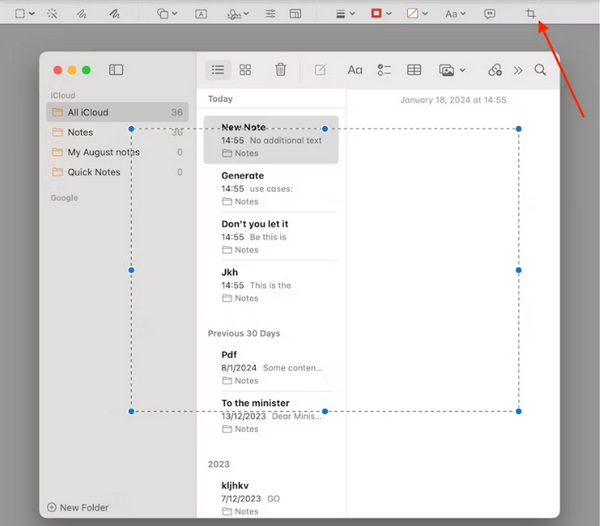
Passaggio 2. Nella finestra di Anteprima, fai clic e trascina sull’immagine per scegliere la parte o l’area che vuoi mantenere, escludendo le zone indesiderate.
Passaggio 3. Dopo aver selezionato la porzione desiderata, apri il menu Strumenti e scegli Ritaglia.
Passaggio 4. Assicurati di salvare l’immagine ritagliata prima di chiudere la finestra di Anteprima, così da conservare le modifiche.
Usare Anteprima per ritagliare screenshot su Mac è davvero uno strumento indispensabile per gli utenti Mac grazie alla sua accessibilità, facilità d'uso, versatilità e compatibilità con i sistemi macOS.
Parte 4. Confronto tra i 3 metodi
Diamo ora uno sguardo più da vicino ai pro e ai contro di questi tre metodi per ritagliare gli screenshot su Mac.
| Metodo | Professionisti | Contro |
| Metodo 1: ritagliare uno screenshot direttamente sul Mac con un registratore dello schermo? | • Ha un'interfaccia intuitiva e controlli semplici per semplificare il ritaglio. • Offre una gamma di funzionalità di modifica, inclusi ritaglio e annotazioni. | • Richiede il download e l'installazione di software aggiuntivo. |
| Metodo 2: ritagliare uno screenshot su Mac con funzionalità integrate | • Non è necessaria alcuna installazione aggiuntiva di software di terze parti, poiché è già integrato in macOS. • Veloce ed efficiente per ritagliare gli screenshot. | • Funzionalità di modifica limitate rispetto a strumenti di terze parti come Aiseesoft Screen Recorder. • Potrebbe non avere opzioni di personalizzazione avanzate. |
| Metodo 3: ritagliare uno screenshot su Mac con un'anteprima | • Incluso in macOS, rendendolo comodo e compatibile con il sistema. • Interfaccia intuitiva con strumenti di modifica aggiuntivi e supporto per vari formati. | • Limitato alle funzioni di modifica di base. • Potrebbe non offrire tante funzionalità quanto gli strumenti di registrazione dello schermo dedicati come Aiseesoft Screen Recorder. |
Ogni metodo per ritagliare gli screenshot su Mac presenta una serie di vantaggi e svantaggi. Sebbene l'utilizzo di uno strumento di registrazione dello schermo offra controlli intuitivi e funzionalità di modifica avanzate, richiede il download di software aggiuntivo. D'altra parte, l'utilizzo dello strumento integrato è rapido e conveniente ma potrebbe non disporre di opzioni di personalizzazione avanzate. L'anteprima, inclusa in macOS, fornisce funzioni di modifica di base facili da usare, ma potrebbe non offrire tante funzionalità quanto gli strumenti di registrazione dello schermo dedicati.
Parte 5. Domande frequenti sul ritaglio di uno screenshot su Mac
Come si fa uno screenshot di un'area specifica su un Mac?
Per acquisire uno screenshot di un'area specifica su un Mac, premi Maiusc + Comando + 4 sulla tastiera. Il cursore si trasformerà in un mirino. Fai clic e trascina per selezionare l'area di cui desideri acquisire lo screenshot. Infine, rilascia il pulsante del mouse per acquisire lo screenshot.
Come si modifica uno screenshot su un Macbook?
Puoi modificare uno screenshot su un Macbook utilizzando l'app Anteprima integrata o un software di modifica di terze parti. In Anteprima, apri lo screenshot e fai clic sul pulsante Modifica per accedere a strumenti di modifica come ritaglio, annotazione e ridimensionamento. In alternativa, puoi utilizzare software di editing di terze parti come Aiseesoft Screen Recorder per funzionalità di editing più avanzate.
Posso aggiungere annotazioni a uno screenshot su un Mac?
Sì, puoi aggiungere annotazioni a uno screenshot su un Mac utilizzando vari strumenti. In Anteprima, puoi utilizzare la barra degli strumenti Modifica per aggiungere testo, forme, frecce ed evidenziazioni allo screenshot. Inoltre, gli strumenti di registrazione dello schermo di terze parti come Aiseesoft Screen Recorder spesso sono dotati di funzionalità di annotazione per un'ulteriore personalizzazione dei tuoi screenshot.
Conclusione
In conclusione, imparare a ritagliare screenshot su Mac non deve essere un compito difficile. Con i tre metodi illustrati in questa guida, hai a disposizione opzioni che si adattano a preferenze ed esigenze diverse. Che tu scelga di usare uno strumento di registrazione dello schermo come Aiseesoft Screen Recorder per funzioni di modifica avanzate, lo strumento integrato per un ritaglio rapido e pratico, oppure Anteprima per la sua semplicità e accessibilità, puoi ottenere facilmente il risultato desiderato. Seguendo le istruzioni passo dopo passo fornite e comprendendo pro e contro di ciascun metodo, potrai ritagliare i tuoi screenshot in modo efficiente e con risultati perfetti. Dì addio ai metodi di ritaglio noiosi e dai il benvenuto a flussi di lavoro più snelli con questi metodi facili da seguire. Sperimenta i vari metodi per trovare quello che si adatta meglio al tuo modo di lavorare e inizia a ritagliare senza sforzo i tuoi screenshot sul Mac già da oggi.
-
 Come eseguire screenshot in Windows Media Player in modo efficiente
 Scopri i metodi più semplici per acquisire screenshot in Windows Media Player senza sforzo. Migliora la tua esperienza di acquisizione dello schermo con la nostra guida completa.
-
 Come fare screenshot su Samsung S23 sul palmo della tua mano
 Tutte le cose che devi sapere su come acquisire screenshot su Samsung S23, massimizzando le funzionalità del dispositivo di punta per un'esperienza di acquisizione dello schermo senza interruzioni.
-
 Come eseguire screenshot sul laptop Toshiba senza sforzo e gratuitamente
 Scopri i tre semplici modi per acquisire uno screenshot su un laptop Toshiba e acquisire gratuitamente tutti i tuoi contenuti preferiti sul tuo laptop Toshiba.