


Una recensione completa per te: Google Drive comprime le foto?
Alcuni siti web impongono restrizioni sulla larghezza e l'altezza delle immagini inserite. Pertanto, è inevitabile che si verifichi la necessità di ingrandire o ridurre le dimensioni di un'immagine. Quando si tratta di lavorare con le immagini, la prima cosa che viene in mente è Photoshop, il programma per eccellenza del settore, noto per le sue numerose funzionalità. Per i professionisti, Photoshop è senza dubbio la scelta ideale per il ridimensionamento delle immagini. Ma se sei un principiante, potresti non trovare le funzioni adatte.
Non ti preoccupare; ti abbiamo coperto con la nostra guida più dettagliata su come ridurre un’immagine in Photoshop. Se hai un compito più urgente, prendi in considerazione un altro strumento di fotoritocco che abbiamo consigliato in questo articolo.
Parte 1. Come ridimensionare un'immagine in Photoshop
Vediamo innanzitutto cosa è possibile fare per modificare le dimensioni di un'immagine utilizzando Photoshop.
Tieni presente che i passaggi per modificare e ridurre le dimensioni di un'immagine potrebbero essere leggermente diversi. Per questo motivo, divideremo la guida passo passo in due parti. Nella prossima sezione troverai linee guida specifiche per ridurre le dimensioni delle immagini.
Passaggio 1. Apri Photoshop, poi vai su File > Apri per selezionare l’immagine che vuoi ridimensionare.
Passaggio 2. Vai su Immagine > Dimensione immagine.
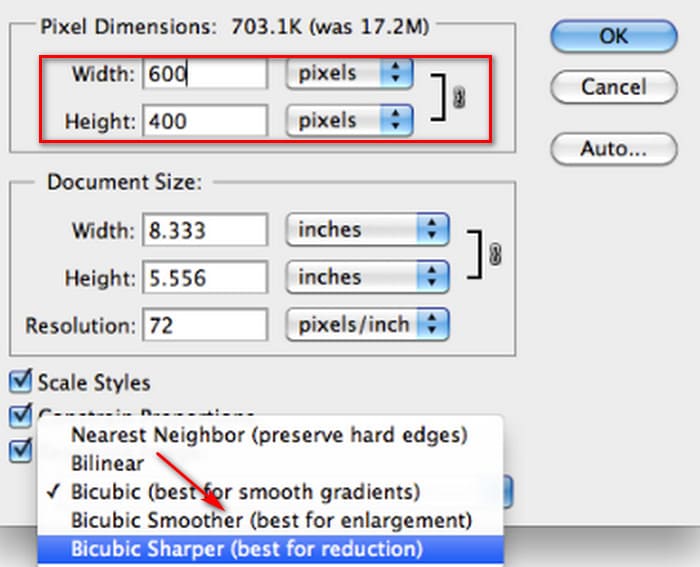
Passaggio 3. Inserisci le dimensioni in pixel, le dimensioni del documento o la risoluzione desiderate nella finestra di dialogo Dimensione immagine.
Passaggio 4. Scegli un Metodo di ricampionamento prima di confermare.
Bicubica: Ideale per le sfumature morbide; calcola i valori medi dei pixel per una maggiore precisione.
Bicubica più morbida: Migliore per ingrandire le immagini, soprattutto quelle con rumore, ottenendo un aspetto più morbido.
Passaggio 5. Fai clic su OK per applicare le modifiche.

Hai modificato correttamente la larghezza e l'altezza dell'immagine. Tuttavia, tieni presente che questa operazione potrebbe anche aumentare le dimensioni del file immagine. Pertanto, pur conoscendo le proporzioni, assicurati di verificare che le dimensioni del file immagine corrispondano ai requisiti della tua piattaforma.
Parte 2. Come rimpicciolire un'immagine in Photoshop
In questa sezione ci concentreremo su come ridurre le dimensioni di un'immagine in Photoshop.
Passaggio 1. Avvia Photoshop e vai su File > Apri per scegliere l’immagine che vuoi modificare.
Passaggio 2. Vai su Immagine > Dimensione immagine. Questo aprirà la finestra di dialogo Dimensione immagine.
Passaggio 3. Inserisci i nuovi valori per le dimensioni in pixel, le dimensioni del documento o la risoluzione in base alle tue esigenze.
Passaggio 4. Scegli un Metodo di ricampionamento.
Bicubica: Ideale per le sfumature morbide; utilizza i pixel circostanti per generare risultati precisi.
Bicubica più nitida: Consigliata per ridurre le dimensioni dell’immagine mantenendo dettagli nitidi. Se l’immagine diventa eccessivamente nitida, torna a Bicubica.
Passaggio 5. Fai clic su OK per applicare le modifiche e ridimensionare l’immagine.
Ora hai ridotto con successo le dimensioni dell'immagine originale. Tuttavia, come nel caso della prima parte, noterai anche una significativa modifica nelle dimensioni del file immagine dopo aver completato l'operazione, dovuta principalmente alla riduzione della compressione.
Va notato che la qualità dell’immagine potrebbe essersi deteriorata. Se ritieni che la perdita sia eccessiva per una visione gradevole, puoi correggerla nuovamente usando il miglioratore di immagini.
Parte 3. Come ridimensionare in batch le immagini in Photoshop
Ridimensionare un'immagine con Photoshop richiede diversi passaggi. Quando si hanno molte immagini da elaborare, trascinarle una alla volta in Photoshop per modificarle è molto dispendioso in termini di tempo e fatica. Fortunatamente, esiste un altro modo per ridurre le dimensioni delle immagini in batch.
Ecco come ridurre in batch le dimensioni di un'immagine in Photoshop.
Passaggio 1. Per prima cosa, inserisci tutte le foto che vuoi comprimere in blocco in un’unica cartella.
Passaggio 2. Avvia Photoshop, vai al menu File, seleziona Script, quindi scegli Elaboratore immagini.
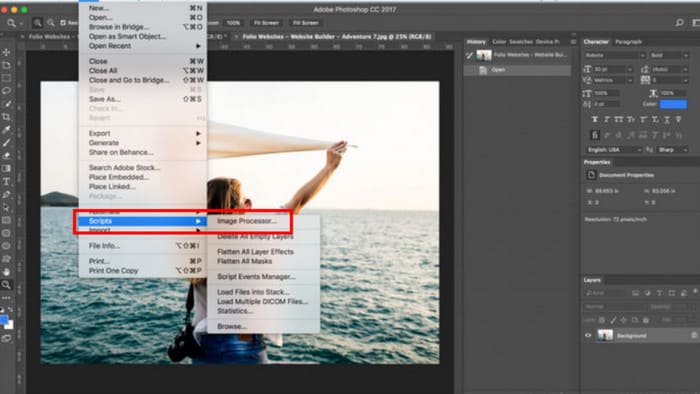
Passaggio 3. Fai clic su Seleziona cartella sotto Seleziona le immagini da elaborare e importa le foto che desideri comprimere.

Passaggio 4. Photoshop creerà automaticamente una nuova cartella all’interno di quella originale per salvare le immagini compresse.
Passaggio 5. Nella sezione Tipo di file, seleziona Ridimensiona per adattare, quindi specifica la larghezza e l’altezza massime per le immagini ridimensionate.

Parte 4. Alternativa a Photoshop - Riduttore di dimensioni delle immagini online - Compressore di immagini FVC
L’interfaccia di Photoshop è ancora troppo complicata per i principianti e per chi ha compiti urgenti di elaborazione delle immagini. Inoltre, ci sono diversi passaggi da seguire per ridurre le dimensioni dell’immagine. Esiste un’alternativa più comoda, il FVC Free Image Compressor. Tutto ciò che devi fare è caricare l’immagine che vuoi elaborare tramite il browser e il servizio comprimerà automaticamente le dimensioni dell’immagine per te; ti permette anche di regolare manualmente il rapporto d’aspetto, ruotare o capovolgere l’immagine direttamente sulla pagina web.
C'è un altro problema che non possiamo ignorare. L'uso regolare di Photoshop richiede un abbonamento. Ma la gamma di prodotti Adobe è costosa. FVC Free Image Compressor è uno strumento online completamente gratuito. Avete mai pensato all'elaborazione in batch delle immagini? Gli sviluppatori di FVC Free Image Compressor non hanno trascurato questo dettaglio. Attualmente, su questa piattaforma è possibile elaborare in batch fino a 40 immagini.
Passaggio 1. Vai al sito ufficiale di FVC Free Image Compressor.

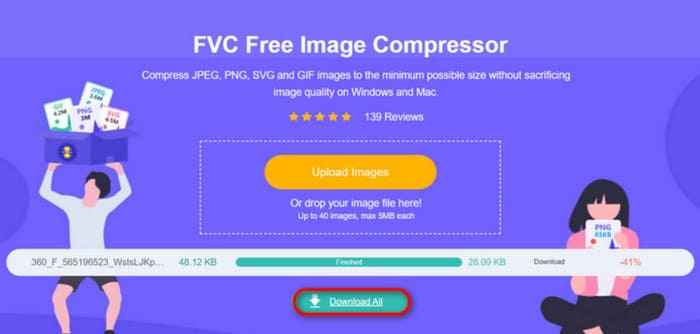
Passaggio 2. Fai clic su Upload Images per scegliere e caricare le foto che desideri comprimere.
Passaggio 3. Al termine del processo di compressione, visualizza in anteprima le nuove dimensioni dei file. Poi fai clic su Download All per salvare le immagini compresse sul tuo dispositivo.
Dopo aver ottenuto i risultati della compressione, sei sorpreso che la nitidezza delle immagini non sia persa di molto? Il compressore d'immagine gratuito FVC utilizza le tecniche di compressione più avanzate ed efficienti per trovare il perfetto equilibrio tra risoluzione e dimensioni dell'immagine.
Che tu sia un principiante o un professionista, scoprirai che FVC Free Image Compressor è la migliore alternativa a Photoshop.
Parte 5. Domande frequenti su come rimpicciolire un'immagine in Photoshop
Come si può rimpicciolire un'immagine in Photoshop senza perdere qualità?
Per ridurre le dimensioni di un'immagine in Photoshop senza distorsioni, è importante assicurarsi di selezionare l'opzione Ricampiona al momento dell'operazione. È inoltre fondamentale tenere d'occhio le variazioni di nitidezza quando si regolano le proporzioni.
Come si può rimpicciolire una foto senza ritagliarla?
Puoi utilizzare il ridimensionatore di foto per cambiare le dimensioni sullo schermo. In alternativa, puoi comprimere i file immagine: questo li renderà sensibilmente più piccoli.
Come si fa a scattare una foto che pesa meno di 1 MB?
Puoi utilizzare alcuni compressori d'immagine specializzati. Sono particolarmente consigliati strumenti che consentono di regolare il livello di compressione e visualizzare in anteprima le dimensioni dell'immagine compressa prima di scaricarla, come Photoshop o FVC Free Image Compressor.
Conclusione
Dopo aver imparato come ridurre un’immagine in Photoshop nel contenuto sopra, puoi provare a farlo da solo. Abbiamo incluso immagini per ogni passaggio per assicurare che tu possa vedere ogni dettaglio. Se non vuoi installare Photoshop sul tuo dispositivo o ti scoraggia la sua interfaccia complessa, prova a usare FVC Free Image Compressor per le tue immagini. È facile da usare, con passaggi semplici e un servizio gratuito.
-
 Come comprimere MXF con Premiere Pro e online gratuito
 Come comprimere MXF con file di dimensioni inferiori? Come comprimere i file MXF in Adobe Premiere Pro? Questo post condivide 2 modi per comprimere i file MXF.
-
 Come comprimere facilmente i file MOV: 6 opzioni gratuite per te
 Per comprimere i file MOV, puoi fare riferimento alle 6 opzioni illustrate in questo articolo, tra cui 3 software desktop e 3 piattaforme online. Ti mostreremo come usarle qui.
-
 Come comprimere un video MP4 in dimensioni inferiori
 Il video MP4 è troppo grande per il caricamento? Vuoi ridurre le dimensioni del video? Ecco 3 modi efficaci per comprimere un file MP4 in dimensioni inferiori senza limiti.