


Comprimi le immagini in Word: guida definitiva per principianti
Quando si crea un documento Word, ci sono momenti in cui dobbiamo allegare foto. Queste foto aggiungono un tocco visivo o forse documentazione o allegati per supportare i nostri documenti. Sebbene questo sia un ottimo modo per comunicare in modo efficace, aggiungere foto con file di grandi dimensioni occuperà più spazio di archiviazione e renderà più lungo il tempo di apertura del file. Di conseguenza, causerà inconvenienti a coloro che apriranno il file e al mittente che lo sta inviando.
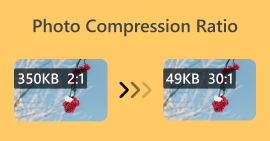
Ma ecco la cosa! Ti abbiamo coperto le spalle: in questo articolo imparerai 2 modi per comprimere immagini in Word e un metodo alternativo per comprimere facilmente le immagini per Word. Cogli subito questa opportunità e inizia a ottimizzare le tue foto per creare un documento Word efficiente.

Parte 1. Comprimi le immagini in Word
Microsoft Word è un software di elaborazione testi ampiamente utilizzato in tutto il mondo, dove gli utenti possono comporre qualsiasi documento Word e allegare foto. Tuttavia, a causa di allegati di immagini di grandi dimensioni, il documento Word occupa più spazio, il che lo rende difficile da gestire. Ma ecco il punto, gli utenti possono comprimere direttamente le loro immagini all'interno del loro documento Word. Di seguito sono riportati i due metodi per comprimere le immagini in Word:
Metodo 1. Comprimi le immagini in Word su Windows
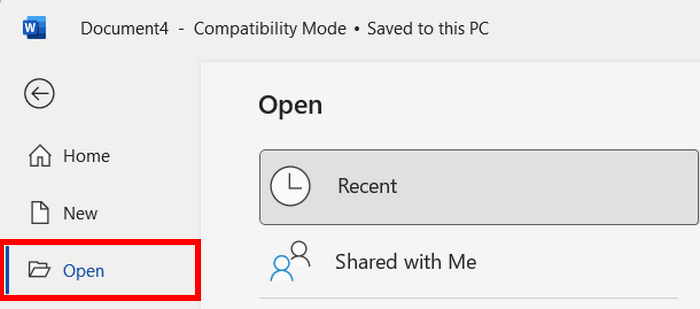
Passaggio 1. Apri il tuo software Word e vedrai tre pulsanti sul lato sinistro. Tra questi, scegli Apri per caricare il file Word che contiene le foto che desideri comprimere.
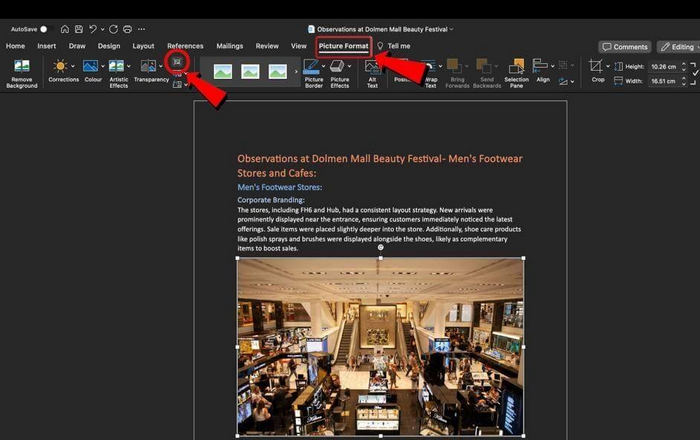
Passaggio 2. Ora, per comprimere le foto, scorri il tuo file e trova l’immagine che desideri comprimere. Una volta trovata, fai clic su di essa. Dopodiché vai alla scheda Formato immagine e, tra i comandi nella barra sottostante, fai clic su Comprimi immagini.

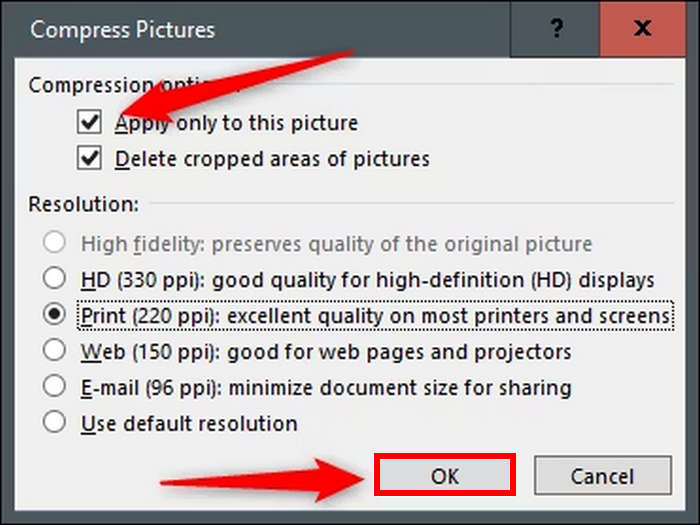
Passaggio 3. A questo punto hai due opzioni per comprimere le tue foto:
• Applica solo a questa immagine: questa opzione assicura che le altre immagini nel documento non vengano modificate e che solo quella selezionata venga compressa.
• Elimina le aree ritagliate delle immagini: quando hai immagini ritagliate, è meglio selezionare questa opzione. Le immagini ritagliate mantengono l’area tagliata nello sfondo del documento, influendo sulle dimensioni del file.
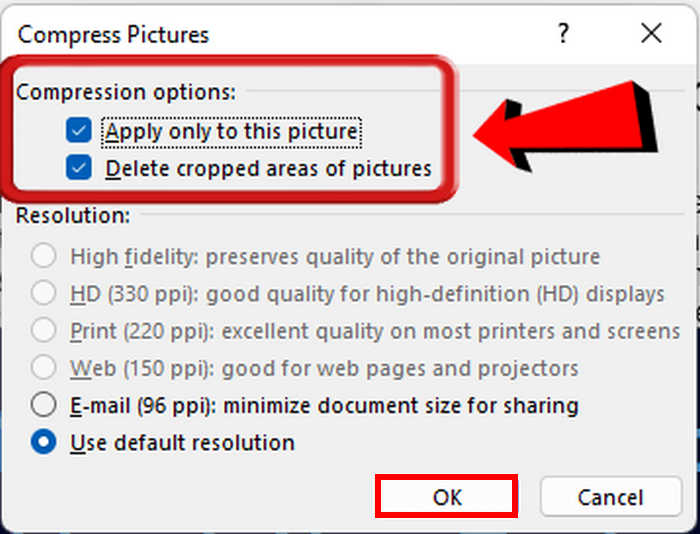
Passaggio 4. Per quanto riguarda la Risoluzione, è altamente consigliato scegliere Usa risoluzione predefinita. In questo modo otterrai un buon equilibrio tra qualità e riduzione delle dimensioni. Quando hai finito, fai clic sul pulsante OK.
Questo metodo è utile per gli utenti Windows. Li aiuterà a ridurre le dimensioni del file Word e potranno garantire un'esperienza fluida durante il salvataggio, la condivisione e l'apertura dei documenti. Tuttavia, la compressione delle immagini in Word può talvolta portare a una notevole perdita di qualità delle immagini, che influisce sulla nitidezza e sui dettagli delle immagini, il che può essere problematico se gli elementi visivi del documento sono critici, come nelle presentazioni professionali o nella grafica dettagliata.
Metodo 2. Comprimi le immagini in Word su Mac
Passaggio 1. Per prima cosa, apri il file Word per accedere al documento che contiene le immagini che vuoi comprimere.
Passaggio 2. Ora, trova nel documento Word l’immagine che vuoi comprimere e fai clic con il tasto destro su di essa. Poi vai su Formato immagine e, nella barra dei comandi, scegli l’opzione Comprimi.
Passaggio 3. Nella finestra Comprimi immagine, scegli High Fidelity come Qualità immagine. Inoltre, proprio come in Windows, seleziona la casella Elimina le aree ritagliate delle immagini, poiché ciò rimuoverà dall’area di sfondo le parti ritagliate.
Passaggio 4. Infine, nell’opzione Applica a, puoi scegliere tra Tutte le immagini in questo file o Solo immagini selezionate. Quando hai terminato, fai clic sul pulsante OK.
Proprio come in Windows, questo metodo può aiutare gli utenti Mac a ottimizzare i loro file di documenti comprimendo le loro foto direttamente nel software Word. Questo elimina la necessità di utilizzare altri strumenti di compressione delle immagini per ridurre le dimensioni delle immagini. Ma il fatto è che questo può causare una perdita di qualità evidente nella qualità dell'immagine a differenza dell'utilizzo di strumenti di compressione delle immagini dedicati.
Parte 2. Il modo migliore per comprimere le immagini con un clic [facile e veloce]
Dal momento che comprimere direttamente le immagini in Word può causare una notevole perdita di qualità, esistono strumenti alternativi che puoi usare per ottimizzare il tuo documento Word utilizzando foto compresse con altri strumenti. FVC Free Image Compressor è la migliore alternativa. Si tratta di uno strumento online gratuito per comprimere immagini, ideale per gli utenti che cercano un modo più rapido per comprimere facilmente le immagini per Word. Con un solo clic, le tue foto verranno ridimensionate automaticamente e la loro qualità sarà mantenuta quasi intatta. Inoltre, questo strumento è estremamente intuitivo e facile da usare. Infine, quando hai molti file immagine da allegare al tuo file Word, puoi sfruttare la sua funzione di elaborazione in batch, che ti permette di comprimere simultaneamente 40 foto con un solo clic.
Ecco come comprimere un'immagine utilizzando FVC Free Image Compressor
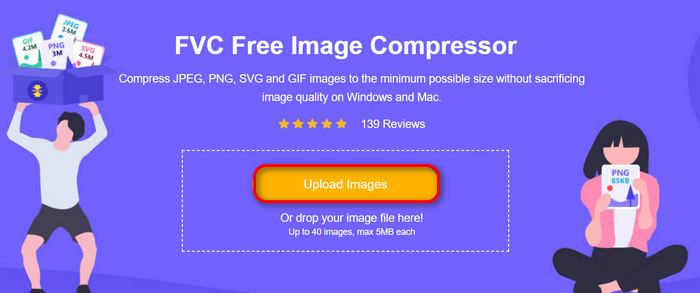
Passaggio 1. Nel browser, digita FVC Free Image Compressor e cercalo.
Passaggio 2. Una volta arrivato sul sito ufficiale, fai clic su Upload Images per importare le foto che desideri comprimere.
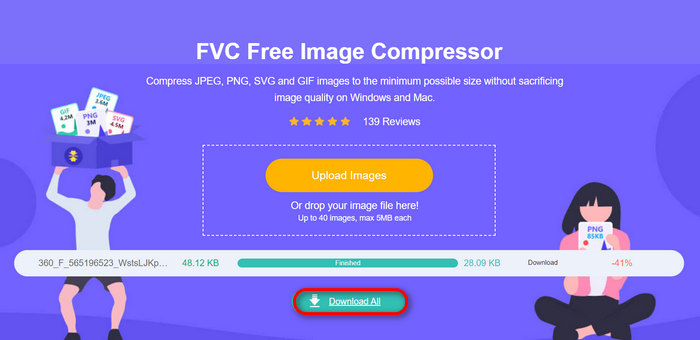
Passaggio 3. Attendi il completamento del processo di compressione. Una volta terminato, vedrai una barra di stato che indica la fine dell’operazione e le informazioni sulle dimensioni dell’immagine prima e dopo la compressione. Successivamente, fai clic su Download per salvare la tua immagine.
Con FVC Free Image Compressor, la compressione non ti costerà fatica. Inoltre, questo strumento è completamente gratuito e super accessibile, quindi è davvero un'ottima alternativa se vuoi usare foto compresse per il tuo documento Word.
Parte 3. Domande frequenti sulla compressione delle immagini in Word
Come faccio a gestire le immagini in Word?
La gestione delle immagini in Word comporta diversi passaggi per garantire che si adattino bene al documento. È possibile ridimensionare, ritagliare e regolare il layout delle immagini utilizzando la scheda Formato immagine. Inoltre, per mantenere l'efficienza del documento, si consiglia di comprimere le immagini per ridurre le dimensioni del file senza compromettere troppo la qualità.
Come posso trasformare un'immagine in un documento Word?
Per trasformare un'immagine in un documento Word, puoi usare il software Optical Character Recognition. Questa tecnologia converte diversi tipi di documenti, come documenti cartacei scansionati, PDF, ecc., in dati modificabili e ricercabili. Devi solo inserire l'immagine in un documento Word, quindi usare uno strumento OCR, integrato o di terze parti, per estrarre il testo.
Come posso ridurre le dimensioni di un file immagine in Word ritagliandolo?
Per ridurre le dimensioni del file immagine in Word tramite ritaglio, inizia selezionando l'immagine e utilizzando lo strumento di ritaglio per mantenere solo la porzione desiderata dell'immagine. Dopo il ritaglio, accedi alle opzioni di formattazione dell'immagine e scegli di comprimerla. Nelle impostazioni di compressione, assicurati di eliminare le aree ritagliate dell'immagine per rimuovere le parti non necessarie e ridurre le dimensioni complessive del file. Infine, seleziona la risoluzione desiderata e applica le modifiche per ottenere un equilibrio tra qualità dell'immagine e riduzione delle dimensioni del file.
Conclusione
In conclusione, la necessità di comprimere le immagini in Word nasce dal fatto che i documenti che contengono file immagine di grandi dimensioni sono più difficili da gestire e possono rallentare i tempi di caricamento del file. Ma con i metodi illustrati in questo articolo puoi comprimere le tue immagini con facilità e rapidità.
Inizia subito a comprimere le tue immagini per rendere i tuoi documenti Word più gestibili ed efficienti!
-
 4 metodi verificati per convertire TS in FLV su desktop/online
 Non puoi aprire TS sul tuo computer o cellulare per impostazione predefinita. L'unico modo per guardare i file video è convertire TS in FLV o altri formati con la nostra guida concreta.
-
 2 modi efficaci per comprimere i file TS senza perdere la qualità
 Vuoi salvare i file video TS ad alta definizione sui tuoi dispositivi? Questo articolo mostra altri modi per la trasformazione dei video TS.
-
 File MTS: cos'è un file MTS e come convertire MTS in MP4/MOV/MKV/AVI
 Che cos'è un file MTS e come posso riprodurlo? Questo post fornisce un'istruzione di base del file MTS. Inoltre, puoi ottenere 3 semplici modi per convertire file MTS in MP4, MOV, AVI, MPEG, MTS, MKV o altri formati con alta qualità.