


How to Easily Reduce Image Size on Mac [Ultimate Guide]
When you are dealing with large image files on your Mac, don’t fret! There are ways to solve this problem.
We understand the need for image compression as it makes them more manageable and convenient to use. Oftentimes, if you may observe, some systems require us to upload image files in a specific file size, some websites load slower, and sending image files through emails takes time. These problems came from the same source, which is a large image file. With that, in this article, we are going to delve into three methods on how you can easily reduce image size on Mac. This is particularly useful when you need to optimize your workflow and ensure that your images are accessible and can load quickly.

Part 1. Reduce Image Size on Mac by Reducing Pixels
Mac devices has a great way of reducing images using their built-in tools. With these, Mac users can easily and freely compress their photos right away on their devices.
Preview is a built-in image and PDF viewer tool. With this tool, users can’t only enjoy its features for viewing images and PDF files. Also, they can take advantage of its editing features where they can reduce image size on Mac easily. Moreover, it’s very convenient and free to use, making it accessible for everyone. To do this, follow the steps below:
Step 1. First, open the Preview app on your Mac device.
Step 2. After that, open the image file that you want to compress the size by going to the File tab and clicking the Open button.
Step 3. Now, go to the Tool tab in the context menu and then click Adjust Size.

Step 4. Select Resample Image if you want to reduce the size of the image files.

Step 5. Now, change the value of your Resolution file. Once you have done so, a new size will be shown at the bottom.
To maintain the highest possible quality while reducing image size on Mac, you can trial and error on what resolution settings work for the image best. By doing so, it’s important to start with a smaller reduction in resolution and gradually increase it until you achieve a good balance between the image quality and the file size.
Part 2. Compress Image Size on Mac with a Shortcut
When you want an easier way to compress image size on Mac, you can use Quick Actions to streamline the process of compressing images. With this, you can perform various tasks directly from the Finder without needing to open an application. This includes the ability to resize images quickly and efficiently. Moreover, it provides a convenientprocess to handle basic image editing tasks, like resizing, which is useful for those who need to process multiple images quickly.
Here’s how you can use Quick Actions to compress image size on Mac:
Step 1. Right-click the image you want to compress.
Step 2. From the context menu, select Quick Actions and then Convert Image.
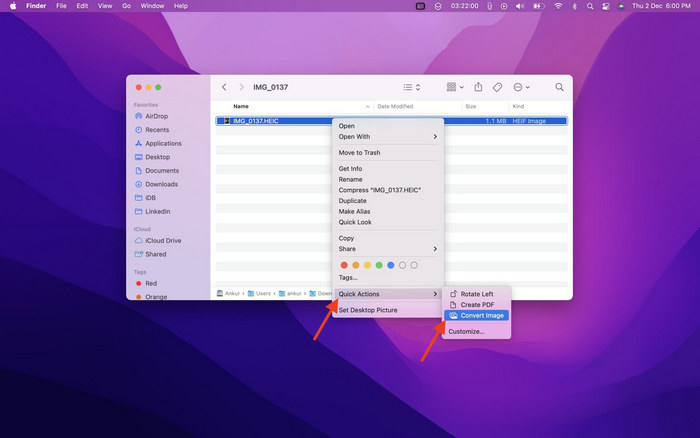
Step 3. Click the Image Size field and select Small, Medium, or Large from the dropdown menu, which also shows the corresponding file sizes.
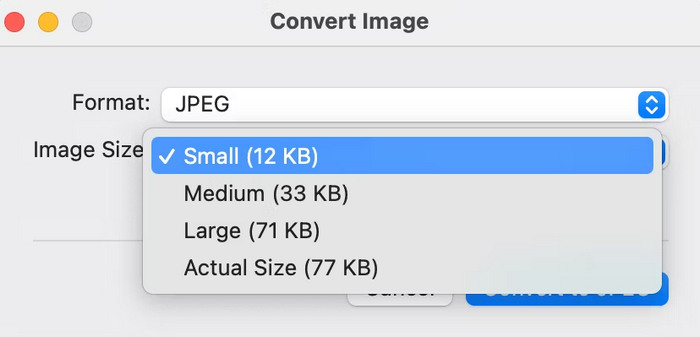
Step 4. Check Preserve Metadata to keep all the image's information.
If you want to customize your Quick Actions and want to include it in your most frequently used resizing options. You can do it through the system preferences under extensions. Moreover, if you want to reduce an image on Mac for batch compression, just select multiple images before applying the Quick Action to save time.
Part 3. Fastest Way to Compress Images on Mac [Up to 40 Images at Once]
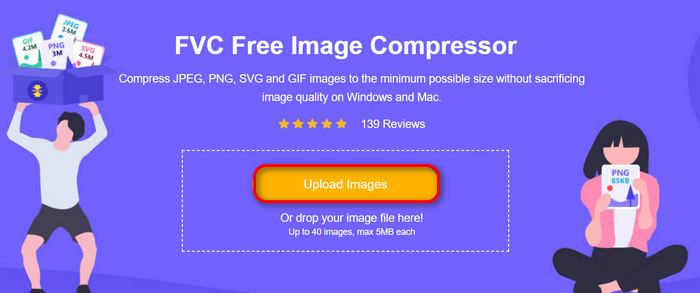
If you’re looking for an alternative tool to reduce image size on Mac, you can try the FVC Free Image Compressor. This tool is completely free, and it supports batch compression, where users can shrink their image files up to 40 all at once. Moreover, this tool integrates the best optimization and compression algorithms to preserve the quality of the compressed photo. When it comes to ease of use, this tool is ideal for beginners as they will only have to take two steps, and the compression will process automatically.
Here’s how to compress JPEG using FVC Free Image Compressor
Step 1. To start, you need to access their official website by searching FVC Free Image Compressor on your browser.
Step 2. Next, click Upload Images to import the photos that you want to compress on your Mac. The tool will automatically compress them.
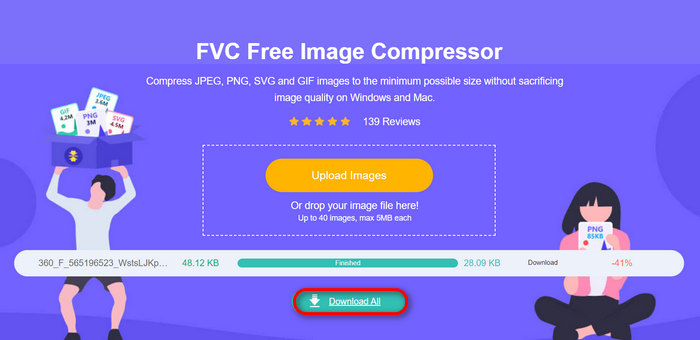
Step 3. After the compression, you can preview the new file size of your compressed image files. Lastly, click Download All to save your image.
With the FVC Free Image Compressor, you can easily reduce image size on Mac, ensure quality output, support a wide range of image file formats, and have other important features like batch compression.
You can take advantage of the batch compression feature of this tool to save time, especially if you have a bunch of images to compress. All you need to do is import them simultaneously into the tool. But take note that you can compress up to 40 images at once, making the process faster and more efficient.
Part 4. FAQs about Reducing Image Size on Mac
How do you resize an image in Apple Photos?
How to make an image smaller in MB on Mac?
What is the batch image resizer app for Mac?
Conclusion
In conclusion, knowing what tool to use to reduce image size on a Mac is important, especially when you’re working with images. So, regardless of the tool or method that you’re going to use, any of them can help you compress your images effectively. Are you ready to leverage all these tools in compressing your photos? Start it today!
-
 How to Reduce Photo File Size on iPhone: Steps for All iOS
 Dealing with large image files on your iPhone and finding it hard to upload them? This article will be your guide on how to reduce photo file size on iPhone.
-
 Compress PNG: 5 Best Methods That You Must Know [2024]
 Wondering what tools are best to Compress PNG? In this article, learn about 5 of them and be guided on how you can shrink them while maintaining their visuals.
-
 Ratio Compression Photo: What Do I Need to Know? [Review]
 Learn what is photo compression ratio is and how it affects image quality. Also, be guided on how to change this compression ratio when it is done incorrectly.