


Panduan Lengkap tentang Cara Mengambil Screenshot FaceTime [2025]
FaceTime adalah aplikasi obrolan video yang banyak digunakan dan dikembangkan oleh Apple agar penggunanya dapat melakukan percakapan video secara langsung di iPhone, iPad, atau Mac. Kini, mengambil tangkapan layar selama panggilan FaceTime adalah cara yang bagus untuk menyimpan momen dengan orang yang kita ajak bicara, terutama ketika orang tersebut telah lama menghilang. Jadi, jika Anda ingin menyimpan momen berharga selama panggilan tersebut, artikel ini cocok untuk Anda. Luangkan waktu untuk membaca dan mempelajari 3 cara untuk mengambil gambar Tangkapan layar FaceTime mudah. Mari kita mulai!

Bagian 1: Cara Terbaik untuk Mengambil Tangkapan Layar FaceTime di iPhone/iPad/Mac
Cara terbaik untuk mengambil tangkapan layar FaceTime dengan mudah di perangkat Apple adalah dengan menggunakan Perekam Layar FVC. Alat perekam layar pihak ketiga ini dirancang sempurna untuk mengambil tangkapan layar di iPhone, iPad, atau Mac. Jadi, jika Anda menggunakan salah satu dari alat tersebut dan ingin mengambil tangkapan layar saat melakukan Panggilan Video FaceTime dengan keluarga, teman, dan orang terkasih, Anda akan sangat diuntungkan dengan fitur snapshot dan perekam teleponnya. Selain itu, alat ini dapat dengan mudah dinavigasi oleh pengguna mana pun karena antarmukanya yang ramah pengguna. Terakhir, jika Anda ingin berkreasi dengan tangkapan layar FaceTime, Anda pasti akan menikmati fitur pengeditannya yang dapat Anda sesuaikan.
Metode 1: Untuk Mac
Langkah 1Pertama, unduh dan instal FVC Screen Recorder di Mac Anda. Perangkat lunak ini mendukung hampir semua versi macOS, termasuk macOS 14 Sonoma terbaru.
Download GratisUntuk Windows 7 atau lebih baruDownload Aman
Download GratisUntuk MacOS 10.7 atau lebih baruDownload Aman
Langkah 2Selanjutnya, luncurkan alat tersebut.
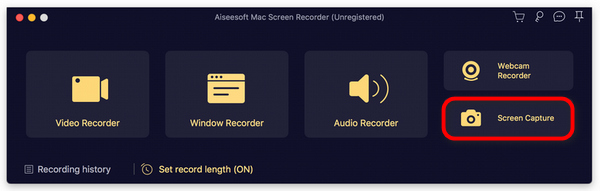
LANGKAH 3. Sekarang, saat Anda melakukan panggilan video FaceTime di Mac Anda. Klik pada Cuplikan Layar tombol yang dapat ditemukan pada jendela mengambang di antarmuka alat.
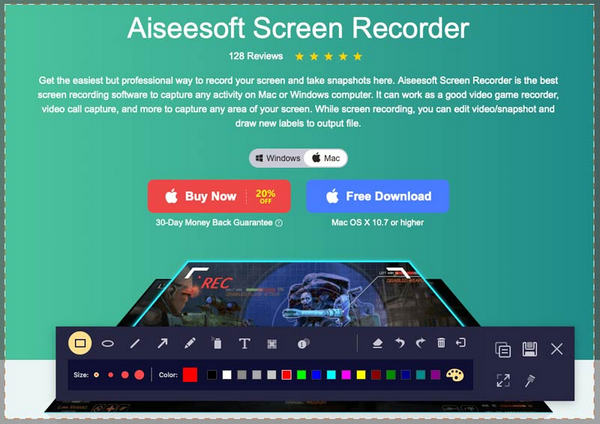
LANGKAH 4Ini bersifat opsional, tetapi Anda dapat mengedit gambar Screenshot FaceTime dengan memanfaatkan beberapa alat pengeditan di bawah ini.
LANGKAH 5. Terakhir, klik Menyimpan untuk menyimpan gambar ke Mac Anda.
Metode 2: Untuk iPhone dan iPad
Langkah 1Unduh dan buka FVC Screen Recorder, tetapi kali ini di Komputer Windows Anda.
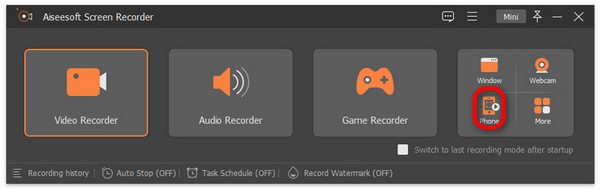
Langkah 2. Sekarang, setelah menginstal alat tersebut, buka dan di sisi kanan antarmuka jendela mengambang alat tersebut, bersama dengan 3 opsi lainnya, klik Telepon pilihan.
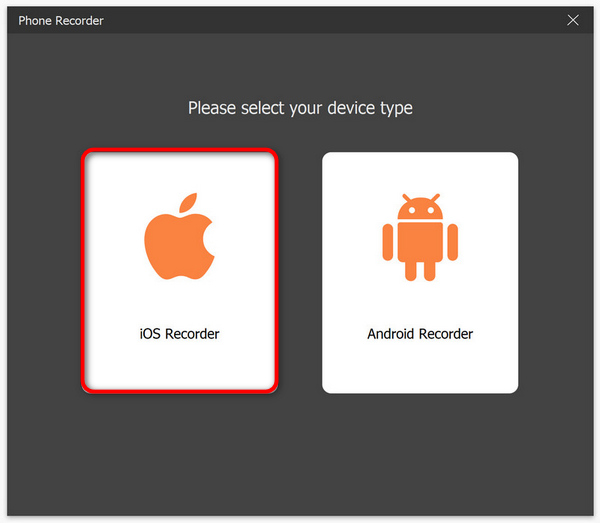
LANGKAH 3. Setelah itu, klik Perekam iOS pilihan.
LANGKAH 4. Sekarang, jendela baru akan muncul berisi instruksi di layar di mana Anda juga akan diminta untuk memilih antara Pencerminan Layar atau Pencerminan AudioDalam kasus Anda, pilih Pencerminan Layar.
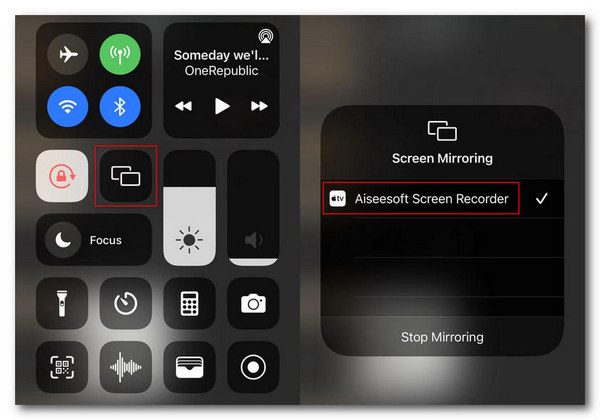
LANGKAH 5Sekarang, di iPhone atau iPad Anda, buka Pusat kendali dan klik Pencerminan LayarLalu klik Aiseesoft Screen Recorder untuk menghubungkan iPhone atau iPad Anda ke komputer.
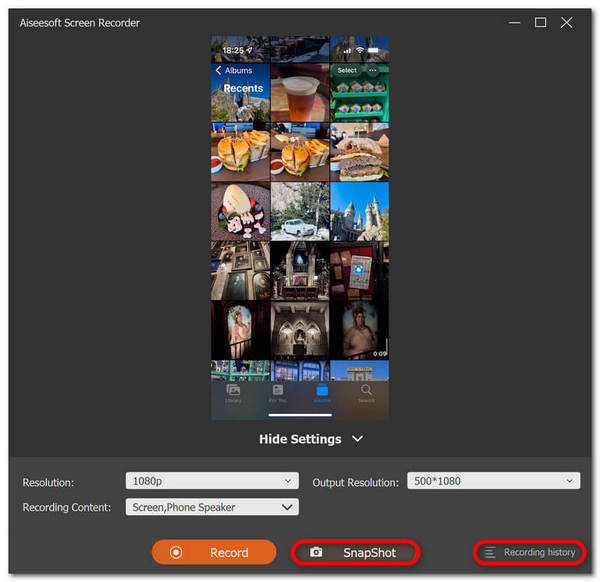
Langkah 6Terakhir, untuk mengambil tangkapan layar di iPhone atau iPad Anda, cukup klik ikon Snapshot.
FVC Screen Recorder memang merupakan alat yang serba guna untuk mengambil tangkapan layar. Bayangkan satu alat yang dapat mendukung beberapa perangkat iOS. Terlalu bagus untuk menjadi kenyataan, tetapi memang begitu. Jadi, apa pun perangkat iOS yang Anda gunakan, mengambil tangkapan layar FaceTime selama panggilan video dapat dilakukan dengan alat perekam layar ini.
Bagian 2: Cara Mengambil Tangkapan Layar FaceTime di iPhone/iPad
Mengambil tangkapan layar FaceTime di iPhone atau iPad dapat dilakukan dengan mudah menggunakan fitur tangkapan layar bawaan.
Langkah 1Periksa perangkat iOS atau iPasOS yang Anda gunakan selama panggilan video FaceTime.
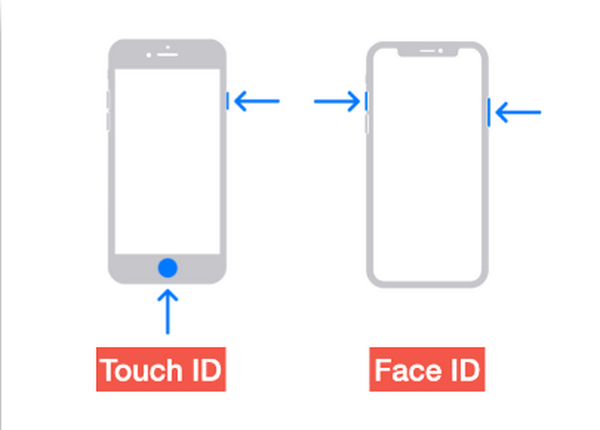
Langkah 2Saat memiliki Touch ID, Anda perlu menekan tombol secara bersamaan Rumah dan Kekuasaan tombol untuk mengambil tangkapan layar panggilan video FaceTime. Sementara itu, jika iPhone atau iPad Anda memiliki Face ID, Anda dapat mengambil tangkapan layar panggilan FaceTime dengan juga menekan tombol secara bersamaan Volume Naik dan Kekuasaan tombol.
LANGKAH 3Akses tangkapan layar Anda di Foto aplikasi di Screenshot map,
Mengambil Screenshot FaceTime memang mudah dilakukan di iPhone atau iPad karena fitur screenshot bawaannya. Namun, Anda harus berhati-hati saat menekan tombol yang diperlukan selama panggilan FaceTime berlangsung karena dapat menimbulkan risiko gangguan yang tidak disengaja, seperti mengakhiri panggilan atau mematikan volume tanpa disadari.
Bagian 3: Cara Mengambil Tangkapan Layar FaceTime di Mac
Saat Anda melakukan panggilan video FaceTime di Mac, cara termudah untuk melakukannya adalah dengan mengambil tangkapan layar FaceTime menggunakan tombol pintasnya.
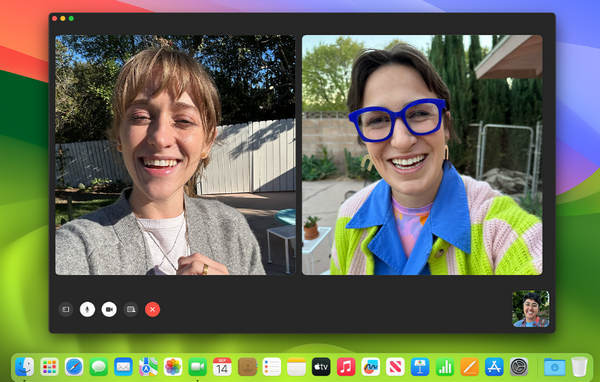
Langkah 1Pertama, buka panggilan video FaceTime Anda di Mac.
Langkah 2Sekarang, ambil tangkapan layar FaceTime menggunakan tombol pintas saat Anda melakukan panggilan video.
catatan: Untuk mengambil tangkapan layar seluruh layar panggilan video FaceTime Anda, tekan dan tahan Memerintah, Menggeser, dan 3 kunci bersama-sama. Sementara itu, jika Anda hanya ingin menangkap sebagian layar, tekan tombol Memerintah, Menggeser, dan 4 tombol dan tahan keduanya. Terakhir, jika Anda ingin mengambil gambar jendela FaceTime, tekan tombol Memerintah, Menggeser, 4, dan Spasi tombol secara bersamaan.
LANGKAH 3Tangkapan layar akan langsung tersimpan di desktop Anda.
Satu-satunya hal tentang penggunaan tombol pintas selama tangkapan layar FaceTime di Mac adalah Anda tidak dapat mengeditnya jika Anda ingin menyesuaikan gambar tangkapan layar Anda. Namun, jika Anda hanya ingin mengambil tangkapan layar, tidak apa-apa, tetapi jika Anda ingin berkreasi, Anda dapat menggunakan alat pihak ketiga seperti FVC Screen Recorder.
Bagian 4: FAQ tentang Mengambil Tangkapan Layar FaceTime
Ke mana tangkapan layar FaceTime pergi?
Anda dapat mengakses tangkapan layar FaceTime di aplikasi Foto perangkat Anda. Biasanya, setelah mengambil tangkapan layar selama panggilan FaceTime, tangkapan layar akan langsung disimpan di aplikasi tersebut, khususnya di folder tangkapan layar aplikasi tersebut.
Apakah FaceTime memberi tahu Anda saat seseorang mengambil tangkapan layar?
Tidak. FaceTime tidak memiliki fitur yang memberi tahu seseorang yang mengambil tangkapan layar selama panggilan video FaceTime. Oleh karena itu, jika seseorang mengambil tangkapan layar selama panggilan FaceTime, Anda tidak akan menerima pemberitahuan apa pun.
Tangkapan layar FaceTime tidak tersimpan?
Jika Anda mengalami masalah dengan tangkapan layar FaceTime yang tidak tersimpan di perangkat iOS Anda, mungkin ada beberapa alasan untuk ini. Pertama, Anda perlu memastikan bahwa penyimpanan perangkat Anda tidak penuh, karena ini dapat menjadi alasan utama mengapa tangkapan layar FaceTime tidak tersimpan. Pada dasarnya, ini mencegah tangkapan layar baru disimpan. Selain itu, periksa pengaturan privasi perangkat Anda mungkin karena aplikasi Foto tidak memiliki izin untuk menyimpan tangkapan layar. Jika masalah berlanjut, memulai ulang perangkat Anda atau memperbarui perangkat lunak Anda dapat membantu menyelesaikan masalah.
Kesimpulan
Sebagai kesimpulan, mengambil Tangkapan layar FaceTime selama panggilan video adalah cara termudah untuk menyimpan dan mengabadikan momen-momen yang tak terlupakan bersama orang-orang terkasih melalui telepon. Baik menggunakan fitur bawaan pada perangkat iOS atau alat pihak ketiga seperti Perekam Layar FVC, ada berbagai metode yang tersedia untuk mengabadikan momen-momen ini dengan mudah. Jadi, jangan ragu untuk memanfaatkan alat dan fitur ini untuk memaksimalkan pengalaman FaceTime Anda. FaceTime dengan orang-orang terkasih Anda sekarang dan simpan momen itu dengan mengambil tangkapan layarnya.
-
 Cara Mengatasi Screenshot Tidak Berfungsi di iPhone [2025]
 Kesulitan mengambil tangkapan layar di iPhone Anda? Kami menangkapmu! Pelajari panduan komprehensif kami untuk membantu Anda memperbaiki tangkapan layar yang tidak berfungsi di iPhone dengan cepat dan mudah.
-
 Screenshot di Windows Tanpa Print Screen [Panduan 2025]
 Mencari cara screenshot di Windows tanpa print screen. Artikel ini memudahkan Anda. Baca ini sekarang dan tangkap layar Anda dengan mudah!
-
 4 Cara Screenshot di Snapchat Tanpa Mereka Sadar
 Apakah Anda ingin mengambil tangkapan layar di Snapchat tanpa mereka sadari? Artikel ini memiliki 4 metode efektif yang dirancang khusus untuk Anda. Periksa sekarang dan coba sendiri!