


Ulasan Lengkap untuk Anda: Apakah Google Drive Mengkompres Foto?
Beberapa situs web memiliki batasan pada lebar dan tinggi gambar yang disisipkan. Oleh karena itu, tidak dapat dihindari bahwa Anda akan menghadapi situasi di mana Anda perlu memperbesar atau memperkecil ukuran gambar. Ketika berbicara tentang bekerja dengan gambar, hal pertama yang akan muncul di benak Anda adalah pakar dalam industri ini, Photoshop. Photoshop dikenal karena banyak fiturnya. Bagi para profesional, Photoshop tidak diragukan lagi merupakan pilihan ideal untuk mengubah ukuran gambar. Namun, jika Anda seorang pemula, Anda mungkin kesulitan menemukan fungsi yang sesuai.
Tidak masalah; kami telah menyiapkan panduan paling lengkap tentang mengecilkan gambar di Photoshop. Jika Anda punya tugas yang lebih mendesak, pertimbangkan alat manipulasi gambar lain yang kami rekomendasikan dalam artikel ini.
Bagian 1. Cara Mengubah Ukuran Gambar di Photoshop
Pertama-tama mari kita lihat apa yang dapat Anda lakukan untuk mengubah ukuran gambar menggunakan Photoshop.
Perlu diketahui bahwa langkah-langkah untuk mengubah ukuran gambar dan memperkecil ukuran gambar mungkin sedikit berbeda. Itulah sebabnya kami akan membagi panduan langkah demi langkah menjadi dua bagian. Anda akan menemukan panduan khusus tentang memperkecil ukuran gambar di bagian berikutnya.
Langkah 1. Buka Photoshop, lalu masuk ke File > Open untuk memilih gambar yang ingin Anda ubah ukurannya.
Langkah 2. Arahkan ke Image > Image Size.
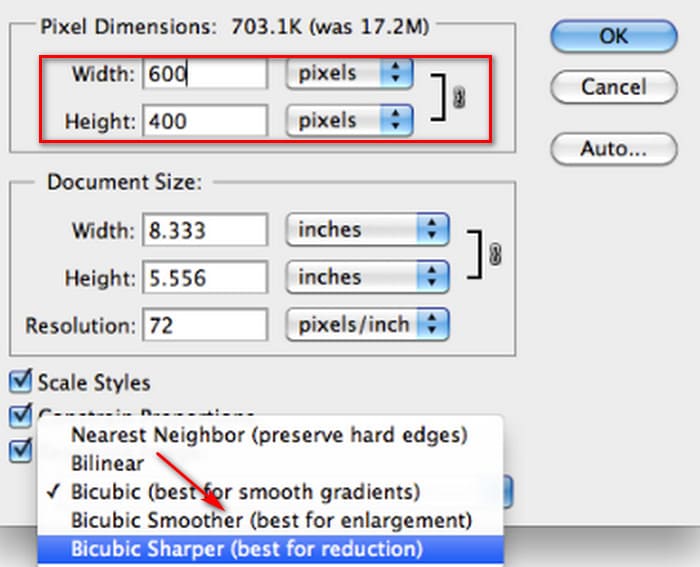
Langkah 3. Masukkan dimensi piksel, ukuran dokumen, atau resolusi yang Anda inginkan di kotak dialog Image Size.
Langkah 4. Pilih Resampling Method sebelum mengonfirmasi.
Bicubic: Ideal untuk gradasi yang halus; metode ini menghitung nilai rata-rata piksel untuk hasil yang presisi.
Bicubic Smoother: Paling cocok untuk memperbesar gambar, terutama yang memiliki noise, sehingga menghasilkan tampilan yang lebih lembut.
Langkah 5. Klik OK untuk menerapkan perubahan.

Anda kini telah berhasil mengubah lebar dan tinggi gambar Anda. Namun, harap diperhatikan bahwa hal ini juga dapat meningkatkan ukuran berkas gambar Anda. Jadi, meskipun Anda mengetahui rasio aspeknya, pastikan untuk memeriksa apakah ukuran berkas gambar sesuai dengan persyaratan platform Anda.
Bagian 2. Cara Mengecilkan Gambar di Photoshop
Pada bagian ini, kita akan fokus pada cara mengurangi ukuran gambar di Photoshop.
Langkah 1. Jalankan Photoshop dan masuk ke File > Open untuk memilih gambar yang ingin Anda edit.
Langkah 2. Buka Image > Image Size. Ini akan menampilkan kotak dialog Image Size.
Langkah 3. Masukkan nilai baru untuk dimensi piksel, ukuran dokumen, atau resolusi sesuai kebutuhan Anda.
Langkah 4. Pilih Resampling Method.
Bicubic: Ideal untuk gradasi yang halus; metode ini menggunakan piksel di sekitarnya untuk menghasilkan hasil yang presisi.
Bicubic Sharper: Direkomendasikan untuk memperkecil ukuran gambar sambil tetap mempertahankan detail yang tajam. Jika gambar menjadi terlalu tajam, kembalikan ke Bicubic.
Langkah 5. Klik OK untuk menerapkan perubahan dan mengubah ukuran gambar Anda.
Sekarang Anda telah berhasil memperkecil ukuran gambar asli. Namun, seperti yang terjadi pada bagian pertama, Anda juga akan melihat perubahan signifikan pada ukuran berkas gambar setelah menyelesaikan operasi, yang terutama tercermin pada fakta bahwa gambar tersebut telah dikompresi lebih kecil.
Perlu diperhatikan bahwa kualitas gambar mungkin berkurang. Jika menurut Anda penurunannya terlalu besar dan mengganggu kenyamanan saat melihat, Anda dapat memperbaikinya lagi dengan menggunakan peningkat kualitas gambar.
Bagian 3. Cara Mengubah Ukuran Gambar Secara Batch di Photoshop
Ada beberapa langkah yang diperlukan untuk mengubah ukuran gambar dengan Photoshop. Jika Anda memiliki banyak gambar yang perlu diproses, menyeretnya satu per satu ke Photoshop untuk mengeditnya akan sangat memakan waktu dan merepotkan. Untungnya, ada cara lain untuk mengurangi ukuran gambar secara massal.
Berikut ini cara memperkecil ukuran gambar secara batch di Photoshop.
Langkah 1. Pertama, tempatkan semua foto yang ingin Anda kompres secara massal ke dalam satu folder.
Langkah 2. Jalankan Photoshop, buka menu File, pilih Scripts, lalu pilih Image Processor.
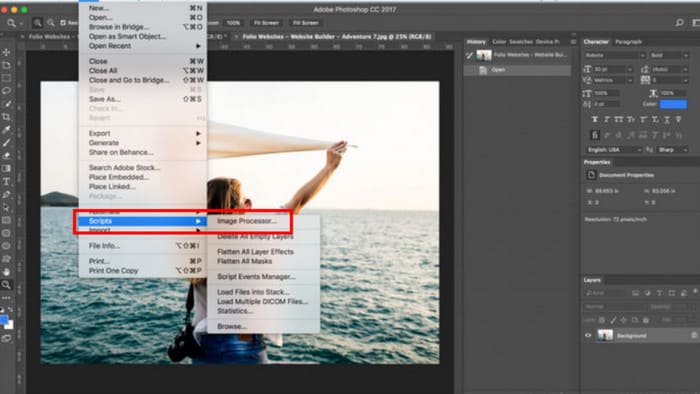
Langkah 3. Klik Select Folder di bagian Select the images to process dan impor foto-foto yang ingin Anda kompres.

Langkah 4. Photoshop akan otomatis membuat folder baru di dalam folder asli untuk menyimpan gambar yang telah dikompres.
Langkah 5. Pada bagian File Type, centang Resize to Fit, lalu tentukan lebar dan tinggi maksimum untuk gambar yang diubah ukurannya.

Bagian 4. Alternatif Photoshop Online untuk Mengurangi Ukuran Gambar - FVC Image Compressor
Antarmuka Photoshop masih terlalu rumit bagi pemula dan mereka yang memiliki tugas pemrosesan gambar yang mendesak. Selain itu, ada cukup banyak langkah yang harus dilakukan untuk mengurangi ukuran gambar. Ada alternatif yang lebih praktis, yaitu FVC Free Image Compressor. Anda hanya perlu mengunggah gambar yang ingin diproses melalui browser, dan alat ini akan secara otomatis mengompres ukuran gambar untuk Anda. Selain itu, Anda juga dapat menyesuaikan rasio aspek secara manual, memutar, atau membalik gambar langsung di halaman web.
Ada masalah lain yang tidak bisa kita abaikan. Penggunaan Photoshop secara rutin memerlukan langganan. Namun, rangkaian produk Adobe mahal. FVC Free Image Compressor adalah alat daring yang sepenuhnya gratis. Pernahkah Anda berpikir tentang pemrosesan gambar secara batch? Pengembang FVC Free Image Compressor tidak mengabaikan detail ini. Saat ini, Anda dapat memproses hingga 40 gambar secara batch pada platform ini.
Langkah 1. Buka situs resmi FVC Free Image Compressor.

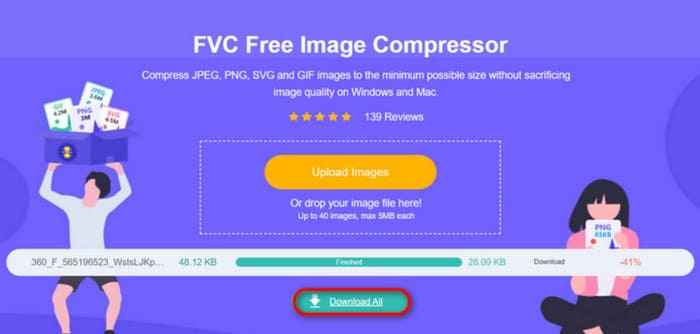
Langkah 2. Klik Upload Images untuk memilih dan mengunggah foto yang ingin Anda kompres.
Langkah 3. Setelah proses kompresi selesai, pratinjau ukuran file yang telah diperbarui. Lalu, klik Download All untuk menyimpan gambar yang dikompres ke perangkat Anda.
Setelah mendapatkan hasil kompresi, apakah Anda terkejut karena ketajaman gambar tidak banyak berkurang? Kompresor Gambar Gratis FVC menggunakan teknik kompresi paling canggih dan efisien untuk menemukan keseimbangan sempurna antara resolusi dan ukuran gambar.
Baik pemula atau profesional, Anda akan menemukan bahwa FVC Free Image Compressor adalah alternatif terbaik untuk Photoshop.
Bagian 5. FAQ tentang Cara Mengecilkan Gambar di Photoshop
Bagaimana Anda bisa mengecilkan gambar di Photoshop tanpa kehilangan kualitas?
Untuk memperkecil ukuran gambar di Photoshop tanpa distorsi, intinya adalah pastikan Anda memilih Resample pada saat operasi. Penting juga untuk memperhatikan perubahan ketajaman saat menyesuaikan rasio aspek.
Bagaimana cara memperkecil foto tanpa memotongnya?
Anda dapat menggunakan pengubah ukuran foto untuk mengubah ukuran tampilan di layar. Atau, pertimbangkan untuk mengompres file gambar. Ini akan membuat ukurannya jauh lebih kecil.
Bagaimana cara membuat foto yang ukurannya kurang dari 1 MB?
Anda dapat menggunakan beberapa kompresor gambar khusus. Alat yang memungkinkan Anda menyesuaikan tingkat kompresi dan melihat pratinjau ukuran gambar terkompresi sebelum mengunduhnya sangat direkomendasikan, seperti Photoshop atau FVC Free Image Compressor.
Kesimpulan
Setelah mempelajari cara mengecilkan gambar di Photoshop pada pembahasan di atas, Anda dapat mencobanya sendiri. Kami telah menyertakan gambar untuk setiap langkah agar Anda dapat melihat setiap detailnya. Jika Anda tidak ingin mengunduh Photoshop ke perangkat Anda atau merasa enggan karena antarmukanya yang rumit, cobalah menggunakan FVC Free Image Compressor untuk gambar-gambar Anda. Alat ini mudah digunakan, langkah-langkahnya sederhana, dan layanannya gratis.
-
 Cara Mengompres MXF dengan Premiere Pro dan Online Gratis
 Bagaimana cara kompres MXF dengan ukuran file yang lebih kecil? Bagaimana cara mengompres file MXF di Adobe Premiere Pro? Posting ini membagikan 2 cara untuk mengompres file MXF.
-
 Cara Kompres File MOV dengan Mudah: 6 Pilihan Gratis untuk Anda
 Untuk mengompres MOV, Anda dapat merujuk ke 6 opsi dalam artikel ini, termasuk 3 perangkat lunak desktop dan 3 platform daring. Kami akan menunjukkan cara menggunakannya di sini.
-
 Cara Mengompres Video MP4 ke Ukuran yang Lebih Kecil
 Video MP4 terlalu besar untuk diunggah? Ingin memperkecil ukuran video? Berikut adalah 3 cara efisien untuk mengompres file MP4 ke ukuran yang lebih kecil tanpa batas.