


Kako jednostavno smanjiti veličinu slike na Macu [Krajnji vodič]
Kada imate posla s velikim slikovnim datotekama na svom Macu, nemojte se uzrujavati! Postoje načini da se riješi ovaj problem.
Razumijemo potrebu za kompresijom slika jer ih tako činimo prikladnijima za rukovanje i praktičnijima za upotrebu. Često ćete primijetiti da neki sustavi od nas zahtijevaju učitavanje slikovnih datoteka određene veličine, neke se web‑stranice učitavaju sporije, a slanje slika putem e‑pošte oduzima vrijeme. Svi ti problemi imaju isti izvor – veliku slikovnu datoteku. Stoga ćemo se u ovom članku pozabaviti s tri metode pomoću kojih možete jednostavno smanjiti veličinu slike na Macu. To je osobito korisno kada trebate optimizirati svoj radni tijek i osigurati da su vaše slike dostupne i da se brzo učitavaju.

Dio 1. Smanjite veličinu slike na Macu smanjenjem piksela
Mac uređaji imaju izvrstan način smanjivanja slika pomoću svojih ugrađenih alata. S njima korisnici Maca mogu jednostavno i slobodno komprimirati svoje fotografije odmah na svojim uređajima.
Preview je ugrađeni alat za preglednik slika i PDF-a. S ovim alatom korisnici ne mogu uživati samo u njegovim značajkama za pregledavanje slika i PDF datoteka. Također, mogu iskoristiti njegove značajke za uređivanje gdje mogu jednostavno smanjiti veličinu slike na Macu. Štoviše, vrlo je praktičan i besplatan za korištenje, što ga čini dostupnim svima. Da biste to učinili, slijedite korake u nastavku:
Korak 1. Prvo otvorite aplikaciju Preview na svom Mac uređaju.
Korak 2. Nakon toga otvorite slikovnu datoteku kojoj želite smanjiti veličinu tako da odete na karticu File i kliknete gumb Open.
Korak 3. Sada idite na karticu Tool u kontekstnom izborniku, a zatim kliknite Adjust Size.

Korak 4. Odaberite Resample Image ako želite smanjiti veličinu slikovnih datoteka.

Korak 5. Sada promijenite vrijednost polja Resolution. Kada to učinite, nova veličina prikazat će se na dnu.
Kako biste održali što je moguće višu kvalitetu dok smanjujete veličinu slike na Macu, možete metodom pokušaja i pogreške isprobati koje postavke razlučivosti najbolje odgovaraju određenoj slici. Pri tome je važno krenuti s manjim smanjenjem razlučivosti i postupno ga povećavati dok ne postignete dobru ravnotežu između kvalitete slike i veličine datoteke.
Dio 2. Komprimirajte veličinu slike na Macu pomoću prečaca
Ako želite jednostavniji način komprimiranja veličine slike na Macu, možete upotrijebiti Quick Actions za pojednostavljenje procesa komprimiranja slika. Na taj način možete izvršavati razne zadatke izravno iz Findera bez potrebe za otvaranjem aplikacije. To uključuje mogućnost brze i učinkovite promjene veličine slika. Štoviše, pruža praktičan postupak za obavljanje osnovnih zadataka uređivanja slika, poput promjene veličine, što je korisno za one koji trebaju brzo obraditi više slika.
Evo kako možete koristiti Quick Actions za kompresiju veličine slike na Macu:
Korak 1. Desnom tipkom miša kliknite sliku koju želite komprimirati.
Korak 2. U kontekstnom izborniku odaberite Quick Actions, a zatim Convert Image.
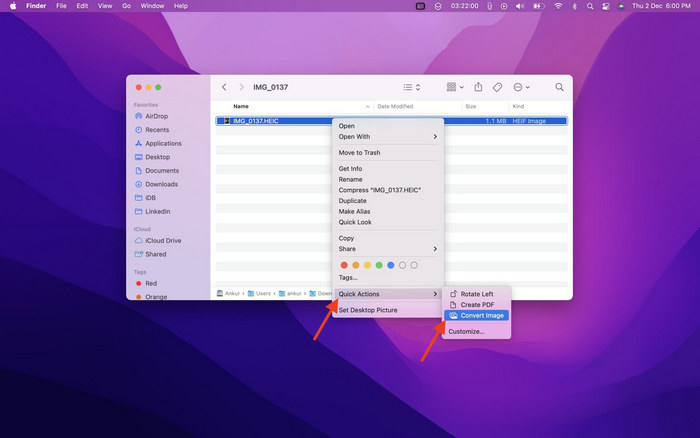
Korak 3. Kliknite polje Image Size i s padajućeg izbornika odaberite Small, Medium ili Large, pri čemu se prikazuju i odgovarajuće veličine datoteka.
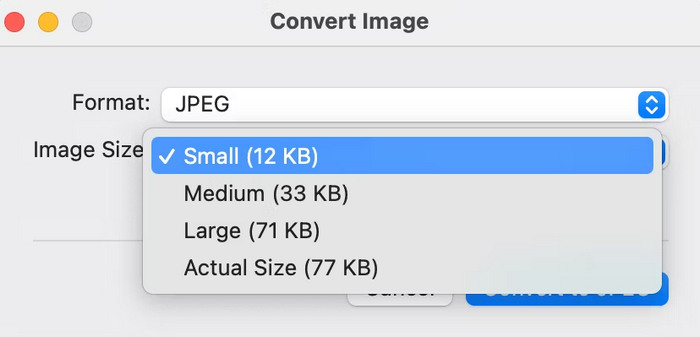
Korak 4. Označite Preserve Metadata kako biste zadržali sve informacije o slici.
Ako želite prilagoditi svoje Brze radnje i želite ih uključiti u najčešće korištene opcije promjene veličine. To možete učiniti putem postavki sustava pod proširenjima. Štoviše, ako želite smanjiti sliku na Macu za skupnu kompresiju, samo odaberite više slika prije primjene Quick Action kako biste uštedjeli vrijeme.
Dio 3. Najbrži način komprimiranja slika na Macu [do 40 slika odjednom]
Ako tražite alternativni alat za smanjenje veličine slike na Macu, možete isprobati FVC Free Image Compressor. Ovaj je alat potpuno besplatan i podržava skupnu kompresiju, pri čemu korisnici mogu istodobno smanjiti do 40 slikovnih datoteka. Štoviše, ovaj alat koristi najbolje algoritme za optimizaciju i kompresiju kako bi sačuvao kvalitetu komprimirane fotografije. Što se tiče jednostavnosti upotrebe, idealan je za početnike jer su dovoljna samo dva koraka, a kompresija se potom odvija automatski.
Kako komprimirati JPEG pomoću FVC Free Image Compressor alata
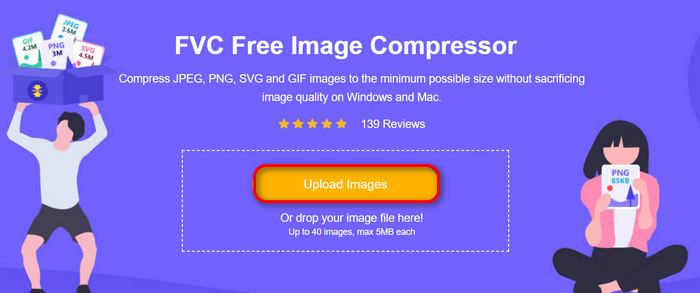
Korak 1. Za početak trebate otvoriti njihovu službenu web‑stranicu tako da u pregledniku potražite FVC Free Image Compressor.
Korak 2. Zatim kliknite Upload Images kako biste uvezli fotografije koje želite komprimirati na svom Macu. Alat će ih automatski komprimirati.
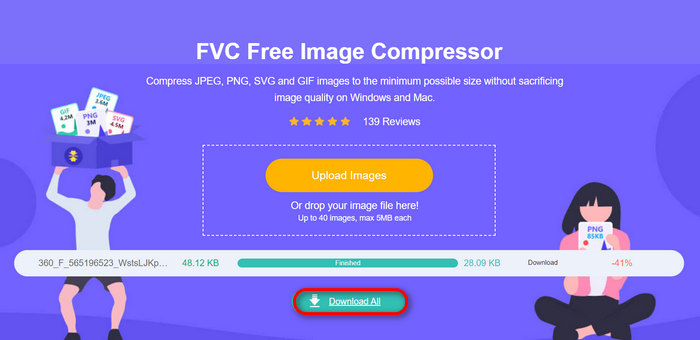
Korak 3. Nakon kompresije možete pregledati novu veličinu datoteka svojih komprimiranih slika. Na kraju kliknite Download All kako biste spremili svoje slike.
S besplatnim kompresorom slika FVC možete jednostavno smanjiti veličinu slike na Macu, osigurati kvalitetan ispis, podržati širok raspon formata slikovnih datoteka i imati druge važne značajke poput skupne kompresije.
Možete iskoristiti značajku skupnog sažimanja ovog alata kako biste uštedjeli vrijeme, posebno ako imate hrpu slika za sažimanje. Sve što trebate učiniti je uvesti ih istovremeno u alat. Ali imajte na umu da možete komprimirati do 40 slika odjednom, čineći proces bržim i učinkovitijim.
Dio 4. Često postavljana pitanja o smanjenju veličine slike na Macu
Kako promijeniti veličinu slike u Apple Photos?
Kako biste promijenili veličinu slike u Apple Photos, možete koristiti njegovu ugrađenu značajku za uređivanje gdje možete izrezati fotografiju. Da biste to učinili, otvorite fotografiju u aplikaciji i dodirnite gumb za uređivanje. Zatim dodirnite alat za obrezivanje i prilagodite vidljivo područje slike. Također, možete povući kutove okvira za izrezivanje kako biste promijenili veličinu vidljivog područja fotografije ili odaberite unaprijed postavljeni omjer širine i visine za veću kontrolu.
Kako smanjiti sliku u MB na Macu?
Kako biste smanjili sliku u MB na Macu, koristite aplikaciju Preview za kompresiju, gdje možete smanjiti razlučivost i dimenzije slike kako biste smanjili veličinu datoteke. Ali imajte na umu da će smanjenje kvalitete smanjiti veličinu datoteke, ali može malo utjecati na izgled slike.
Što je aplikacija za skupnu promjenu veličine slike za Mac?
Batch Photo Resizer izvrstan je batch alat za promjenu veličine slika za Mac. Pruža sveobuhvatan skup funkcija koji je savršen za smanjenje veličine slika. Uz to možete skupno promijeniti veličinu svojih slika na željene dimenzije, uz zadržavanje što je moguće više kvalitete.
Zaključak
Zaključno, poznavanje pravog alata kojim ćete smanjiti veličinu slike na Macu važno je, posebno kada radite sa slikama. Dakle, bez obzira na alat ili metodu koju ćete koristiti, svaka od njih može vam učinkovito pomoći u komprimiranju slika. Jeste li spremni iskoristiti sve ove alate za kompresiju svojih fotografija? Započnite već danas!
-
 Kako smanjiti veličinu datoteke fotografije na iPhoneu: koraci za sve iOS-e
 Imate posla s velikim slikovnim datotekama na svom iPhoneu i teško vam ih je prenijeti? Ovaj članak će biti vaš vodič o tome kako smanjiti veličinu datoteke fotografije na iPhoneu.
-
 Komprimirajte PNG: 5 najboljih metoda koje morate znati [2024]
 Pitate se koji su alati najbolji za komprimiranje PNG-a? U ovom članku saznajte više o njih 5 i saznajte kako ih možete smanjiti, a da zadržite njihov vizualni izgled.
-
 Omjer kompresije fotografija: Što trebam znati? [Pregled]
 Saznajte što je omjer kompresije fotografije i kako on utječe na kvalitetu slike. Također, vodite se o tome kako promijeniti ovaj omjer kompresije kada je to učinjeno neispravno.