


अपने प्रोजेक्ट वीडियो के लिए वीडियो को गहरा कैसे बनाएं
जब वीडियो प्रोडक्शन की बात आती है, तो अक्सर इस्तेमाल की जाने वाली एक तकनीक फुटेज के कुछ हिस्सों को गहरा करना होती है। यह प्रक्रिया कई कारणों से की जा सकती है, जैसे किसी खास मूड या वातावरण को बनाना, स्क्रीन के किसी विशेष हिस्से पर ध्यान आकर्षित करना, या खामियों को छुपाने में मदद करना। वीडियो को डार्क करना (गहरा करना) का एक मुख्य कारण किसी दृश्य में ड्रामा और तनाव जोड़ना है। एक्सपोज़र को कम करके और कॉन्ट्रास्ट बढ़ाकर, छायाएँ ज्यादा गहरी हो जाती हैं और हाइलाइट्स कम हो जाती हैं, जिससे फुटेज और ज्यादा भयावह और अशुभ महसूस होता है। यह प्रक्रिया खास तौर पर हॉरर फिल्मों या थ्रिलर में प्रभावी होती है, जहाँ दर्शकों को असहज महसूस कराना मकसद होता है। अपने प्रोजेक्ट वीडियो के लिए, आपको नीचे दिए गए विस्तृत मार्गदर्शनों के साथ यह तकनीक सीखनी होगी।.

भाग 1. वीडियो को ऑफ़लाइन काला कैसे करें
1. वीडियो कनवर्टर अल्टीमेट
Video Converter Ultimate एक शक्तिशाली एप्लिकेशन और वीडियो एडिटिंग यूटिलिटी है जो आपको आपकी ज़रूरत की हर चीज़ दे सकती है। क्या आपको अपने प्रोजेक्ट वीडियो की ब्राइटनेस कम करने में मदद चाहिए? यह टूल आपके वीडियो की दिखावट की ब्राइटनेस घटाने का एक व्यावहारिक तरीका प्रदान करता है। इसमें एक उन्नत वीडियो यूटिलिटी, Video Enhancer, शामिल है जो प्रोजेक्ट वीडियो की ब्राइटनेस और कॉन्ट्रास्ट को अपने आप समायोजित कर देती है। यह फ़ाइल का आंतरिक रूप से विश्लेषण करती है और कॉन्ट्रास्ट को इस तरह समायोजित करती है कि फ़ाइल पर रोशनी बेहतर दिखे, जैसे कि इसे कम रोशनी वाले वातावरण या सेटिंग में कैप्चर किया गया हो। इस ऐप का उपयोग करने की विस्तृत गाइड सीखने के लिए आप नीचे दिए गए दिशा-निर्देश देख सकते हैं।.
चरण 1. ऐप डाउनलोड करें
अपने वीडियो फ़ाइल को बेहतर बनाने और संशोधित करने की शुरुआत अपने पीसी पर यह सॉफ़्टवेयर प्राप्त करके करें। इस चरण के नीचे दिए गए Free Download पर क्लिक करें। इसका फ़ाइल इंस्टॉलर प्राप्त करें और फ़ाइल को अपने कंप्यूटर पर चलाएँ।.
Free DownloadWindows 7 या बाद के वर्ज़न के लिएसिक्योर डाउनलोड
फ्री डाउनलोडMacOS 10.7 या उसके बाद के वर्ज़न के लिएसुरक्षित डाउनलोड
चरण 2. वीडियो इम्पोर्ट करें
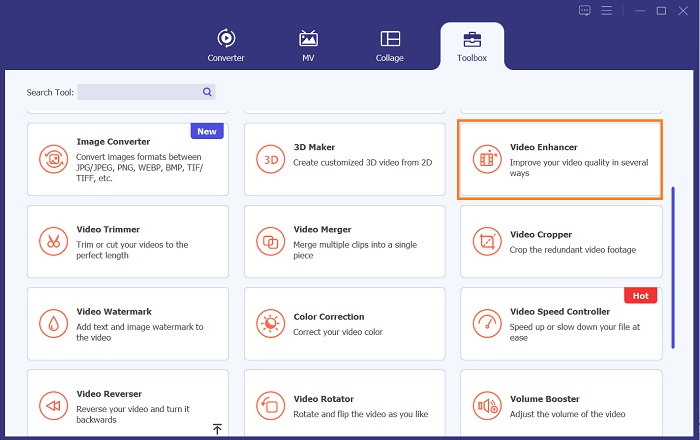
अगला चरण ऐप को लॉन्च करना और वह वीडियो जोड़ना है जिसे आपको एन्हांस करना है। जहाँ सभी उन्नत फीचर मौजूद हैं, वहाँ जाने के लिए Toolbox विकल्प पर जाएँ। इसका डायलॉग बॉक्स एक्सेस करने के लिए Video Enhancer फीचर चुनें। + आइकन दबाकर फ़ाइल इम्पोर्ट करें।.
चरण 3. प्रक्रिया को अंतिम रूप दें
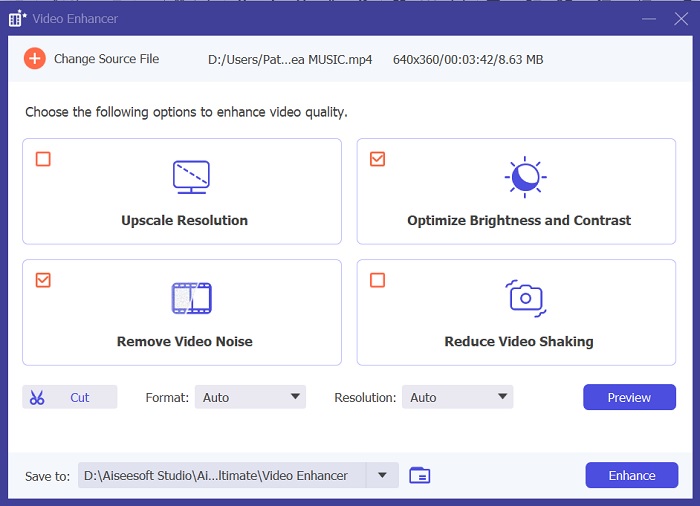
इसके बाद, जैसे ही चयनित वीडियो इम्पोर्ट हो जाए, आपकी स्क्रीन पर चार विकल्प दिखाई देंगे। वीडियो को अपने आप प्रोसेस करने के लिए Optimized Brightness and Contrast मेन्यू चुनें। फिर वीडियो को निर्धारित आउटपुट फ़ोल्डर में एक्सपोर्ट कर दिया जाएगा। फ़ाइल खोजें और प्रोजेक्ट वीडियो के कॉन्ट्रास्ट की जाँच करने के लिए उसे चलाएँ।.
2. एडोब प्रीमियर प्रो
प्रीमियर प्रो एक अभिनव वीडियो उपयोगिता सॉफ्टवेयर है जो अपने सहज इंटरफ़ेस, अन्य एडोब उत्पादों के साथ सहज एकीकरण और मजबूत सुविधाओं के साथ कई पेशेवर वीडियो संपादकों की पसंदीदा पसंद बन गया है। प्रीमियर प्रो के महत्वपूर्ण लाभों में से एक एसडी से एचडी से 4K और उससे आगे तक वीडियो प्रारूपों की एक विस्तृत श्रृंखला को संसाधित करने की क्षमता है। यह सुविधा कैमरे, मोबाइल डिवाइस और ड्रोन सहित विभिन्न स्रोतों से फुटेज के साथ काम करना आसान बनाती है। यदि आपके वीडियो की रोशनी को समायोजित करने की आवश्यकता है, तो एडोब प्रीमियर प्रो अपने ल्यूमेट्री कलर पैनल फीचर के साथ एक बड़ी मदद है, जो किसी फ़ाइल के कंट्रास्ट और चमक को समायोजित कर सकता है। इसके अलावा, प्रीमियर प्रो उन्नत रंग सुधार उपकरण, ऑडियो संपादन क्षमताएं, दृश्य प्रभाव और बहुत कुछ प्रदान करता है।
चरण 1. Premiere Pro पर ब्राइटनेस एडिट करने के लिए, आपको यह ऐप अपने पीसी पर डाउनलोड करना होगा। आप इसके मुख्य वेब पेज पर इसका फ़ाइल इंस्टॉलर खोज सकते हैं और ऐप इंस्टॉल करने के लिए इसका फ़र्मवेयर प्राप्त कर सकते हैं। टूल लॉन्च करें और Import बटन दबाकर वीडियो फ़ाइल इम्पोर्ट करें।.
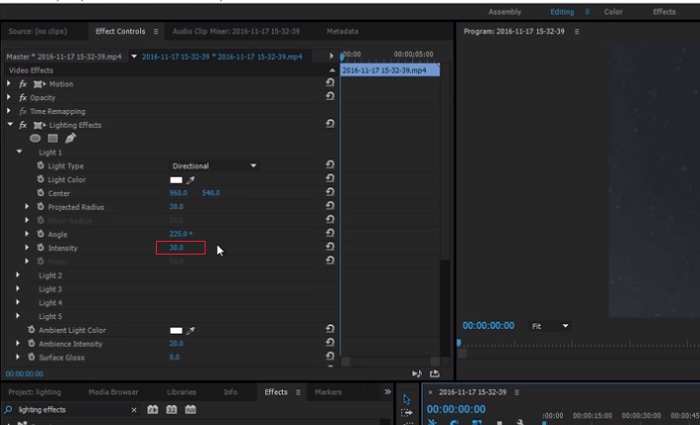
चरण 2. स्क्रीन के ऊपर बाएँ कोने में Color टैब पर क्लिक करके Lumetri Color पैनल खोलें। Lumetri Color पैनल में आपको विभिन्न कलर करेक्शन विकल्प दिखाई देंगे। ब्राइटनेस समायोजित करने के लिए, Basic Correction सेक्शन खोजें। यहाँ आप क्लिप की ब्राइटनेस बदलने के लिए Exposure स्लाइडर का उपयोग कर सकते हैं। ब्राइटनेस बढ़ाने के लिए स्लाइडर को दाएँ की ओर खींचें या ब्राइटनेस घटाने के लिए बाएँ की ओर।.
चरण 3. अंत में, फ़ाइल को सेव करने के लिए Export बटन पर क्लिक करें। वीडियो के रेंडर होने का इंतज़ार करें और उसे टूल के आउटपुट फ़ोल्डर में खोजें। प्रोजेक्ट वीडियो चलाएँ और प्रीव्यू करें कि किए गए बदलाव आपकी पसंद के अनुसार हैं या नहीं।.
3. एडोब आफ्टर इफेक्ट्स
आफ्टर इफेक्ट्स में चमक को समायोजित करते समय, कई सुविधाएँ काम में आती हैं। सबसे पहले, लेवल प्रभाव का उपयोग चमक और कंट्रास्ट को समायोजित करने के लिए किया जा सकता है। यह प्रभाव आपको काले और सफेद बिंदु सेट करने की अनुमति देता है, जो यह सुनिश्चित करने में मदद करता है कि आपकी छवि बहुत अधिक धुंधली या बहुत गहरी न हो जाए। आप विशिष्ट वीडियो भागों की चमक और कंट्रास्ट को समायोजित करने के लिए कर्व्स प्रभाव का भी उपयोग कर सकते हैं। यह सुविधा छाया या हाइलाइट में विवरण सामने ला सकती है। एक अन्य उपयोगी विशेषता एक्सपोज़र प्रभाव है, जो आपको संपूर्ण छवि की चमक और कंट्रास्ट को बदलने की अनुमति देता है। इस प्रभाव में गामा और ऑफसेट को समायोजित करने के विकल्प भी शामिल हैं, जो आपकी छवि के स्वरूप को बेहतर बनाने में आपकी सहायता कर सकते हैं।
चरण 1. After Effects पर वीडियो की दिखावट एडिट करने का शुरुआती कदम टूल का फ़र्मवेयर प्राप्त करना और उसे अपने पीसी पर इंस्टॉल करना है। आप इसे Adobe की आधिकारिक वेबसाइट से डाउनलोड या प्राप्त कर सकते हैं और इसका फ़ाइल इंस्टॉलर चला सकते हैं। फिर ऐप लॉन्च करें और इसकी खूबियों को नेविगेट करें।.
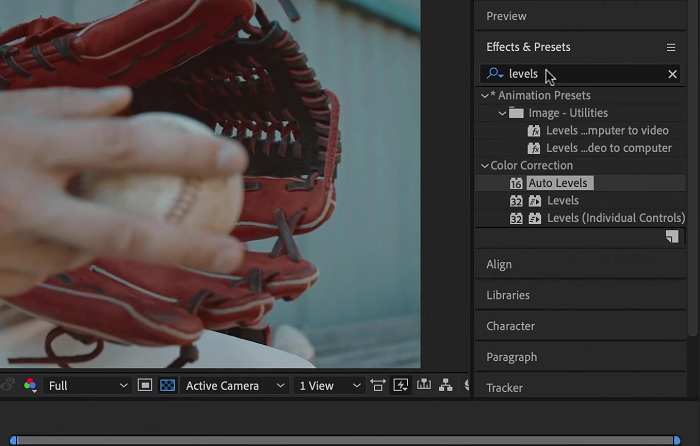
चरण 2. अगला कदम वीडियो को इम्पोर्ट करना है, इसके लिए File विकल्प पर जाएँ और Import विकल्प दबाएँ। अपना वीडियो खोजें और उसे वीडियो एडिटिंग में जोड़ने के लिए टैप करें। उसके बाद Windows टैब पर जाएँ और Effects and Presets पर क्लिक करें। एक ट्रैकिंग बॉक्स दिखाई देगा जिसमें आप Levels विकल्प खोज सकते हैं।.
चरण 3. अंत में, Auto Level पर क्लिक करें और उसे खींचकर उस वीडियो पर छोड़ें, जिसकी ब्राइटनेस आपको अपने प्रोजेक्ट क्लिप में कम करनी है। बदलावों को सेव करने के लिए Export विकल्प दबाएँ। आप अपनी फ़ाइल की ब्राइटनेस समायोजित करने के लिए अलग-अलग प्रीसेट्स भी इस्तेमाल कर सकते हैं। आउटपुट फ़ोल्डर में जाएँ, संशोधित प्रोजेक्ट वीडियो को प्रीव्यू और चेक करें।.
4. दा विंची संकल्प
जब वीडियो संशोधन की बात आती है, तो डेविंसी रिज़ॉल्यूशन एक शक्तिशाली सॉफ्टवेयर और वीडियो उपयोगिता है जो आपके फुटेज की गुणवत्ता को बढ़ाने के लिए विभिन्न प्रकार की संपादन सुविधाएँ प्रदान करता है। सबसे आम संपादन तकनीकों में से एक वीडियो को काला करना है, जो आपके दृश्यों को नाटकीय रूप से प्रभावित कर सकता है। इस वीडियो संपादन सॉफ़्टवेयर की उपयोगकर्ता की पसंदीदा विशेषताओं में से एक फ़ुटेज को आसानी से रंग-ग्रेड करने की क्षमता है। सॉफ़्टवेयर में रंग ग्रेडिंग टूल की एक विस्तृत श्रृंखला है जो उपयोगकर्ताओं को कलात्मक दृष्टि से मेल खाने के लिए फुटेज के स्वरूप और अनुभव को संशोधित करने के लिए अधिकृत करती है। यह एक टाइमलाइन पैनल के साथ भी आता है जिसमें उपयोगकर्ता बेहतर संपादन प्रक्रिया प्रदान कर सकते हैं। डेविंसी रिज़ॉल्व अपने उन्नत उपकरणों के साथ इस प्रक्रिया को आसान और कुशल बनाता है।
चरण 1. DaVinci Resolve का उपयोग करके किसी वीडियो की एक्सपोज़र समायोजित करने की शुरुआती गाइड यह है कि इस टूल को अपने पीसी पर प्राप्त करें। इसकी आधिकारिक वेबसाइट से ऐप डाउनलोड करें और इसे प्राप्त करने के लिए फ़ाइल इंस्टॉलर चलाएँ। फिर वीडियो एडिटिंग ऐप लॉन्च करें और इसकी खूबियों को जाँचें ताकि आप इसकी एडिटिंग यूटिलिटीज़ से परिचित हो जाएँ।.
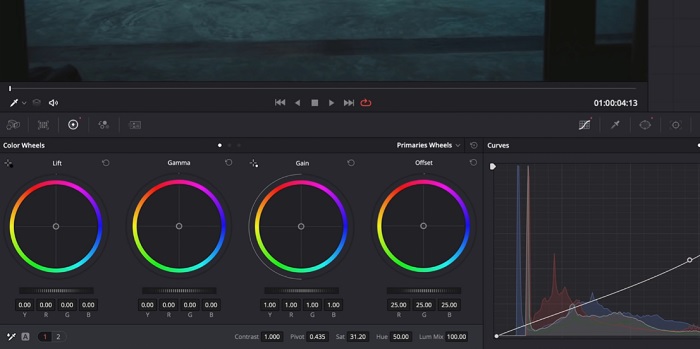
चरण 2. DaVinci Resolve के साथ वीडियो को डार्क करने के लिए, File विकल्प पर क्लिक करके और Import file बटन एक्सेस करके वीडियो इम्पोर्ट करें। फिर आप सॉफ़्टवेयर के कलर ग्रेडिंग टूल्स का उपयोग कर सकते हैं। टाइमलाइन में वह क्लिप चुनें जिसे आपको डार्क करना है, फिर Color पेज खोलें।.
चरण 3. वहाँ से, आप क्लिप की ब्राइटनेस और कॉन्ट्रास्ट समायोजित करने के लिए Lift, Gamma, और Gain कंट्रोल्स का उपयोग कर सकते हैं। इसके बाद, वीडियो प्रोजेक्ट में किए गए बदलाव सेव करने के लिए Export बटन पर क्लिक करें और चुनें। आउटपुट फ़ोल्डर एक्सेस करें और फ़ाइल का प्रीव्यू करें।.
भाग 2. ऑनलाइन वीडियो को काला कैसे करें
क्या आप अपने पीसी पर एक साधारण वीडियो क्लिप को समायोजित करने के लिए भारी वीडियो संपादन सॉफ़्टवेयर का उपयोग करके थक गए हैं? खैर, वीडियो संपादन के विकल्प के रूप में क्लिडियो एक बड़ी मदद हो सकता है, क्योंकि यह बड़ी मात्रा में कंप्यूटर स्थान की खपत करता है। यह ऑनलाइन टूल उपयोगकर्ताओं को इसके टाइमलाइन पैनल तक आसानी से पहुंचने और किसी खाते को इंस्टॉल या लॉग इन किए बिना इसके एपीआई में वीडियो आयात करने में सक्षम बनाता है। उपयोगकर्ता सीधे उस वीडियो फ़ाइल को अपलोड कर सकते हैं जिसे उन्हें संपादित करने की आवश्यकता है, और ऑनलाइन टूल प्रोजेक्ट क्लिप की उपस्थिति को बढ़ाने और बढ़ाने के लिए विश्लेषण करेगा और संपादन सुविधाएं प्रदान करेगा। आप इस ऑनलाइन ऐप का पूरी तरह से उपयोग करने के बारे में नीचे दी गई विस्तृत मार्गदर्शिका देख सकते हैं।
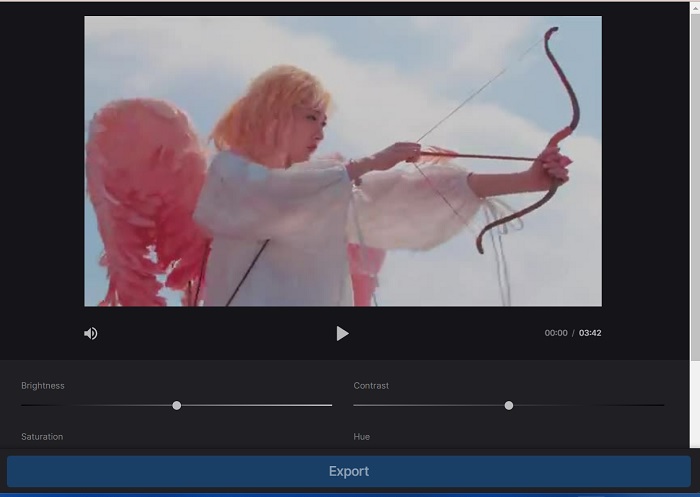
चरण 1. Clideo पर ब्राइटनेस समायोजित करने के लिए, अपने वेब ब्राउज़र पर इस ऐप को एक्सेस करें। मुख्य इंटरफेस लॉन्च करें और Choose File दबाकर अपना वीडियो क्लिप प्लेटफ़ॉर्म पर अपलोड करना शुरू करें। जिस वीडियो को आपको एडिट करना है उसे चुनें और ऑनलाइन टूल पर इम्पोर्ट करें।.
चरण 2. अगला, वीडियो प्लेयर के नीचे मौजूद मेनू से Adjust विकल्प चुनें। इस तरीके से आप कई एडिटिंग टूल्स का उपयोग कर सकेंगे, जिनमें ब्राइटनेस समायोजित करने का विकल्प भी शामिल है। ब्राइटनेस घटाने या बढ़ाने के लिए brightness slider को क्रमशः बाएँ या दाएँ खींचें।.
चरण 3. आप ब्राइटनेस अपने आप समायोजित करने के लिए ऑटो-अजस्ट बटन का भी उपयोग कर सकते हैं। एक बार जब आप ब्राइटनेस स्तर से संतुष्ट हो जाएँ, तो अपने बदलाव सेव करने के लिए Apply आइकन या बटन पर क्लिक करें। अंत में, Export विकल्प पर क्लिक करके अपना एडिट किया हुआ वीडियो डाउनलोड करें।.
अधिक पढ़ें:
वीडियो फ़िल्टर: डेस्कटॉप पर फ़िल्टर और इफ़ेक्ट्स के साथ अपने वीडियो को बेहतर बनाएँ
5 शानदार YouTube मूवी मेकर | बेहतरीन मूवी कंटेंट बनाएँ
भाग 3. डार्कन वीडियो के बारे में अक्सर पूछे जाने वाले प्रश्न
iPhone पर वीडियो को काला कैसे करें?
ऐसे विभिन्न सॉफ़्टवेयर हैं जिनका उपयोग आप अपने मोबाइल डिवाइस पर कर सकते हैं और इंस्टॉल कर सकते हैं जो आपके प्रोजेक्ट क्लिप के एक्सपोज़र को समायोजित कर सकते हैं। आप एक ऑनलाइन टूल का भी उपयोग कर सकते हैं जो सीधे आपके स्मार्टफ़ोन पर वीडियो समायोजित करने में आपकी सहायता कर सकता है। क्लिडियो की अनुशंसा की जाती है क्योंकि इसे वेब ब्राउज़र में एक्सेस किया जा सकता है, जिसमें सफारी और अन्य शामिल हैं जो ऐप्पल डिवाइस के साथ संगत हैं।
आप iMovie पर किसी वीडियो को काला कैसे करते हैं?
iMovie पर वीडियो को गहरा करने के लिए चमक और कंट्रास्ट सेटिंग्स समायोजित करें। आप वीडियो को गहरा दिखाने के लिए उसमें गहरा ओवरले या फ़िल्टर भी जोड़ सकते हैं। एक अन्य विकल्प वीडियो को गहरा बनाने के लिए एक्सपोज़र स्तर को समायोजित करना है। जब तक आप अपने वीडियो के लिए वांछित स्वरूप प्राप्त नहीं कर लेते तब तक इन सेटिंग्स के साथ प्रयोग करते रहें।
आप iPhone पर वीडियो को काला क्यों करना चाहेंगे?
किसी वीडियो को काला करना कई परिदृश्यों में सहायक हो सकता है, जैसे समग्र वीडियो गुणवत्ता में सुधार करना, कंट्रास्ट बढ़ाना, या एक निश्चित मूड या माहौल बनाना।
निष्कर्ष
अलग-अलग तरीकों को आज़माने के बाद, इस लेख ने पाया कि पीसी पर किसी वीडियो को डार्क करना काफ़ी आसान हो सकता है। इसके लिए आपको Video Converter Ultimate, Adobe Premiere Pro, DaVinci Resolve और After Effects जैसे वीडियो एडिटिंग सॉफ़्टवेयर का उपयोग करना होगा। एक बार जब आपने सॉफ़्टवेयर इंस्टॉल कर लिया, तो आप अपने वीडियो की एक्सपोज़र को आसानी से संशोधित कर सकते हैं ताकि मनचाहा डार्क इफ़ेक्ट मिल सके। हालाँकि, यह ज़रूरी है कि वीडियो इतना भी हल्का न हो जाए कि उसमें मौजूद विवरण देखना मुश्किल हो जाए। इन सुझावों की मदद से, जो बताते हैं कि बहुत ज़्यादा ब्राइट वीडियो को कैसे ठीक करें, आप सफलतापूर्वक अपने वीडियो को डार्क कर सकते हैं और एक दृश्य रूप से आकर्षक अंतिम उत्पाद तैयार कर सकते हैं।.
-
 क्रॉस-प्लेटफ़ॉर्म में उपलब्ध वीडियो रिज़ॉल्यूशन बदलने के लिए अंतिम मार्गदर्शिका
 वीडियो के वीडियो रिज़ॉल्यूशन को बदलने की आवश्यकता है? अगर ऐसा है, तो आप जिस वीडियो को देख रहे हैं उसका वीडियो रिज़ॉल्यूशन बदलने के लिए विभिन्न तरीकों के बारे में जानें।
-
 वीडियो पर वॉटरमार्क क्या है और इसे कैसे जोड़ें या निकालें?
 क्या आप जानना चाहते हैं कि वॉटरमार्क क्या है, विभिन्न प्रकार के क्या हैं, और फोटोग्राफर्स इसे क्यों जोड़ते हैं? खैर, आपको बस इतना करना है कि इस लेख को पढ़ें।
-
 वीडियो की गुणवत्ता खोए बिना MP4 फ़ाइल को क्रॉप कैसे करें [2023]
 केवल आपके लिए दिए गए आसान चरणों से MP4 को क्रॉप करना सीखें। तो, गति बनाए रखें क्योंकि हम आपके लिए सर्वोत्तम फसल उपकरण प्रस्तुत करते हैं जिनका आप उपयोग कर सकते हैं।