

स्लो मोशन वीडियो बनाने में फाइनल कट प्रो की पूरी क्षमता देखें
Final Cut Pro केवल Mac उपयोगकर्ताओं के लिए उपलब्ध एक शक्तिशाली पोस्ट-प्रोडक्शन वीडियो एडिटिंग टूल है। इस प्रोग्राम की मदद से वीडियो और ऑडियो एडिटिंग, एडवांस्ड कलर ग्रेडिंग, क्लोज़्ड कैप्शनिंग और बहुत कुछ संभव है। अन्य एडिटिंग और डिलीवरी सॉफ्टवेयर की तरह, Final Cut Pro में शुरुआत से अंत तक आपको जो कुछ भी चाहिए, वह सब मौजूद है। यह सॉफ्टवेयर स्लो-मोशन वीडियो बनाने में भी बेहतरीन है, क्योंकि इसमें एक ऐसा टूल है जो वीडियो की प्लेबैक स्पीड को एडजस्ट कर सकता है। जिस तरह का स्लो-मोशन इफेक्ट आप चाहते हैं उसे पाने के लिए, आगे पढ़ते रहें और जानें कि Final Cut Pro का उपयोग करके स्लो-मोशन वीडियो कैसे बनाएँ। अधिक जानकारी के लिए आगे पढ़ें।.

भाग 1. फाइनल कट प्रो पर स्लो मोशन वीडियो कैसे बनाएं?
जब वीडियो या फिल्म में उपयोग किया जाता है, तो धीमी गति किसी विशेष क्रिया पर ध्यान आकर्षित करने या विचाराधीन काम के नाटकीय या भावनात्मक प्रभाव को बढ़ाने में मदद कर सकती है। किसी क्लिप की गति को गिराना अच्छा लगता है, इससे कोई फर्क नहीं पड़ता कि आप इसका उपयोग किस लिए कर रहे हैं। हम आपको कुछ सरल चरणों में फाइनल कट प्रो स्लो-मोशन इफेक्ट बनाने का तरीका दिखाएंगे। चलो इसके लिए चलते हैं, क्या हम?
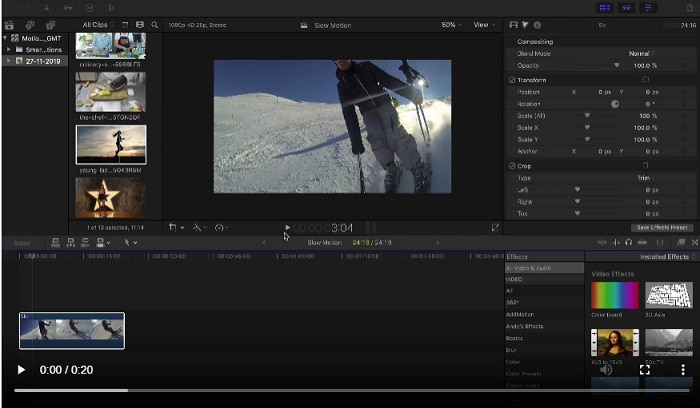
स्टेप 1. टाइमलाइन में जाएँ, और जिस क्लिप को आप एडिट करना चाहते हैं उसे खोजकर उस पर क्लिक करें।.
स्टेप 2. रीटाइम मेन्यू तक पहुँचने के लिए, या तो व्यूअर विंडो में स्पीड मीटर आइकन पर क्लिक करें या फिर कीबोर्ड पर Command + R दबाएँ।.
स्टेप 3. दो स्पीड लेवल में से चुनें: Slow और Fast। वैकल्पिक रूप से, अपने कीबोर्ड पर Command + R दबाकर क्लिप के ऊपर एक ड्रॉपडाउन मेन्यू ला सकते हैं।.
स्टेप 4. क्लिप का टाइमिंग बदलना उतना ही आसान है जितना कि हर विकल्प के नीचे दी गई स्पीड प्रतिशत को एडजस्ट करना। इस इफेक्ट का उपयोग करते समय अगर आप स्पीड बढ़ाएँगे तो क्लिप छोटी हो जाएगी और स्पीड कम करेंगे तो क्लिप लंबी हो जाएगी। क्लिप की अवधि स्पीड के अनुसार बदल जाएगी।.
भाग 2. विंडोज़ पर स्लो मोशन बनाने में उपयोग करने के लिए उत्कृष्ट विकल्प
विधि 1. वीडियो कनवर्टर अल्टीमेट का प्रयोग करें
यदि मान लें कि स्लो-मोशन वीडियो बनाने के लिए Final Cut Pro का उपयोग करना बहुत मुश्किल सॉफ्टवेयर है, तो हम Video Converter Ultimate का उपयोग करने की सलाह देते हैं। यह सॉफ्टवेयर फ्री डाउनलोड के लिए उपलब्ध है और Windows तथा Mac दोनों पर चलता है, इसलिए इसे डाउनलोड करने को लेकर आपको चिंता करने की ज़रूरत नहीं है। इसमें अलग-अलग तरह के टूल उपलब्ध हैं जो आपके वीडियो को एडिट कर सकते हैं, बिल्कुल वैसे ही जैसे Final Cut Pro कर सकता है।.
इन टूल्स में से एक Video Speed Controller है, जो सामान्य स्पीड वाले वीडियो की प्लेबैक स्पीड एडजस्ट करके स्लो-मोशन वीडियो बना सकता है। Final Cut Pro के विपरीत, यह सॉफ्टवेयर उपयोग करने में आसान है और हर टूल को सीखने में अधिक समय नहीं लगता। इसके अलावा, यह अनेक वीडियो फॉर्मेट को सपोर्ट करता है, ताकि जिस वीडियो फॉर्मेट को आपको कन्वर्ट करना है उसके लिए सही सॉफ्टवेयर खोजने में आपको मुश्किल न हो। अब जब आपको यह अंदाज़ा हो गया है कि Video Converter Ultimate कितना अच्छा है, तो आइए देखें कि इस सॉफ्टवेयर की मदद से स्लो-मोशन कैसे बनाया जाए।.
स्टेप 1. सॉफ्टवेयर का उपयोग करने से पहले आपको इसे डाउनलोड और इंस्टॉल करना होगा। ऐसा करने के लिए, बस नीचे स्थित Free Download बटन पर क्लिक करें। इसे अपने डेस्कटॉप पर डाउनलोड करें और Start Now बटन पर क्लिक करके इंस्टॉलेशन शुरू करें।.
फ्री डाउनलोडWindows 7 या बाद के संस्करण के लिएसुरक्षित डाउनलोड
फ्री डाउनलोडMacOS 10.7 या बाद के संस्करण के लिएसुरक्षित डाउनलोड
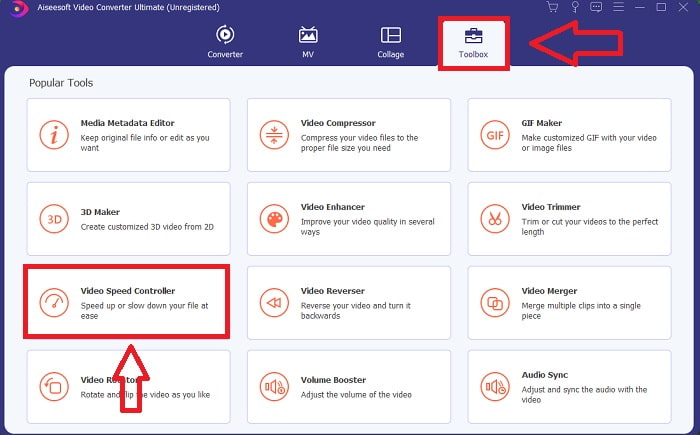
स्टेप 2. प्रोग्राम इंस्टॉल हो जाने के बाद, प्रक्रिया पूरी होने पर आप मुख्य सॉफ्टवेयर इंटरफ़ेस पर स्टार्ट-अप मेन्यू देख पाएँगे। मेन्यू टैब में Toolbox टैब पर क्लिक करके, आप जल्दी और आसानी से इस सॉफ्टवेयर द्वारा प्रदान किए गए सभी फीचर्ड टूल्स देख सकते हैं। और अगर आप अपने वीडियो को धीमा करना या उसकी स्पीड बदलना चाहते हैं, तो उपलब्ध टूल्स की सूची में से Video Speed Controller चुनें।.
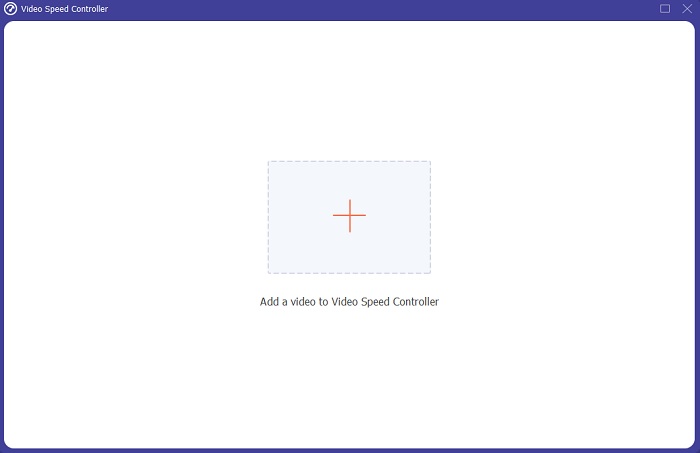
स्टेप 3. यदि आप आगे बढ़ना चुनते हैं, तो आपके कंप्यूटर स्क्रीन पर एक और विंडो दिखाई देगी। प्लस साइन + पर क्लिक करके आप अपना वीडियो अपलोड कर सकते हैं और उसकी प्लेबैक स्पीड में बदलाव शुरू कर सकते हैं।.
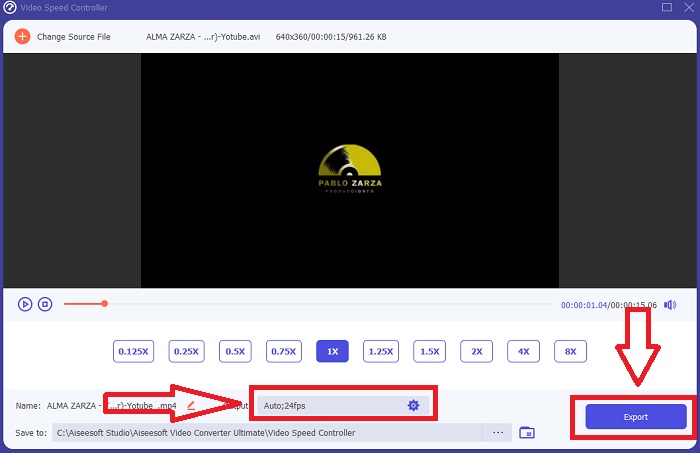
स्टेप 4. Final Cut Pro के विपरीत, यहाँ आप सामान्य स्पीड वाले वीडियो को सिर्फ एक क्लिक में स्लो मोशन बना सकते हैं। इस टूल से स्लो-मोशन वीडियो बनाने के लिए, अब आप अपने वीडियो की प्लेबैक स्पीड कम करेंगे, इसके लिए 1 से नीचे दिए गए सभी मानों पर क्लिक करें; ये पूर्णांक इस बात के गुणक होंगे कि आप अपने वीडियो की फ्रेम रेट को कितनी कम करने जा रहे हैं।.
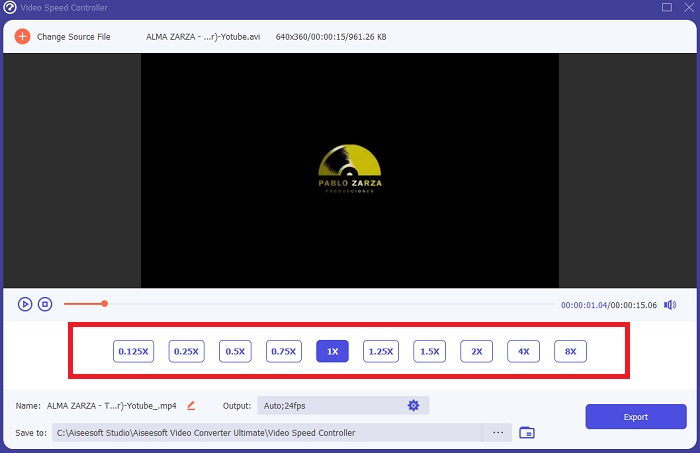
स्टेप 5. जब आप अपने वीडियो की समग्र स्पीड से संतुष्ट हों, तो उसका फॉर्मेट, रेज़ॉल्यूशन, फ्रेम रेट और अन्य पैरामीटर एडजस्ट करके अब आप उसकी क्वालिटी को और बेहतर कर सकते हैं। यदि आप चाहें तो आपको अपने वीडियो आउटपुट का नाम बदलने का विकल्प भी मिलेगा। Export को फ़ाइल मेन्यू से चुनकर और अपने कंप्यूटर के फाइल सिस्टम में कोई लोकेशन ब्राउज़ करके आप अपना काम सेव कर सकते हैं।.
विधि 2. मोशन 5 . का प्रयोग करें
मोशन वीडियो संपादकों के लिए डिज़ाइन किया गया एक शक्तिशाली मोशन ग्राफ़िक्स टूल है जो सिनेमैटिक 2डी और 3डी टाइटल, फ्लूइड ट्रांज़िशन और रीयल-टाइम में यथार्थवादी प्रभाव बनाना आसान बनाता है। मोशन वीडियो संपादकों के लिए डिज़ाइन किया गया है। धीमी गति के वीडियो बनाने में मोशन फाइनल कट प्रो का एक अन्य विकल्प भी है क्योंकि यह मैक पर भी उपलब्ध है। इसके मददगार टूल से अब आप स्लो-मोशन वीडियो आसानी से बना सकते हैं। मोशन 5 का उपयोग करके धीमी गति कैसे करें, इसके बारे में अधिक जानने के लिए, यहां दिए गए चरण दिए गए हैं।
स्टेप 1. Motion 5 खोलें, और वीडियो फ़ाइल को Timeline पर ड्रैग करें।.
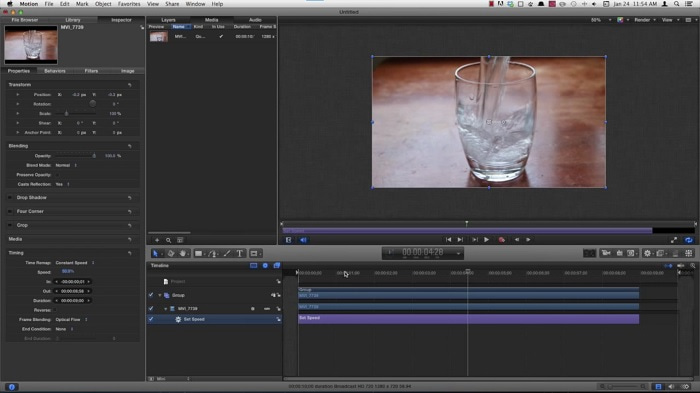
स्टेप 2. मूवी क्लिप को चुनें, और वीडियो ट्रैक के ऊपर मौजूद एडिटिंग टूल्स में Gear आइकन को ढूँढें। उसके बाद, Retiming पर क्लिक करें और आगे Set Speed चुनें।.
स्टेप 3. आगे बढ़ने के बाद, इंटरफ़ेस के बाएँ कोने पर Properties पर क्लिक करें और Inspector विंडो को ढूँढें। आपको नीचे की ओर Retiming सेटिंग दिखेगी। स्लो-मोशन इफेक्ट पाने के लिए स्पीड को 100 से नीचे सेट करें। और ताकि आपका स्लो-मोशन वीडियो स्मूद चले, Frame Blending पर क्लिक करें और Optical Flow चुनें।.
संबंधित:
भाग 3. अंतिम कट प्रो के बारे में अक्सर पूछे जाने वाले प्रश्न
फाइनल कट प्रो में आप ऑडियो की बराबरी कैसे करते हैं?
फ़ाइनल कट प्रो में टाइमलाइन में वीडियो का चयन करें। ऑडियो इंस्पेक्टर के ऑडियो एन्हांसमेंट सेक्शन में इक्वलाइज़ेशन पॉप-अप मेनू से एक अलग इक्वलाइज़ेशन सेटिंग चुनें। यदि आप सभी EQ को हटाना चाहते हैं तो Flat विकल्प चुनें।
आप फ़ाइनल कट प्रो में वीडियो को कैसे स्थिर करते हैं?
फ़ाइनल कट प्रो में टाइमलाइन में एक क्लिप का चयन करके और फिर इंस्पेक्टर बटन पर क्लिक करके वीडियो इंस्पेक्टर तक पहुँचा जा सकता है। उपयुक्त बॉक्स को चेक करके स्थिरीकरण और रोलिंग शटर के बीच टॉगल करें। आप बॉक्स को चेक करके फाइनल कट प्रो की स्थिरीकरण सुविधा का उपयोग कर सकते हैं, और फाइनल कट प्रो इसके विश्लेषण के आधार पर सर्वोत्तम स्थिरीकरण विधि की तलाश करेगा।
फाइनल कट प्रो में आप बाएँ और दाएँ ऑडियो को कैसे संतुलित करते हैं?
ऑडियो इंस्पेक्टर के पैन सेक्शन में मोड पॉप-अप मेनू से स्टीरियो लेफ्ट/राइट चुनें। निम्न में से एक ध्वनि को बाईं या दाईं ओर ले जाने का कारण होगा: पैन राशि वह है जहां आप अपना पैसा लगाते हैं। बस सुनिश्चित करें कि आप इसे ओवरशूट नहीं करते हैं।
निष्कर्ष
अंततः, Final Cut Pro Mac पर उपलब्ध सबसे बेहतरीन सॉफ्टवेयरों में से एक है। इसमें अलग-अलग तरह के टूल हैं जो आपके पोस्ट-एडिटिंग प्रोसेस को काफ़ी बेहतरीन बना सकते हैं। लेकिन यह सिर्फ Mac पर उपलब्ध है, तो अगर आप Windows इस्तेमाल कर रहे हैं तो स्लो-मोशन वीडियो कैसे बनाएँगे? Video Converter Ultimate आपकी इस समस्या का समाधान है; इस सॉफ्टवेयर के बारे में सारी जानकारी ऊपर दी जा चुकी है, और यह कितना बेहतरीन है कि आपकी वीडियो को स्लो मोशन में बदल सकता है।.
-
 IPhone पर वीडियो को गति देने के 3 तरीके [सिद्ध]
 अपने वीडियो की प्लेबैक गति को समायोजित करने में समस्या हो रही है क्योंकि आप iPhone का उपयोग कर रहे हैं? आपकी समस्या में मदद करने के लिए यह एक उत्कृष्ट लेख है।
-
 कैसे एक वीडियो धीमा करने के लिए: बिल्कुल सही युक्तियाँ [डेस्कटॉप/मोबाइल फोन]
 क्या आप ऑनलाइन वीडियो को धीमा करने में मदद करने वाले सर्वोत्तम टूल की खोज करते-करते थक गए हैं? नीचे सूचीबद्ध जानकारी के टुकड़ों से प्रबुद्ध होने के लिए इस विशेष लेख को पढ़ें।
-
 विंडोज मीडिया प्लेयर | वीडियो को गति देना सीखें [सिद्ध]
 आप अपने विंडोज मीडिया प्लेयर का उपयोग करके अपनी वीडियो क्लिप को धीमा करना चाहते हैं, लेकिन आप इसे करने में परेशानी महसूस कर रहे हैं? यह लेख पढ़ने के लिए आदर्श है और विंडोज मीडिया प्लेयर का उपयोग करके वीडियो को गति देने के तरीके के बारे में आपके दृष्टिकोण को स्पष्ट कर सकता है।