


जब आपकी छवि अत्यधिक संपीड़ित हो जाए तो क्या करें: 2 सर्वोत्तम तरीके
किसी इमेज को कंप्रेस करना उन्हें ऑप्टिमाइज़ करने का एक शानदार तरीका है, उन्हें मैनेज करना बहुत आसान है, खासकर, वेबसाइट के इस्तेमाल और भेजने और अपलोड करने जैसी दूसरी चीज़ों के लिए। हालाँकि, जब गलत तरीके से किया जाता है, तो इमेज कंप्रेस करना एक बुरा सपना हो सकता है और इमेज की क्वालिटी को खराब कर सकता है। लेकिन यहाँ आपकी सारी चिंताएँ दूर करने वाली एक चीज़ है। हम इमेज को कंप्रेस करने की ज़रूरत को समझते हैं, लेकिन बेशक, आपको उन्हें सहजता से करने के तरीके के बारे में उचित मार्गदर्शन की ज़रूरत है।
इस लेख में, हम आपको बताएँगे कि अपने अत्यधिक संपीड़ित फ़ोटो के साथ क्या करना है और यह भी समझाएँगे कि ऐसा क्यों होता है। अब अंदाज़ा लगाना बंद कीजिए और शुरू करते हैं!

भाग 1. कोई छवि अत्यधिक संपीड़ित क्यों होती है
किसी छवि के अत्यधिक संपीड़ित हो जाने के कई कारण हो सकते हैं, लेकिन यहां कुछ सामान्य कारण दिए गए हैं, जिन्हें समझने के लिए आपको यह जानना होगा कि ऐसा क्यों होता है:
• जब आप किसी इमेज की फ़ाइल साइज को बहुत ज़्यादा कम करने की कोशिश करते हैं और बहुत ऊँचा कंप्रेशन रेशियो इस्तेमाल करते हैं, तो इससे डेटा का भारी नुकसान हो सकता है। इस तरह का कंप्रेशन इमेज क्वालिटी में स्पष्ट गिरावट लाता है, क्योंकि ज़रूरी डिटेल्स प्रक्रिया में प्रभावित हो जाती हैं।
• ऐसे इमेज कंप्रेसर टूल का इस्तेमाल करना जो अनुचित कंप्रेशन एल्गोरिदम का उपयोग करता हो। अलग‑अलग कंप्रेशन एल्गोरिदम अलग उद्देश्यों के लिए बनाए जाते हैं। जिस इमेज में बहुत ज़्यादा डिटेल की ज़रूरत हो, उसके लिए अगर आप JPEG जैसे लॉसी कंप्रेशन एल्गोरिदम का उपयोग करते हैं, तो क्वालिटी धीरे‑धीरे गिरती जाती है, क्योंकि लॉसी एल्गोरिदम इमेज को कंप्रेस करते समय कुछ डेटा को स्थायी रूप से हटा देते हैं।
• किसी इमेज को बार‑बार कंप्रेस करना उसकी क्वालिटी को ज़रूर प्रभावित करेगा। यह अत्यधिक संपीड़ित फ़ोटो का एक बेहतरीन उदाहरण है, क्योंकि हर बार कंप्रेशन का एक नया चक्र और अधिक डेटा हटा देता है, जिससे इमेज की डिटेल और स्पष्टता धीरे‑धीरे कम होती जाती है।
• कंप्रेशन प्रक्रिया के दौरान गलत सेटिंग्स का इस्तेमाल करना, जैसे ग़लत कंप्रेशन पैरामीटर चुनना या उन्हें गलत तरीके से समायोजित करना, इमेज के अत्यधिक संपीड़ित होने का कारण बन सकता है। इससे आर्टिफैक्ट्स, धुंधलापन और अन्य क्वालिटी से जुड़ी समस्याएँ पैदा हो सकती हैं।
• कम रेज़ॉल्यूशन वाली इमेज से शुरू करना और फिर उसे कंप्रेस करना उसकी क्वालिटी को काफी हद तक खराब कर सकता है। इसकी वजह यह है कि ऐसी इमेज में शुरू से ही कम डिटेल होती है। इस तरह की इमेज को कंप्रेस करने पर वह अत्यधिक संपीड़ित फ़ोटो बन सकती है, जिससे क्वालिटी का नुकसान और ज़्यादा स्पष्ट दिखाई देने लगता है।.
इन कारणों को ध्यान में रखकर, इस बात की काफी संभावना है कि आप अपने फोटो का आकार कम करते समय उन्हें अत्यधिक संपीड़ित करने से बच सकते हैं।
भाग 2. अत्यधिक संपीड़ित फोटो को रोकने का सबसे अच्छा तरीका
जैसा कि बताया गया है, इमेज कंप्रेशन के मामले में, अत्यधिक संपीड़ित फ़ोटो से बचने के लिए आपको सही टूल और सही तरीका अपनाने की ज़रूरत होती है। इसके लिए सबसे अच्छा तरीका यह है कि आप एक भरोसेमंद इमेज कंप्रेसर टूल का उपयोग करें। FVC Free Image Compressor अपनी बेहतरीन ऑप्टिमाइज़ेशन क्षमता और कंप्रेशन एल्गोरिदम की वजह से इस मामले में खास है, जो फ़ाइल साइज कम करते समय इमेज की क्वालिटी को बरक़रार रखता है। इसके अलावा, उपयोगकर्ता इसके बेहद सहज और यूज़र‑फ्रेंडली इंटरफ़ेस का लाभ उठा सकते हैं, क्योंकि उन्हें सिर्फ़ एक क्लिक से अपनी फ़ोटो अपलोड करनी होती हैं और कंप्रेसर टूल उन्हें अपने‑आप कंप्रेस कर देता है।.
FVC फ्री इमेज कंप्रेसर का उपयोग करके फ़ोटो को संपीड़ित करने का तरीका यहां बताया गया है
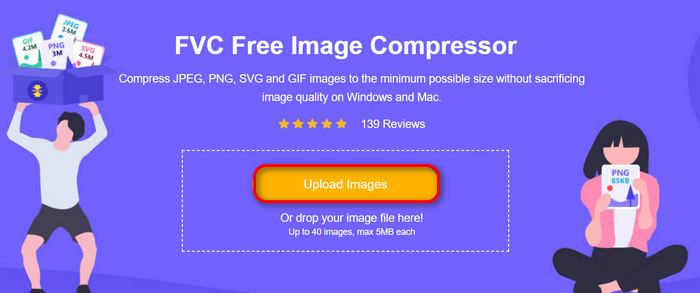
स्टेप 1. अपने ब्राउज़र में जाएँ और सर्च बार में Free Image Compressor टाइप करें।.
स्टेप 2. जब आप वेबसाइट पर पहुँच जाएँ, तो जिन फ़ोटो को आप रीसाइज़ करना चाहते हैं उन्हें इंपोर्ट करने के लिए Upload Images पर क्लिक करें। टूल आपके द्वारा अपलोड की गई सभी फ़ोटो को अपने‑आप कंप्रेस कर देगा।.
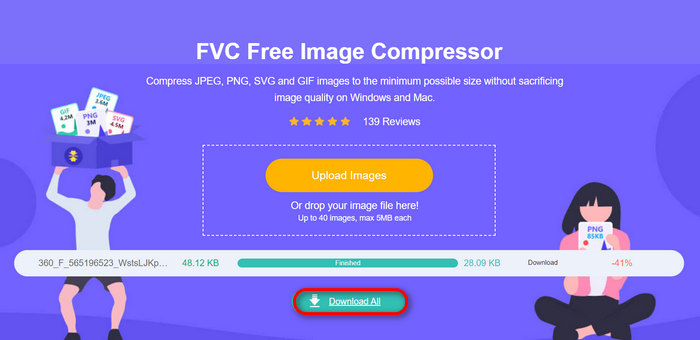
स्टेप 3। कम्प्रेशन प्रक्रिया पूरी होने का इंतज़ार करें। जैसे ही प्रक्रिया समाप्त होगी, आपको एक बार की स्थिति दिखाई देगी जिस पर ‘फिनिश्ड’ लिखा होगा और कम्प्रेस की गई इमेज के पहले और बाद के आकार की जानकारी दी जाएगी। इसके बाद, अपनी इमेज को सेव करने के लिए Download All पर क्लिक करें।.
FVC फ्री इमेज कंप्रेसर का उपयोग करना वास्तव में अत्यधिक संपीड़ित फ़ोटो को रोकने का एक शानदार तरीका है। साथ ही, यह मुफ़्त है और इसे आसानी से ऑनलाइन एक्सेस किया जा सकता है, इसलिए इसे स्वयं देखें और अभी अपनी फ़ोटो को संपीड़ित करने का प्रयास करें।
भाग 3. अत्यधिक संपीड़ित फ़ोटो को कैसे ठीक करें
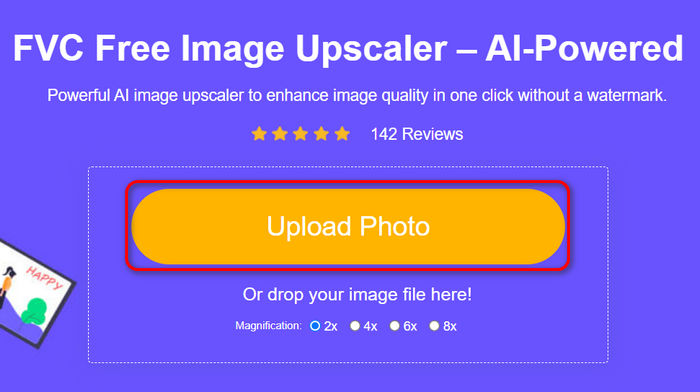
स्टेप 1. सबसे पहले, उनकी आधिकारिक वेबसाइट से FVC Free Image Compressor को एक्सेस करें।.
स्टेप 2. एक बार जब आप इसे एक्सेस कर लें, तो जिस अत्यधिक संपीड़ित फ़ोटो को आप अपस्केल करना चाहते हैं, उसे इंपोर्ट करने के लिए Upload Photo बटन पर क्लिक करें।.
स्टेप 3. अब तय करें कि आप इमेज को कितना अपस्केल करना चाहते हैं। आप अपनी इमेज को 2× से लेकर 8× तक अपस्केल करने का विकल्प चुन सकते हैं।.
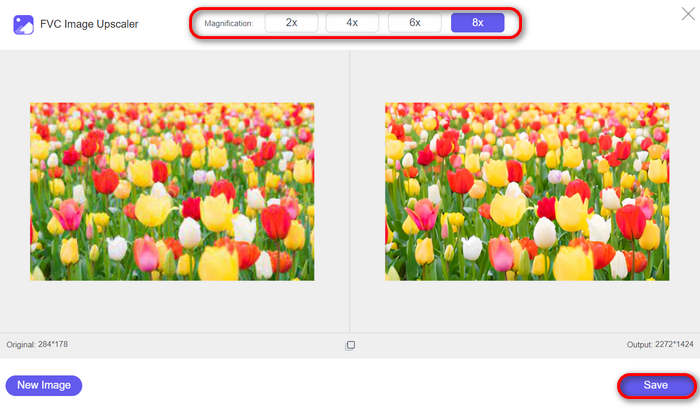
स्टेप 4. काम पूरा होने पर Save बटन पर क्लिक करें, और नया रीसाइज़ किया हुआ फ़ाइल अपने‑आप आपके कंप्यूटर पर डाउनलोड हो जाएगा।.
AI पावर और अन्य सुविधाओं के साथ समर्थित जो एक फोटो को अपस्केल करने के लिए आवश्यक हैं, FVC फ्री इमेज अपस्केलर वास्तव में अत्यधिक संपीड़ित फ़ोटो को ठीक करने के लिए एक ठोस समाधान है। इसका उपयोग करते समय आपको चिंता करने की कोई बात नहीं है क्योंकि यह उपयोगकर्ता के अनुकूल और पूरी तरह से मुफ़्त है।
भाग 4. अत्यधिक संपीड़ित फोटो को ठीक करने के बारे में अक्सर पूछे जाने वाले प्रश्न
क्या संपीड़न से फोटो की गुणवत्ता कम हो जाती है?
हां। संपीड़न फोटो की गुणवत्ता को कम कर सकता है, खासकर जब उच्च संपीड़न अनुपात का उपयोग किया जाता है या जब JPEG जैसे हानिपूर्ण संपीड़न एल्गोरिदम लागू होते हैं। ये विधियाँ फ़ाइल आकार को कम करने के लिए कुछ छवि डेटा को त्याग देती हैं, जिससे गुणवत्ता में स्पष्ट कमी हो सकती है। हालाँकि, ऐसा हमेशा नहीं होता है। जब संपीड़न सही उपकरण के साथ ठीक से किया जाता है, तो संपीड़ित फ़ोटो की छवि गुणवत्ता में कोई स्पष्ट कमी नहीं होगी।
क्या आप संपीड़ित छवि को पुनर्स्थापित कर सकते हैं?
हां, FVC Free Image Upscaler जैसे टूल का उपयोग करके संपीड़ित छवि को पुनर्स्थापित करना संभव है। यह AI-संचालित टूल पिक्सेल, रंग और बनावट को समायोजित करके छवि को बेहतर बनाता है, प्रभावी रूप से इसकी गुणवत्ता को पुनर्स्थापित और बेहतर बनाता है। बस संपीड़ित फ़ोटो को टूल पर अपलोड करें और अपस्केलिंग प्रक्रिया की प्रतीक्षा करें जिसमें केवल कुछ सेकंड लगेंगे।
मैं किसी फोटो का संपीड़न अनुपात कैसे कम कर सकता हूँ?
किसी फोटो के कम्प्रेशन रेशियो को कम करने के लिए, आप इसके लिए विभिन्न तरीकों और उपकरणों का उपयोग कर सकते हैं। लेकिन किसी फोटो के कम्प्रेशन रेशियो को कम करने के शुरुआती-अनुकूल तरीके के लिए, ऐसे उपकरण का उपयोग करना सबसे अच्छा है जो आपको कम्प्रेशन सेटिंग्स को समायोजित करने की अनुमति देता है। FVC Free Image Compressor जैसे उपकरण बेहतरीन अनुकूलन सुविधाएँ प्रदान करते हैं, यह सुनिश्चित करते हुए कि फ़ाइल का आकार कम करते हुए छवि की गुणवत्ता बनी रहे। ऐसा करने के लिए, आपको बस उनकी वेबसाइट पर जाना होगा, वहाँ अपनी तस्वीरें अपलोड करनी होंगी, और उपकरण को उन्हें स्वचालित रूप से संपीड़ित करने देना होगा।
अत्यधिक संपीड़ित फोटो के कुछ संकेत क्या हैं?
यह निर्धारित करने के लिए कई दृश्य संकेत हैं कि क्या फ़ोटो अत्यधिक संपीड़ित है। इनमें धुंधलापन, विवरण का नुकसान, रंग विकृतियाँ और आम तौर पर खराब दिखना शामिल है। ये समस्याएँ इसलिए होती हैं क्योंकि संपीड़न प्रक्रिया के दौरान आवश्यक छवि डेटा खो जाता है।
निष्कर्ष
अत्यधिक संपीड़ित फ़ोटो परेशानी बन सकती हैं, लेकिन सही इमेज कंप्रेसर टूल और सही तरीके के साथ आप इन समस्याओं को रोक भी सकते हैं और ठीक भी कर सकते हैं। फ़ोटो को ज़्यादा कंप्रेस होने से बचाने और उनकी विज़ुअल क्वालिटी बनाए रखने के लिए FVC Free Image Compressor टूल का उपयोग करें। वहीं, अगर आपकी फ़ोटो पहले से ही कंप्रेस हो चुकी है, तो FVC Free Image Upscaler उसे रिस्टोर और एन्हांस कर सकता है, जिससे आपकी इमेज दोबारा अपनी मूल स्पष्टता और डिटेल के काफ़ी नज़दीक पहुँच जाए। इन शक्तिशाली लेकिन उपयोग में आसान टूल्स को अभी आज़माएँ, ताकि आपकी इमेज हमेशा बेहतरीन दिखें!
-
 गुणवत्ता खोए बिना छवियों का आकार बदलने के 3 प्रभावी तरीके
 क्या आप फ़ोटो को कंप्रेस करते समय उसकी क्वालिटी खोने के बारे में चिंतित हैं? अब चिंता न करें! इस लेख में, बिना क्वालिटी खोए आसानी से इमेज का आकार बदलने के 3 तरीकों के बारे में जानें।
-
 GIMP का उपयोग करके छवि से पृष्ठभूमि कैसे हटाएं
 GIMP और छवियों से पृष्ठभूमि हटाने की चरण-दर-चरण प्रक्रिया प्रारंभ करें। आज ही GIMP का उपयोग करके पारदर्शी छवियां बनाने के कुशल तरीके खोजें!
-
 विंडोज़ और मैक पर JPEG को कैसे संपीड़ित करें [अंतिम गाइड]
 क्या आप अपने विंडोज और मैक डिवाइस पर JPEG फ़ाइलों को संपीड़ित करने के लिए एक कुशल टूल की तलाश कर रहे हैं? अभी इस लेख को पढ़ें और सहज संपीड़न के लिए पाँच तरीके जानें।