


یک بررسی کامل برای شما: آیا گوگل درایو عکسها را فشرده میکند؟
برخی از وبسایتها محدودیتهایی در عرض و ارتفاع تصاویر درج شده دارند. بنابراین، اجتنابناپذیر است که با موقعیتی مواجه شوید که نیاز به بزرگ یا کوچک کردن اندازه یک تصویر داشته باشید. وقتی صحبت از کار با تصاویر میشود، اولین چیزی که به ذهن شما خطور میکند، متخصص این صنعت، یعنی فتوشاپ، است. این نرمافزار به خاطر ویژگیهای فراوانش شناخته شده است. برای حرفهایها، فتوشاپ بدون شک انتخاب ایدهآلی برای تغییر اندازه تصاویر است. اما اگر تازهکار هستید، ممکن است در پیدا کردن توابع مربوطه گیر کنید.
اشکالی ندارد؛ ما در جامعترین راهنمای خود دربارهٔ کوچک کردن یک تصویر در فتوشاپ همه چیز را پوشش دادهایم. اگر کار فوریتری دارید، میتوانید از یکی دیگر از ابزارهای ویرایش تصویر که در این مقاله پیشنهاد کردهایم استفاده کنید.
بخش ۱. نحوه تغییر اندازه تصویر در فتوشاپ
بیایید ابتدا نگاهی به کارهایی که میتوانید برای تغییر اندازه تصویر با استفاده از فتوشاپ انجام دهید، بیندازیم.
توجه داشته باشید که مراحل تغییر اندازه تصویر و کاهش اندازه تصویر ممکن است کمی متفاوت باشد. به همین دلیل راهنمای گام به گام را به دو بخش تقسیم میکنیم. در بخش بعدی دستورالعملهای خاصی در مورد کاهش اندازه تصویر خواهید یافت.
مرحله ۱. فتوشاپ را باز کنید، سپس از مسیر File > Open تصویری را که میخواهید تغییر اندازه دهید انتخاب کنید.
مرحله ۲. به مسیر Image > Image Size بروید.
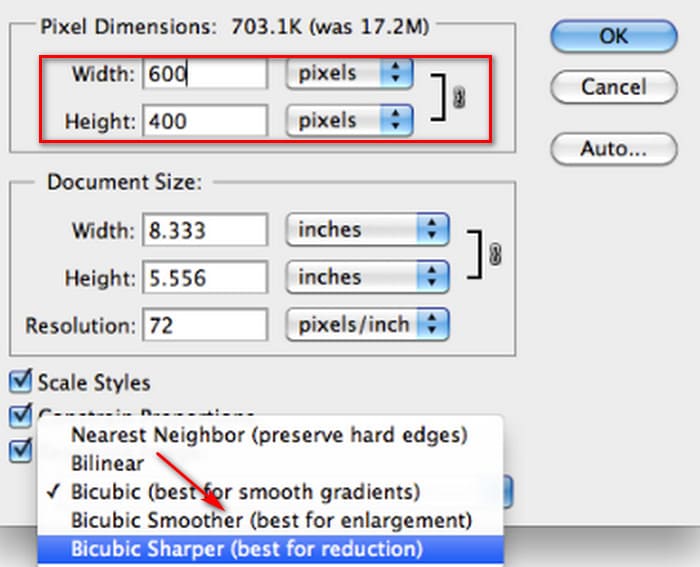
مرحله ۳. در پنجرهٔ محاورهای Image Size ابعاد دلخواهِ پیکسل، اندازهٔ سند، یا وضوح (resolution) موردنظر خود را وارد کنید.
مرحله ۴. پیش از تأیید، یک روش Resampling انتخاب کنید.
Bicubic: مناسب برای گرادیانهای نرم؛ برای دقت بیشتر میانگین مقادیر پیکسلها را محاسبه میکند.
Bicubic Smoother: بهترین گزینه برای بزرگکردن تصاویر، بهویژه تصاویر دارای نویز، و در نتیجه ایجاد ظاهری نرمتر است.
مرحله ۵. روی OK کلیک کنید تا تغییرات اعمال شوند.

اکنون با موفقیت عرض و ارتفاع تصویر خود را تغییر دادهاید. با این حال، لطفاً توجه داشته باشید که این کار ممکن است اندازه فایل تصویر شما را نیز افزایش دهد. بنابراین، در حالی که از نسبت ابعاد آگاه هستید، حتماً بررسی کنید که اندازه فایل تصویر با الزامات پلتفرم شما مطابقت داشته باشد.
بخش ۲. نحوه کوچک کردن تصویر در فتوشاپ
در این بخش، به نحوه کاهش حجم تصویر در فتوشاپ خواهیم پرداخت.
مرحله ۱. فتوشاپ را اجرا کنید و از مسیر File > Open تصویری را که میخواهید ویرایش کنید انتخاب کنید.
مرحله ۲. به مسیر Image > Image Size بروید. با این کار پنجرهٔ محاورهای Image Size باز میشود.
مرحله ۳. با توجه به نیاز خود، مقادیر جدید برای ابعاد پیکسلی، اندازهٔ سند، یا وضوح (resolution) را وارد کنید.
مرحله ۴. یک روش Resampling انتخاب کنید.
Bicubic: مناسب برای گرادیانهای نرم؛ از پیکسلهای اطراف برای تولید نتایج دقیق استفاده میکند.
Bicubic Sharper: برای کوچککردن اندازهٔ تصویر در عین حفظ جزئیات تیز توصیه میشود. اگر تصویر بیش از حد تیز شد، دوباره به Bicubic برگردید.
مرحله ۵. روی OK کلیک کنید تا تغییرات اعمال شده و تصویر شما تغییر اندازه یابد.
اکنون شما با موفقیت اندازه تصویر اصلی را کاهش دادهاید. با این حال، همانطور که در بخش اول مشاهده شد، پس از اتمام عملیات، متوجه تغییر قابل توجهی در اندازه فایل تصویر نیز خواهید شد که عمدتاً در این واقعیت منعکس میشود که فشردهسازی شده و حجم آن کاهش یافته است.
باید توجه داشت که ممکن است از کیفیت تصویر کاسته شده باشد. اگر فکر میکنید این کاهش کیفیت برای تماشای شما کمی آزاردهنده است، میتوانید دوباره با استفاده از افزایشدهندهٔ کیفیت تصویر آن را اصلاح کنید.
بخش ۳. نحوه تغییر اندازه دستهای تصویر در فتوشاپ
برای تغییر اندازه تصویر با فتوشاپ، مراحل زیادی لازم است. وقتی تصاویر زیادی دارید که باید پردازش شوند، کشیدن تک تک آنها به فتوشاپ برای ویرایش بسیار زمانبر و طاقتفرسا است. خوشبختانه ما روش دیگری برای کاهش حجم دستهای تصاویر داریم.
در اینجا نحوه کاهش حجم تصاویر به صورت دستهای در فتوشاپ را آموزش میدهیم.
مرحله ۱. ابتدا همهٔ عکسهایی را که میخواهید بهصورت دستهای فشرده کنید در یک پوشهٔ واحد قرار دهید.
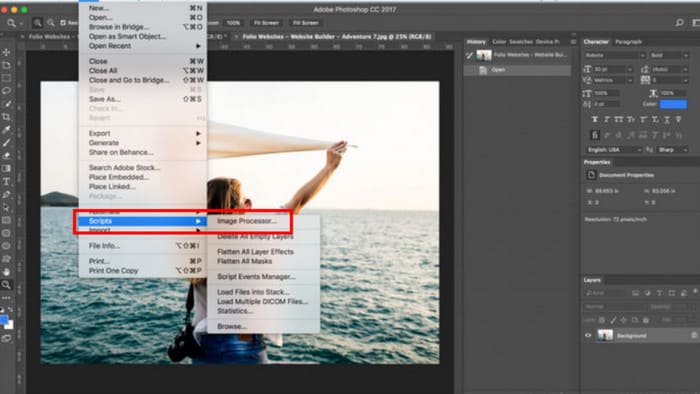
مرحله ۲. فتوشاپ را اجرا کنید، به منوی File بروید، Scripts را انتخاب کنید و سپس Image Processor را برگزینید.
مرحله ۳. زیر بخش Select the images to process روی Select Folder کلیک کنید و عکسهایی را که میخواهید فشردهسازی شوند وارد کنید.

مرحله ۴. فتوشاپ بهصورت خودکار یک پوشهٔ جدید درون پوشهٔ اصلی برای ذخیرهٔ تصاویر فشرده ایجاد خواهد کرد.
مرحله ۵. در بخش File Type، گزینهٔ Resize to Fit را علامت بزنید، سپس حداکثر عرض و ارتفاع موردنظر برای تصاویر تغییر اندازهیافته را مشخص کنید.

بخش ۴. جایگزین آنلاین فتوشاپ برای کاهش حجم تصویر - فشردهساز تصویر ۱TP1T
رابط کاربری فتوشاپ هنوز هم برای مبتدیان و کسانی که کارهای فوریِ پردازش تصویر دارند، بیش از حد پیچیده است. علاوه بر این، برای کوچک کردن اندازهٔ تصویر مراحل نسبتاً زیادی لازم است. یک جایگزین راحتتر وجود دارد: FVC Free Image Compressor. فقط کافی است تصویری را که میخواهید پردازش کنید از طریق مرورگر خود بارگذاری کنید؛ این ابزار بهطور خودکار اندازهٔ فایل تصویر را برای شما فشرده میکند، و همچنین به شما اجازه میدهد نسبت تصویر را بهصورت دستی تنظیم کنید، تصویر را در صفحهٔ وب بچرخانید یا معکوس کنید.
مسئله دیگری هم وجود دارد که نمیتوانیم نادیده بگیریم. استفاده منظم از فتوشاپ نیاز به اشتراک دارد. اما محصولات ادوبی گران هستند. ابزار فشردهسازی تصویر رایگان FVC یک ابزار آنلاین کاملاً رایگان است. آیا به پردازش دستهای تصاویر فکر کردهاید؟ توسعهدهندگان FVC Free Image Compressor این نکته را نادیده نگرفتهاند. در حال حاضر، میتوانید تا 40 تصویر را در این پلتفرم به صورت دستهای پردازش کنید.
مرحله ۱. به وبسایت رسمی FVC Free Image Compressor بروید.

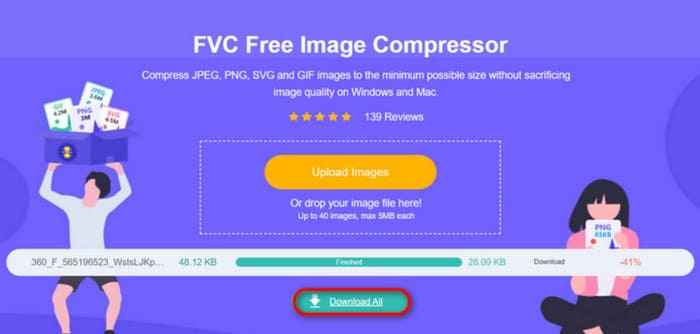
مرحله ۲. روی Upload Images کلیک کنید تا عکسهایی را که میخواهید فشرده کنید انتخاب و بارگذاری کنید.
مرحله ۳. پس از پایان فرآیند فشردهسازی، اندازههای فایل بهروزشده را پیشنمایش کنید. سپس روی Download All کلیک کنید تا تصاویر فشردهشده را در دستگاه خود ذخیره کنید.
بعد از دریافت نتایج فشردهسازی، آیا از اینکه وضوح تصاویر خیلی از بین نرفته است، شگفتزده شدهاید؟ فشردهساز تصویر رایگان FVC از پیشرفتهترین و کارآمدترین تکنیکهای فشردهسازی برای یافتن تعادل کامل بین وضوح تصویر و اندازه آن استفاده میکند.
چه تازه کار باشید و چه حرفه ای، متوجه خواهید شد که کمپرسور تصویر رایگان FVC بهترین جایگزین برای فتوشاپ است.
بخش 5. سوالات متداول در مورد نحوه کوچک کردن تصویر در فتوشاپ
چگونه میتوان حجم عکس را در فتوشاپ بدون افت کیفیت کاهش داد؟
برای کاهش اندازه تصویر در فتوشاپ بدون اعوجاج، نکته این است که مطمئن شوید در زمان کار، Resample را انتخاب کردهاید. همچنین ضروری است که هنگام تنظیم نسبت ابعاد، تغییرات وضوح را نیز زیر نظر داشته باشید.
چطور میشه بدون کراپ کردن، عکس رو کوچیک کرد؟
میتوانید از تغییردهندهٔ اندازهٔ عکس برای تغییر اندازهٔ نمایش (screen size) استفاده کنید. در عین حال، میتوانید به فشردهسازی فایلهای تصویری نیز فکر کنید. این کار اندازهٔ آنها را بهطور قابلتوجهی کوچکتر میکند.
چطور میشه عکسی با حجم کمتر از ۱ مگابایت ساخت؟
میتوانید از برخی فشردهسازهای تصویر تخصصی استفاده کنید. ابزارهایی که به شما امکان تنظیم سطح فشردهسازی و پیشنمایش اندازه تصویر فشردهشده قبل از دانلود آن را میدهند، بهویژه توصیه میشوند، مانند فتوشاپ یا FVC Free Image Compressor.
نتیجه
پس از یادگیری چگونه در فتوشاپ یک تصویر را کوچک کنیم در محتوای بالا، حالا میتوانید خودتان آن را امتحان کنید. برای هر مرحله، تصویر مربوطه را قرار دادهایم تا مطمئن شوید میتوانید هر جزئیات را ببینید. اگر نمیخواهید بهصورت جداگانه فتوشاپ را روی دستگاه خود دانلود کنید یا رابط کاربری پیچیدهٔ آن شما را منصرف میکند، از FVC Free Image Compressor برای تصاویر خود استفاده کنید. استفاده از آن آسان است، مراحل سادهای دارد و خدمات آن رایگان است.
-
 نحوه فشرده سازی MXF با Premiere Pro و رایگان آنلاین
 چگونه MXF را با اندازه پرونده کوچکتر فشرده کنیم؟ چگونه فایل های MXF را در Adobe Premiere Pro فشرده کنیم؟ این پست 2 روش برای فشرده سازی پرونده های MXF را به اشتراک می گذارد.
-
 چگونه فایلهای MOV را به راحتی فشرده کنیم: 6 انتخاب رایگان برای شما
 برای فشردهسازی فایلهای MOV، میتوانید به ۶ گزینه موجود در این مقاله، شامل ۳ نرمافزار دسکتاپ و ۳ پلتفرم آنلاین، مراجعه کنید. ما در اینجا نحوه استفاده از آنها را به شما نشان خواهیم داد.
-
 نحوه فشرده سازی یک فیلم MP4 به اندازه کوچکتر
 ویدیوی MP4 برای بارگذاری خیلی بزرگ است؟ آیا می خواهید اندازه ویدئو را کاهش دهید؟ در اینجا 3 روش کارآمد برای فشرده سازی فایل MP4 به اندازه کوچکتر و بدون محدودیت آورده شده است.