Cómo reducir fácilmente el tamaño de una imagen en Mac [Guía definitiva]
Si trabaja con archivos de imágenes de gran tamaño en su Mac, ¡no se preocupe! Existen formas de resolver este problema.
Entendemos la necesidad de comprimir imágenes, ya que las hace más manejables y cómodas de usar. A menudo, si puede observar, algunos sistemas requieren que carguemos archivos de imagen en un tamaño de archivo específico, algunos sitios web se cargan más lento y enviar archivos de imagen por correo electrónico lleva tiempo. Estos problemas provienen de la misma fuente, que es un archivo de imagen grande. Por eso, en este artículo, vamos a profundizar en tres métodos sobre cómo puede reducir el tamaño de la imagen en MacEsto es particularmente útil cuando necesita optimizar su flujo de trabajo y garantizar que sus imágenes sean accesibles y puedan cargarse rápidamente.

Parte 1. Reducir el tamaño de la imagen en Mac reduciendo los píxeles
Los dispositivos Mac tienen una excelente manera de reducir imágenes mediante sus herramientas integradas. Con ellas, los usuarios de Mac pueden comprimir sus fotos de forma fácil y gratuita directamente en sus dispositivos.
Preview es una herramienta integrada para visualizar imágenes y archivos PDF. Con esta herramienta, los usuarios no solo pueden disfrutar de sus funciones para ver imágenes y archivos PDF, sino que también pueden aprovechar sus funciones de edición, donde pueden reducir el tamaño de las imágenes en Mac fácilmente. Además, es muy conveniente y de uso gratuito, lo que la hace accesible para todos. Para ello, siga los pasos a continuación:
Paso 1. Primero, abra la aplicación Vista Previa en su dispositivo Mac.
Paso 2Después de eso, abra el archivo de imagen cuyo tamaño desea comprimir yendo a Expediente pestaña y haciendo clic en el Abierto botón.
Paso 3Ahora, ve a la Herramienta pestaña en el menú contextual y luego haga clic en Ajustar tamaño.
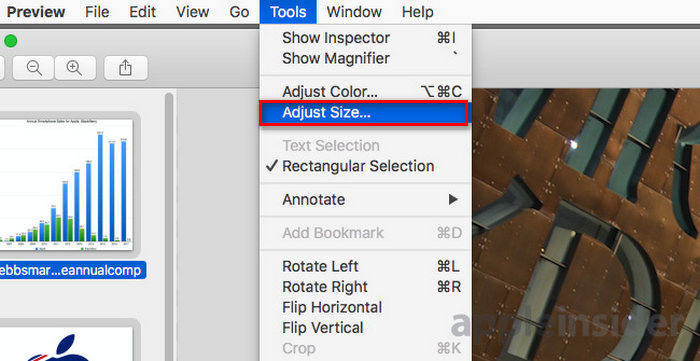
Paso 4. Seleccione Remuestrear imagen Si desea reducir el tamaño de los archivos de imagen.
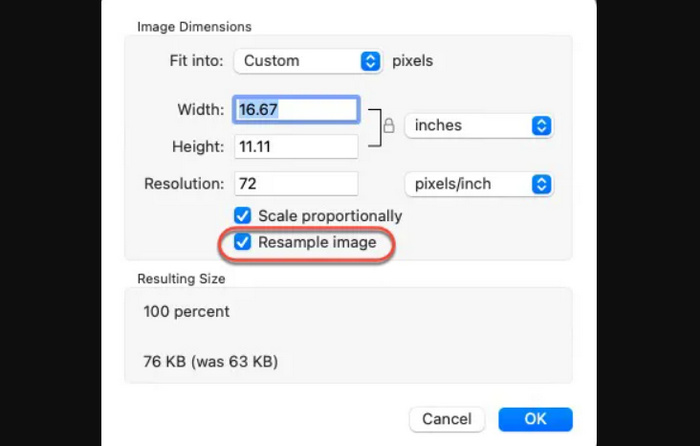
Paso 5Ahora, cambia el valor de tu Resolución archivo. Una vez que lo hayas hecho, se mostrará un nuevo tamaño en la parte inferior.
Para mantener la más alta calidad posible mientras reduciendo el tamaño de la imagen En Mac, puedes probar y equivocarte para ver qué configuración de resolución funciona mejor para la imagen. Para ello, es importante comenzar con una reducción menor de la resolución y aumentarla gradualmente hasta lograr un buen equilibrio entre la calidad de la imagen y el tamaño del archivo.
Parte 2. Comprimir el tamaño de una imagen en Mac con un acceso directo
Si desea una forma más sencilla de comprimir el tamaño de una imagen en Mac, puede utilizar Acciones rápidas para agilizar el proceso de compresión de imágenes. Con esto, puede realizar varias tareas directamente desde el Finder sin necesidad de abrir una aplicación. Esto incluye la capacidad de cambiar el tamaño de las imágenes de forma rápida y eficiente. Además, proporciona un proceso conveniente para manejar tareas básicas de edición de imágenes, como cambiar el tamaño, lo que resulta útil para quienes necesitan procesar varias imágenes rápidamente.
A continuación te indicamos cómo puedes usar Acciones rápidas para comprimir el tamaño de una imagen en Mac:
Paso 1Haga clic derecho en la imagen que desea comprimir.
Paso 2. Desde el menú contextual, seleccione Acciones rápidas y entonces Convertir imagen.
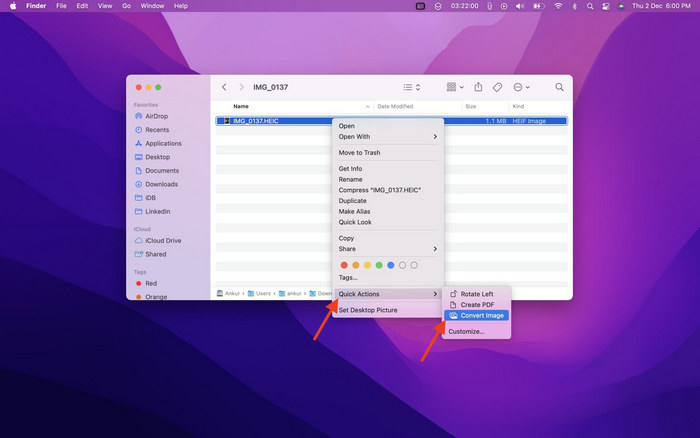
Paso 3. Haga clic en el Tamaño de la imagen campo y seleccionar Pequeño, Medio, o grande desde el menú desplegable, que también muestra los tamaños de archivo correspondientes.
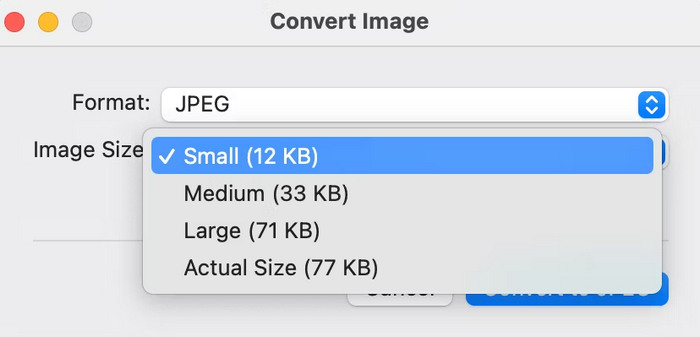
Paso 4. Controlar Conservar metadatos para mantener toda la información de la imagen.
Si desea personalizar sus acciones rápidas e incluirlas entre las opciones de cambio de tamaño que utiliza con más frecuencia, puede hacerlo a través de las preferencias del sistema en extensiones. Además, si desea reducir una imagen en Mac para comprimirla por lotes, simplemente seleccione varias imágenes antes de aplicar la acción rápida para ahorrar tiempo.
Parte 3. La forma más rápida de comprimir imágenes en Mac [Hasta 40 imágenes a la vez]
Si estás buscando una herramienta alternativa para reducir el tamaño de la imagen en Mac, puedes probar la Compresor de imagen libre de FVCEsta herramienta es completamente gratuita y admite la compresión por lotes, donde los usuarios pueden reducir sus archivos de imagen hasta 40 veces a la vez. Además, esta herramienta integra los mejores algoritmos de optimización y compresión para preservar la calidad de la foto comprimida. En cuanto a la facilidad de uso, esta herramienta es ideal para principiantes, ya que solo tendrán que realizar dos pasos y la compresión se procesará automáticamente.
A continuación se explica cómo comprimir JPEG con el compresor de imágenes gratuito FVC
Paso 1Para comenzar, debes acceder a su sitio web oficial buscando FVC Free Image Compressor en tu navegador.
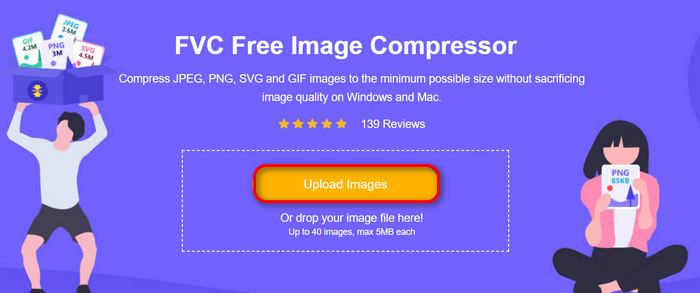
Paso 2A continuación, haga clic en Subir imágenes para importar las fotos que quieras comprimir en tu Mac. La herramienta las comprimirá automáticamente.
Paso 3Después de la compresión, puede obtener una vista previa del nuevo tamaño de archivo de sus archivos de imagen comprimidos. Por último, haga clic en Descargar todo para guardar tu imagen.
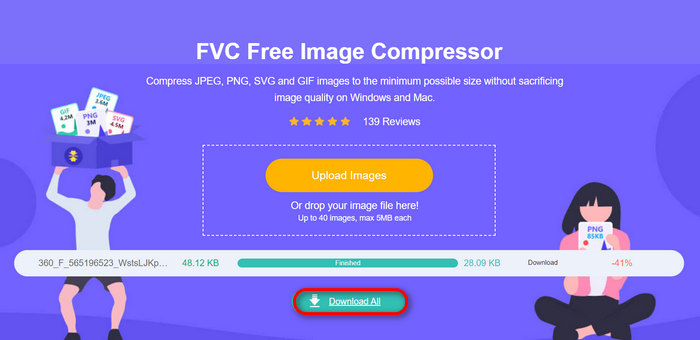
Con el compresor de imágenes gratuito FVC, puede reducir fácilmente el tamaño de las imágenes en Mac, garantizar una salida de calidad, admitir una amplia gama de formatos de archivos de imagen y tener otras funciones importantes como la compresión por lotes.
Puedes aprovechar la función de compresión por lotes de esta herramienta para ahorrar tiempo, especialmente si tienes que comprimir muchas imágenes. Todo lo que necesitas hacer es importarlas simultáneamente a la herramienta. Pero ten en cuenta que puedes comprimir hasta 40 imágenes a la vez, lo que hace que el proceso sea más rápido y eficiente.
Parte 4. Preguntas frecuentes sobre cómo reducir el tamaño de las imágenes en Mac
¿Cómo cambiar el tamaño de una imagen en Apple Photos?
Para cambiar el tamaño de una imagen en Apple Photos, puedes usar la función de edición integrada, que te permite recortar la foto. Para ello, abre la foto en la aplicación y pulsa el botón de edición. A continuación, pulsa la herramienta de recorte y ajusta el área visible de la imagen. También puedes arrastrar las esquinas del cuadro de recorte para cambiar el tamaño del área visible de la foto o seleccionar una relación de aspecto preestablecida para tener más control.
¿Cómo hacer una imagen más pequeña en MB en Mac?
Para reducir el tamaño de una imagen en MB en Mac, use la aplicación Vista previa para comprimir, donde puede reducir la resolución y las dimensiones de la imagen para reducir el tamaño del archivo. Pero tenga en cuenta que reducir la calidad reducirá el tamaño del archivo, pero puede afectar levemente la apariencia de la imagen.
¿Qué es la aplicación de cambio de tamaño de imágenes por lotes para Mac?
Batch Photo Resizer es un excelente programa para cambiar el tamaño de las fotos por lotes. aplicación para cambiar el tamaño de las imágenes para Mac. Ofrece un conjunto completo de funciones que son perfectas para reducir el tamaño de las imágenes. Con esto, puede cambiar el tamaño de sus imágenes por lotes a las dimensiones deseadas y, al mismo tiempo, garantizar la mayor calidad posible.
Conclusión
En conclusión, saber qué herramienta utilizar para reducir el tamaño de la imagen en una Mac Es importante, especialmente cuando trabajas con imágenes. Por lo tanto, independientemente de la herramienta o el método que vayas a utilizar, cualquiera de ellos puede ayudarte a comprimir tus imágenes de manera eficaz. ¿Estás listo para aprovechar todas estas herramientas para comprimir tus fotos? ¡Empieza hoy mismo!


 Video Converter Ultimate
 Grabador de pantalla
