


Αναλογία συμπίεσης φωτογραφιών: Συμπιέστε τις εικόνες σας αποτελεσματικά
Όταν πρόκειται για συμπίεση εικόνας, είναι σημαντικό να κατανοήσουμε την έννοια πίσω από την αναλογία συμπίεσης. Αν και μπορεί να είναι ένας κοινός όρος, πάντα παρεξηγείται και λαμβάνεται διαφορετικά σε άλλο πλαίσιο. Για παράδειγμα, οι χρήστες υποθέτουν ότι μπορούν πάντα να επιτύχουν την ίδια ποιότητα εξόδου μιας συμπιεσμένης εικόνας και μπορούν να αναμένουν σημαντική απώλεια μεγέθους όταν χρησιμοποιούν χαμηλή αναλογία συμπίεσης. Το θέμα είναι ότι εξαρτάται από την αναλογία συμπίεσης και τον τύπο συμπίεσης που χρησιμοποιείται.
Για να αποκτήσετε μια ολοκληρωμένη κατανόηση των λόγων συμπίεσης φωτογραφιών και των αποτελεσματικών μεθόδων συμπίεσης, διαβάστε αυτό το άρθρο και εμβαθύνετε σε αυτό που σημαίνει λόγος συμπίεσης φωτογραφίας, καθώς και στις μεθόδους για το πώς να τον αλλάξετε. Προετοιμαστείτε και μάθετε πώς να συμπιέζετε τις εικόνες σας αποδοτικά.

Μέρος 1. Τι είναι το Photo Compression Ratio
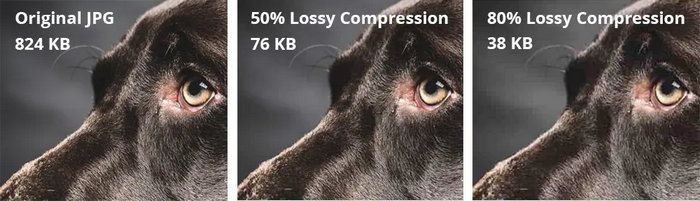
Ο λόγος συμπίεσης φωτογραφίας είναι ο λόγος του αριθμού των byte στη μη συμπιεσμένη φωτογραφία προς τον αριθμό των byte όταν συμπιέζεται. Στην απλούστερη εξήγηση, αναφέρεται στο πόσο μικρότερο γίνεται ένα αρχείο φωτογραφίας σε σύγκριση με το αρχικό του μέγεθος. Έτσι, όταν μια φωτογραφία έχει υψηλή αναλογία συμπίεσης, σημαίνει ότι η φωτογραφία μπορεί να μειωθεί σε μικρότερο μέγεθος, γεγονός που μπορεί να την κάνει να φαίνεται θολή ή με pixel. Εν τω μεταξύ, όταν μια φωτογραφία έχει χαμηλή αναλογία συμπίεσης, τότε η φωτογραφία είχε μόνο μια μικρή μείωση μεγέθους στη φωτογραφία που συμπιέστηκε. Για να το καταλάβετε καλύτερα αυτό, ακολουθεί μια σύγκριση με το τι είναι η συμπίεση χωρίς απώλειες έναντι της συμπίεσης χωρίς απώλειες.
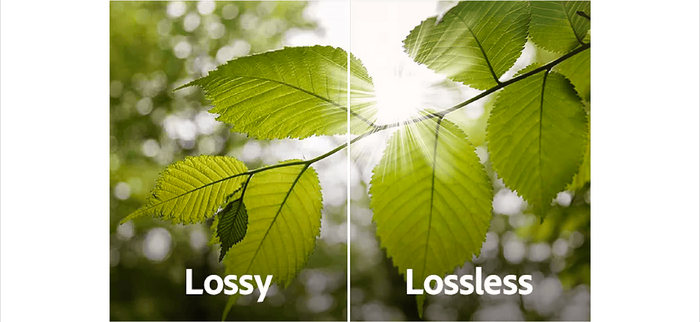
Συμπίεση με απώλειες
Αυτός είναι ένας τύπος συμπίεσης εικόνας όπου μια φωτογραφία μπορεί να μειώσει σημαντικά το μέγεθος και την ποιότητά της. Σημαίνει ότι η φωτογραφία έχει υψηλή αναλογία συμπίεσης. Για παράδειγμα, όταν μια φωτογραφία έχει αρχικό μέγεθος 10 MB και συμπιέστηκε στα 500 KB που σημαίνει ότι πέτυχε αναλογία συμπίεσης φωτογραφίας 20:1.
Πλεονεκτήματα:
• Μειώνει σημαντικά το μέγεθος του αρχείου.
• Ιδανική για χρήση στο διαδίκτυο.
Μειονεκτήματα:
• Απώλεια ποιότητας εικόνας, ειδικά σε υψηλά επίπεδα συμπίεσης.
• Δεν είναι κατάλληλη για εικόνες που απαιτούν ακριβή αναπαραγωγή των αρχικών δεδομένων.
Συμπίεση χωρίς απώλειες
Σε σύγκριση με τη συμπίεση με απώλειες, αυτός ο τύπος συμπίεσης σημαίνει ότι δεν υπάρχει απώλεια πληροφοριών και η ποιότητα της εικόνας παραμένει ακριβώς η ίδια με την αρχική.
Πλεονεκτήματα:
• Δεν υπάρχει αισθητή απώλεια ποιότητας εικόνας.
• Κατάλληλη για εικόνες που απαιτούν υψηλή πιστότητα.
Μειονεκτήματα:
• Λιγότερη μείωση μεγέθους αρχείου.
Μέρος 2. Πώς να αλλάξετε την αναλογία συμπίεσης στη φωτογραφία
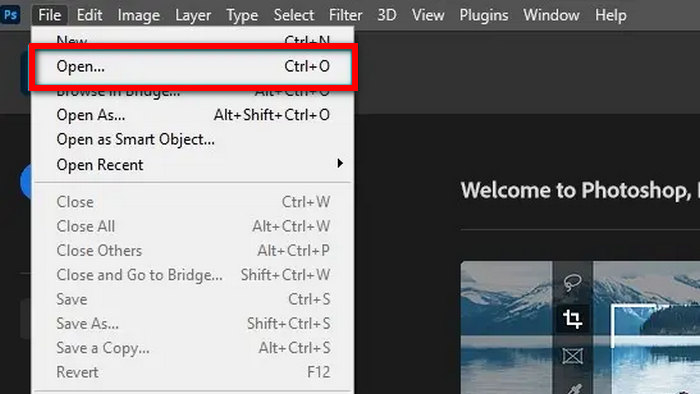
Η προσαρμογή της αναλογίας συμπίεσης μιας εικόνας βοηθά στην επίτευξη της σωστής ισορροπίας μεταξύ της ποιότητάς της και του μεγέθους του αρχείου, διασφαλίζοντας ότι φαίνεται υπέροχη ενώ καταλαμβάνει λιγότερο χώρο. Για να το πετύχετε αυτό, μπορείτε να χρησιμοποιήσετε το Photoshop. Αυτό το εργαλείο επιτρέπει στους χρήστες να εκτελούν ένα ευρύ φάσμα εργασιών επεξεργασίας εικόνας, συμπεριλαμβανομένης της προσαρμογής του λόγου συμπίεσης της φωτογραφίας. Με αυτή τη συγκεκριμένη λειτουργία, μπορείτε να ρυθμίσετε την ποιότητα της εικόνας ώστε να πληροί συγκεκριμένες απαιτήσεις. Δείτε πώς μπορείτε να χρησιμοποιήσετε το Photoshop για να αλλάξετε την αναλογία συμπίεσης της φωτογραφίας σας:
Βήμα 1. Πρώτα, εισαγάγετε το αρχείο εικόνας του οποίου θέλετε να αλλάξετε τον λόγο συμπίεσης πηγαίνοντας στην καρτέλα Αρχείο (File) και κάνοντας κλικ στην επιλογή Open.
Βήμα 2. Μόλις εισαγάγετε τη φωτογραφία σας στο Photoshop, μεταβείτε στην καρτέλα Image και κάντε κλικ στο Image Size.
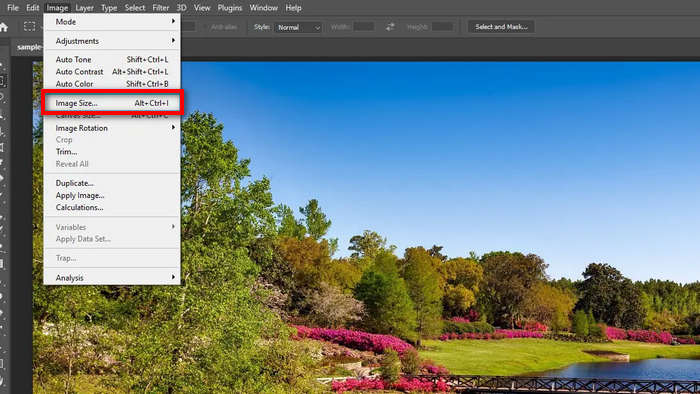
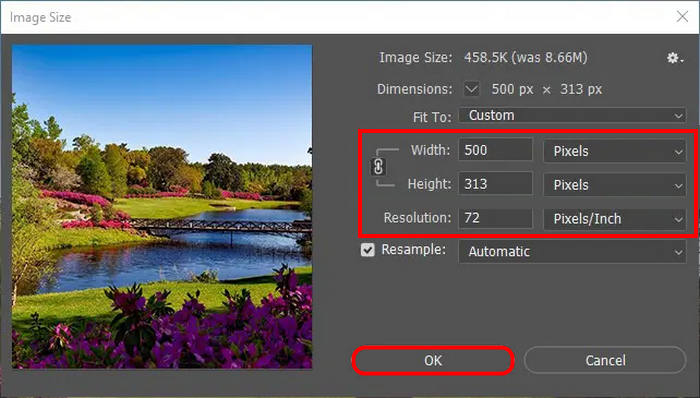
Βήμα 3. Τώρα, στο πλαίσιο διαλόγου εικόνας, ορίστε την επιθυμητή ανάλυσή σας. Στη συνέχεια, ορίστε τις τιμές-στόχους για το Height και το Width. Σημειώστε ότι πρόκειται για τιμές σε pixels. Όταν τελειώσετε, απλώς κάντε κλικ στο κουμπί OK.
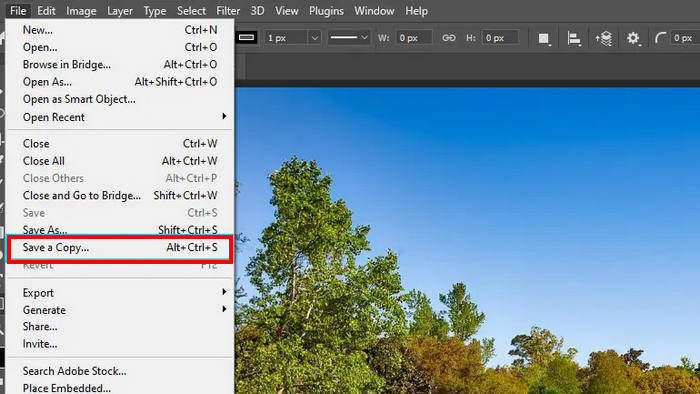
Βήμα 4. Για να αποθηκεύσετε το αρχείο σας, μεταβείτε στην καρτέλα File και επιλέξτε Save a copy από το μενού.
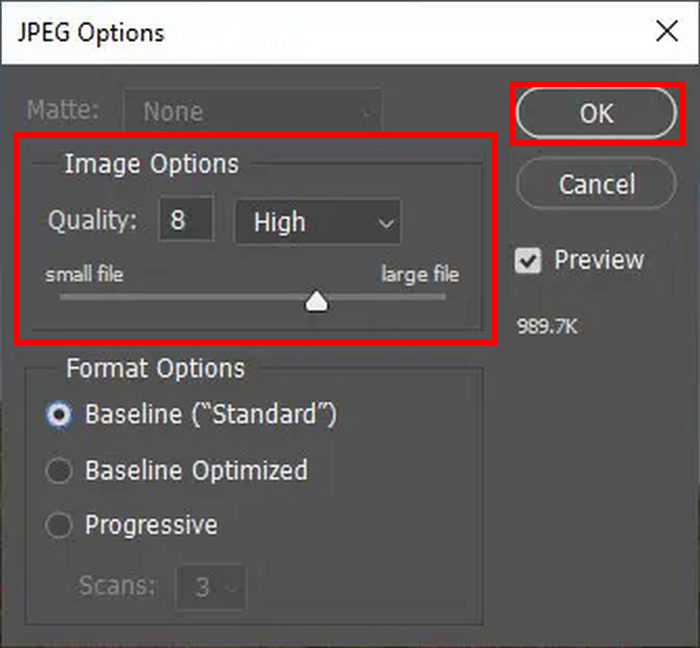
Βήμα 5. Αφού κάνετε κλικ στο κουμπί Save, θα εμφανιστεί ένα πλαίσιο επιλογών JPEG. Από εκεί, μπορείτε εύκολα να προσαρμόσετε την ποιότητα της εικόνας μετακινώντας τη γραμμή στην ενότητα Image Options. Όταν τελειώσετε, κάντε κλικ στο OK για να αποθηκεύσετε.
Με αυτή τη μέθοδο, μπορείτε εύκολα να αλλάξετε την αναλογία συμπίεσης της φωτογραφίας σας. Ωστόσο, αυτό μπορεί να είναι λίγο περίπλοκο για μερικούς και οι νέοι χρήστες πρέπει να επωφεληθούν από τη συνδρομή για να απολαύσουν τις πλήρεις δυνατότητες του.
Μέρος 3. Μπόνους: Συμπίεση εικόνας χωρίς απώλεια ποιότητας
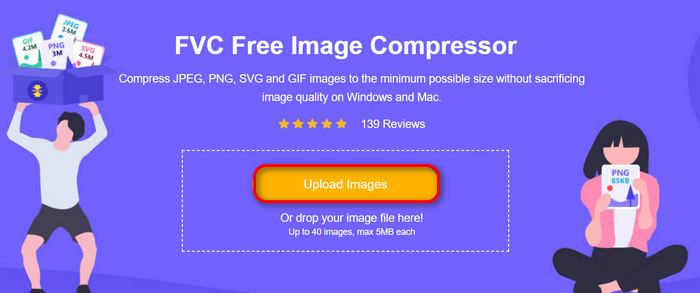
Το FVC Free Image Compressor είναι ένα δωρεάν online εργαλείο συμπίεσης εικόνων που μειώνει το μέγεθος της εικόνας χωρίς εμφανή απώλεια ποιότητας στο τελικό αποτέλεσμα. Σε σύγκριση με ορισμένα άλλα εργαλεία συμπίεσης, αυτό διαθέτει εξαιρετικούς αλγόριθμους βελτιστοποίησης και συμπίεσης, διασφαλίζοντας την καλύτερη δυνατή ανάλυση ποιότητας της συμπιεσμένης φωτογραφίας.
Δείτε πώς να συμπιέσετε φωτογραφίες χρησιμοποιώντας το FVC Free Image Compressor
Βήμα 1. Πρώτα, πρέπει να μεταβείτε στον επίσημο ιστότοπο του FVC Free Image Compressor.
Βήμα 2. Στη συνέχεια, κάντε κλικ στο Upload Images για να εισαγάγετε τις φωτογραφίες που θέλετε να συμπιέσετε. Αυτό το εργαλείο συμπιέζει αυτόματα τις φωτογραφίες σας.
Βήμα 3. Περιμένετε να ολοκληρωθεί η διαδικασία συμπίεσης. Όταν τελειώσει, θα δείτε μια γραμμή κατάστασης που θα αναφέρει ότι ολοκληρώθηκε, καθώς και πληροφορίες για το μέγεθος της εικόνας πριν και μετά τη συμπίεση. Έπειτα, κάντε κλικ στο Download All για να αποθηκεύσετε την εικόνα σας.
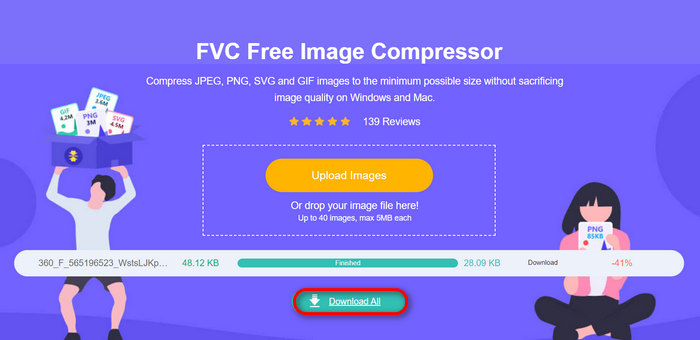
Εάν θέλετε να συμπιέσετε εύκολα τις φωτογραφίες σας, η χρήση ενός εργαλείου συμπιεστή δωρεάν εικόνας FVC είναι μια εξαιρετική εναλλακτική λύση. Θα χρειαστεί να κάνετε μόνο ένα κλικ για να τις συμπιέσετε και όλα διασφαλίζουν ότι οι φωτογραφίες σας είναι καλά συμπιεσμένες σε μέγεθος και ποιότητα.
Μέρος 4. Συχνές ερωτήσεις σχετικά με το λόγο συμπίεσης φωτογραφιών
Πώς να συμπιέσετε μια φωτογραφία σε αναλογία 20:1;
Για να συμπιέσετε μια φωτογραφία σε αναλογία 20:1, μπορείτε να χρησιμοποιήσετε ένα εργαλείο επεξεργασίας εικόνας όπως το Photoshop ή έναν διαδικτυακό συμπιεστή. Στο Photoshop, προσαρμόστε τις ρυθμίσεις ποιότητας και ανάλυσης εικόνας μέχρι να επιτύχετε την επιθυμητή αναλογία συμπίεσης. Επίσης, υπάρχουν ηλεκτρονικά εργαλεία που συχνά παρέχουν μια επιλογή για τον καθορισμό του μεγέθους του αρχείου στόχου ή του επιπέδου συμπίεσης, όπως η συμπίεση ή η μήτρα. Αλλά όσον αφορά την ευκολία, το εργαλείο FVC Free Image Compressor μπορεί επίσης να είναι ένα εξαιρετικό εργαλείο για τη συμπίεση μιας φωτογραφίας με αναλογία 20:1.
Πώς μπορώ να βρω την αναλογία συμπίεσης μιας φωτογραφίας;
Για να βρείτε την αναλογία συμπίεσης φωτογραφίας, διαιρέστε το αρχικό μέγεθος αρχείου με το μέγεθος του συμπιεσμένου αρχείου. Για παράδειγμα, εάν η αρχική φωτογραφία είναι 10 MB και η συμπιεσμένη φωτογραφία είναι 0,5 MB, ο λόγος συμπίεσης είναι 10 MB / 0,5 MB = 20:1.
Ποια είναι η αναλογία συμπίεσης ενός αρχείου JPG;
Ο λόγος συμπίεσης φωτογραφίας ενός αρχείου JPG ποικίλλει ανάλογα με τις ρυθμίσεις ποιότητας που χρησιμοποιούνται κατά τη συμπίεση. Η υψηλή συμπίεση οδηγεί σε μικρότερα μεγέθη αρχείων αλλά χαμηλότερη ποιότητα εικόνας, ενώ η χαμηλή συμπίεση διατηρεί υψηλότερη ποιότητα εικόνας με μεγαλύτερα μεγέθη αρχείων. Οι τυπικοί λόγοι συμπίεσης JPG κυμαίνονται από 10:1 έως 20:1 για χρήση web.
Υπάρχει όριο στο πόσο μπορείτε να συμπιέσετε μια φωτογραφία;
Ναι, υπάρχουν πρακτικά όρια για το πόσο μπορείτε να συμπιέσετε μια φωτογραφία πριν προκύψει σημαντική απώλεια ποιότητας. Οι υψηλότεροι λόγοι συμπίεσης οδηγούν συχνά σε ορατά τεχνουργήματα, όπως pixelation ή θολότητα, ειδικά σε εικόνες με πολύπλοκες λεπτομέρειες ή διαβαθμίσεις.
συμπέρασμα
Η κατανόηση και η προσαρμογή του λόγου συμπίεσης φωτογραφίας είναι απαραίτητη για τη βελτιστοποίηση των εικόνων, ώστε να επιτυγχάνεται ισορροπία μεταξύ ποιότητας και μεγέθους αρχείου. Το Adobe Photoshop προσφέρει έναν ισχυρό τρόπο διαχείρισης αυτού, παρέχοντας λεπτομερή έλεγχο της ποιότητας της εικόνας. Για όσους αναζητούν πιο απλές λύσεις, εργαλεία όπως το FVC Free Image Compressor προσφέρουν αποτελεσματικές εναλλακτικές λύσεις.
Πάρτε τον έλεγχο της βελτιστοποίησης της εικόνας σας τώρα! Δοκιμάστε το Adobe Photoshop για προηγμένη επεξεργασία ή χρησιμοποιήστε το FVC Free Image Compressor για γρήγορη και εύκολη συμπίεση.
-
 3 Μέθοδοι αλλαγής μεγέθους εικόνας σε 20 KB: Απρόσκοπτη συμπίεση
 Ανησυχείτε για το πώς να επιτύχετε μέγεθος 20 KB για το αρχείο εικόνας σας; Αυτό το άρθρο θα σας διδάξει 3 μεθόδους για το πώς να αλλάξετε γρήγορα και απρόσκοπτα το μέγεθος της εικόνας στα 20 KB.
-
 Υπερβολικά συμπιεσμένη φωτογραφία: Δείτε πώς μπορείτε να τις διορθώσετε εύκολα
 Αναρωτιέστε τι να κάνετε όταν η εικόνα σας είναι υπερβολικά συμπιεσμένη; Διαβάστε αυτό το άρθρο και μάθετε γιατί συμβαίνει αυτό το πρόβλημα με την εικόνα και μάθετε 2 μεθόδους για το πώς να τα διορθώσετε.
-
 Τρόπος συμπίεσης JPEG σε Windows και Mac [Ultimate Guide]
 Αναζητάτε ένα αποτελεσματικό εργαλείο για τη συμπίεση αρχείων JPEG στις συσκευές σας Windows και Mac; Διαβάστε αυτό το άρθρο τώρα και μάθετε πέντε μεθόδους για απρόσκοπτη συμπίεση.