


Πώς να συμπιέσετε μια εικόνα στο Photoshop: Αποτέλεσμα χωρίς απώλειες
Το Photoshop είναι ένα ευρέως χρησιμοποιούμενο λογισμικό επεξεργασίας φωτογραφιών. Λόγω των απίστευτων και χρήσιμων χαρακτηριστικών της, αυτή η εφαρμογή λογισμικού έγινε ένα βασικό εργαλείο για επαγγελματίες επεξεργαστές φωτογραφιών για να βελτιώσουν τις φωτογραφίες τους.
Τώρα, εάν έχετε να κάνετε με μεγάλα αρχεία εικόνας και θεωρείτε ότι είναι δύσκολο να τα χειριστείτε, μπορείτε πραγματικά να τα συμπιέσετε. Με αυτό, αυτό το άρθρο θα σας διδάξει τρεις διαφορετικές μεθόδους και μία εναλλακτική πώς να συρρικνώσετε μια εικόνα στο Photoshop. Κατανοούμε ότι η χρήση αυτού του εργαλείου μπορεί να είναι συντριπτική για κάποιους, αλλά αυτός ο οδηγός θα σας διευκολύνει να συμπιέσετε τις φωτογραφίες σας. Ας μην το κάνουμε άλλο αυτό. Ας ξεκινήσουμε!

Μέρος 1. Πώς να συρρικνώσετε μια εικόνα στο Photoshop μετατρέποντας τη μορφή εικόνας
Ναί! Μπορείτε να συρρικνώσετε μια εικόνα στο Photoshop μετατρέποντας τη μορφή εικόνας της. Είναι ένας αποτελεσματικός τρόπος συμπίεσης εικόνων καθώς διαφορετικές μορφές εικόνας έχουν διαφορετικά επίπεδα συμπίεσης. Έτσι, επιλέγοντας τη σωστή μορφή για τις ανάγκες σας, μπορείτε να βελτιστοποιήσετε τις εικόνες για διάφορους σκοπούς.
Δείτε πώς μπορείτε να συρρικνώσετε μια εικόνα στο Photoshop:
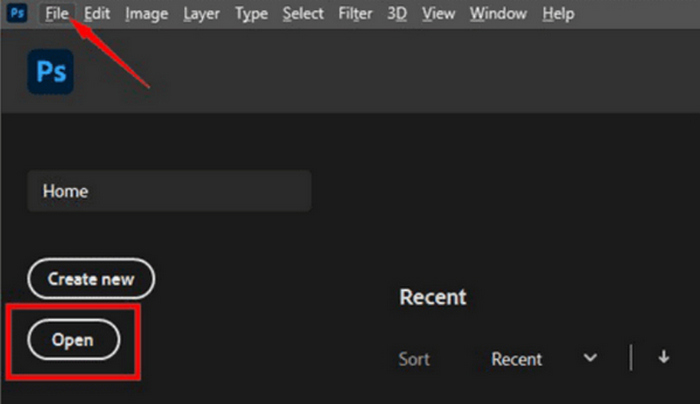
Βήμα 1. Στο Photoshop, ανοίξτε το αρχείο που θέλετε να μετατρέψετε. Για να το κάνετε αυτό, μεταβείτε στο Καρτέλα αρχείο και κάντε κλικ στο Ανοιξε επιλογή.
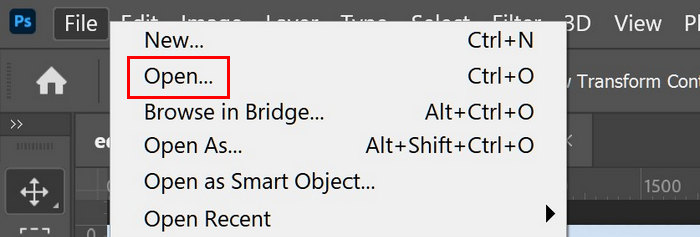
Βήμα 2. Στη συνέχεια, επιστρέψτε στο Καρτέλα αρχείο, μετακινηθείτε προς τα κάτω και αναζητήστε το Αποθήκευση ως κουμπί στο μενού.

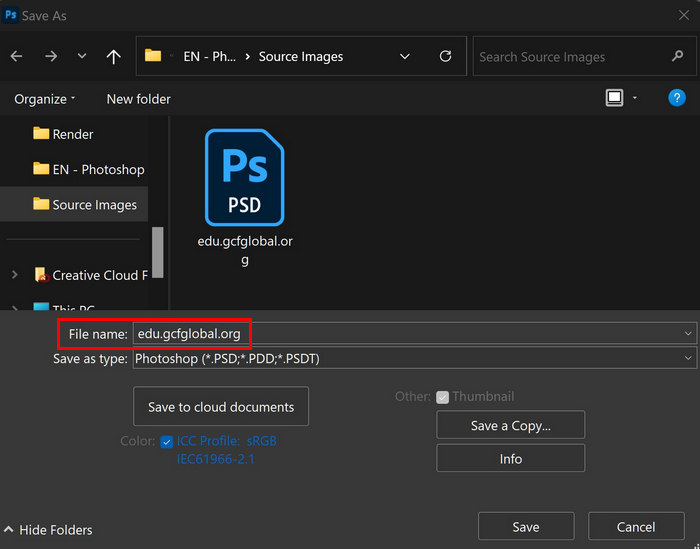
Βήμα 3. Τώρα, πληκτρολογήστε το όνομα του αρχείου που θέλετε και, στη συνέχεια, επιλέξτε μια θέση για το αρχείο.
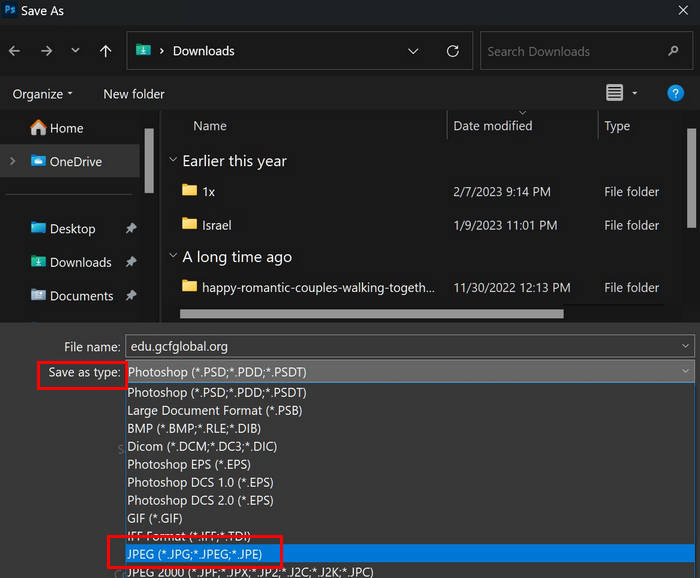
Βήμα 4. Μετά από αυτό, επιλέξτε ανάμεσα στη λίστα των μορφών αρχείων στις οποίες θέλετε να μετατραπεί η φωτογραφία σας.
Βήμα 5. Μόλις τελειώσετε, απλώς κάντε κλικ Σώσει.
Η μετατροπή της μορφής της εικόνας σας μπορεί πράγματι να συρρικνώσει το μέγεθός της. Έτσι, με αυτήν τη μέθοδο, θα είναι εύκολο για εσάς να βελτιστοποιήσετε τις εικόνες σας για διάφορες ανάγκες. Λάβετε υπόψη, όμως, εάν εξοικονομείτε χώρο αποθήκευσης για αυτήν τη μέθοδο. Η απλή μετατροπή της μορφής της φωτογραφίας σας δεν μπορεί να προκαλέσει σημαντική απώλεια μεγέθους.
Μέρος 2. Πώς να μειώσετε το μέγεθος αρχείου στο Photoshop μειώνοντας την ανάλυση ή την ποιότητα
Αλλο μέθοδος μείωσης του μεγέθους αρχείου εικόνας στο Photoshop είναι μέσα από ισχυρές δυνατότητες επεξεργασίας. Οι χρήστες μπορούν να αλλάξουν τα μεγέθη των εικόνων τους, καθώς και τις ρυθμίσεις ποιότητας και μορφής, για να επιτύχουν ένα επιθυμητό μέγεθος αρχείου χωρίς να υποστούν σημαντική απώλεια ποιότητας.
Βήμα 1. Ανοίξτε την εικόνα σας στο Photoshop κάνοντας κλικ Ανοιξε ή πηγαίνετε στο Αρχείο και επιλέξτε τα αρχεία εικόνας που θέλετε να αλλάξετε το μέγεθος.
Βήμα 2. Τώρα, πηγαίνετε στο Εικόνα καρτέλα και επιλέξτε Μέγεθος εικόνας.

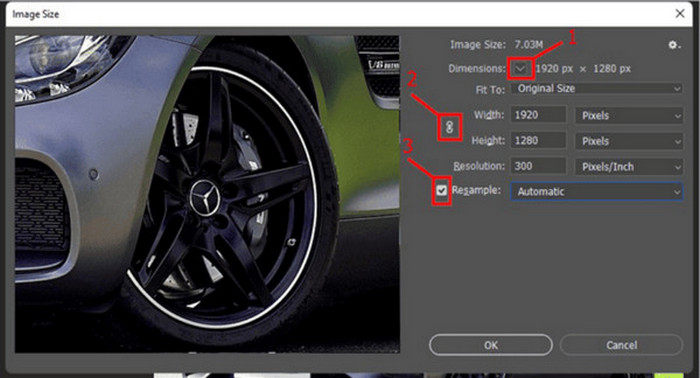
Βήμα 3. Στο Μέγεθος εικόνας παράθυρο διαλόγου, επιλέξτε Pixels από το αναπτυσσόμενο μενού. Για να ορίσετε συγκεκριμένες διαστάσεις για τη συμπίεση των αρχείων εικόνας σας, εισαγάγετε τιμές στα πλαίσια κειμένου πλάτους και ύψους και κάντε κλικ Εντάξει για να αλλάξετε το μέγεθος της εικόνας.
Βήμα 4. Τέλος, σώστε το δικό σας συμπιεσμένο PNG κάνοντας κλικ στο Αποθήκευση ως κουμπί κάτω από το Αρχείο αυτί.
Αποθηκεύστε το αρχείο PSD σε μορφή PNG πριν το αποθηκεύσετε.
Βήμα 1. Ανοίξτε την εικόνα σας στο Photoshop κάνοντας κλικ Ανοιξε ή πηγαίνετε στο Αρχείο και επιλέξτε τα αρχεία εικόνας που θέλετε να συμπιέσετε.
Βήμα 2. Τώρα, πηγαίνετε στο Εικόνα καρτέλα και επιλέξτε Μέγεθος εικόνας.
Βήμα 3. Στο Μέγεθος εικόνας παράθυρο διαλόγου, επιλέξτε ίντσες από το αναπτυσσόμενο μενού. Για να ορίσετε συγκεκριμένες διαστάσεις για να συμπιέσετε τα αρχεία εικόνας σας, εισαγάγετε τιμές στα πλαίσια κειμένου πλάτους και ύψους και κάντε κλικ Εντάξει για να αλλάξετε το μέγεθος της εικόνας.
photoshop-εικόνα-μέγεθος-ίντσεςΒήμα 4. Τέλος, κάντε κλικ στο Αποθήκευση ως κουμπί κάτω από το Αρχείο καρτέλα για να αποθηκεύσετε την τελική εικόνα.
Και οι δύο αυτές μέθοδοι μπορούν να βοηθήσουν σημαντικά στη συμπίεση ενός αρχείου εικόνας στο Photoshop. Ωστόσο, πρέπει να δοκιμάσετε και να ελέγξετε το μέγεθος που εισάγετε στις ρυθμίσεις για να επιτύχετε το καλύτερο μέγεθος και ποιότητα των φωτογραφιών σας.
Μέρος 3. Πώς να συμπιέσετε κατά παρτίδες εικόνες στο Photoshop
Ένας άλλος τρόπος συμπίεσης εικόνων στο Photoshop είναι να τις κάνετε ομαδικά. Αυτή η μέθοδος είναι ιδιαίτερα χρήσιμη για όσους θέλουν να συμπιέσουν μια δέσμη αρχείων εικόνας. Προκειμένου να απλοποιηθεί αυτή η διαδικασία, οι χρήστες μπορούν να συμπιέζουν ομαδικά τις φωτογραφίες τους στο Photoshop. Δείτε πώς:
Βήμα 1. Πρέπει πρώτα να αποθηκεύσετε όλες τις φωτογραφίες που θέλετε να συμπιέσετε ομαδικά σε έναν μόνο φάκελο.
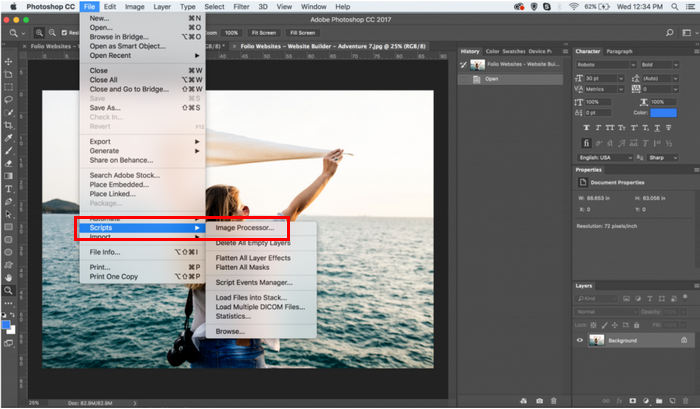
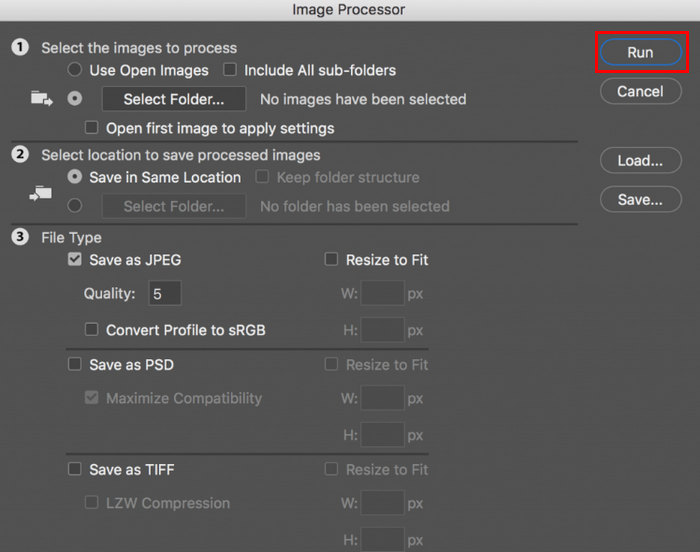
Βήμα 2. Ανοίξτε το Photoshop σας και μετά μεταβείτε στο Καρτέλα αρχείο, Κάντε κλικ Γραφήκαι επιλέξτε Επεξεργαστής εικόνας.
Βήμα 3. Στη συνέχεια, εισαγάγετε τις φωτογραφίες που θέλετε να συμπιέσετε κάνοντας κλικ στο Επιλέξτε φάκελο κάτω από το Επιλέξτε τις εικόνες προς επεξεργασία.
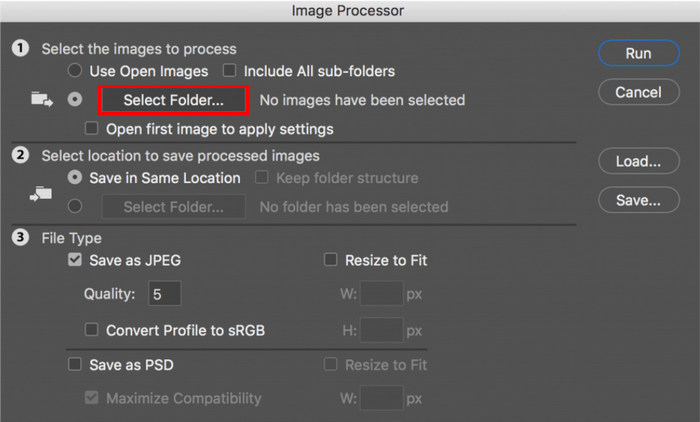
Βήμα 4. Μετά από αυτό, ένας νέος φάκελος θα δημιουργηθεί αυτόματα στον αρχικό φάκελο και εδώ θα αποθηκευτούν ή θα αποθηκευτούν οι συμπιεσμένες εικόνες.
Βήμα 5. Κάτω από το Τύπος αρχείου ενότητα, προσαρμόστε τις ρυθμίσεις για να αλλάξετε το μέγεθος του αρχείου εικόνας σας. Σημειώστε το Αλλαγή μεγέθους σε Fit και ορίστε το μέγιστο ύψος και πλάτος της συμπιεσμένης φωτογραφίας σας.

Βήμα 6. Στο Ποιότητα πληκτρολογήστε έναν αριθμό μεταξύ 1 και 12. Λάβετε υπόψη ότι όσο μεγαλύτερος είναι ο αριθμός, τόσο μεγαλύτερο είναι το μέγεθος του αρχείου. Εν τω μεταξύ, εάν συμπιέζετε μορφές αρχείων JPG, θυμηθείτε να σημειώσετε το πλαίσιο Αποθήκευση ως JPEG.
Βήμα 7. Τώρα, κάντε κλικ στο Εκτέλεση Δράσης κουμπί για να δείτε τις διαθέσιμες ενέργειες.
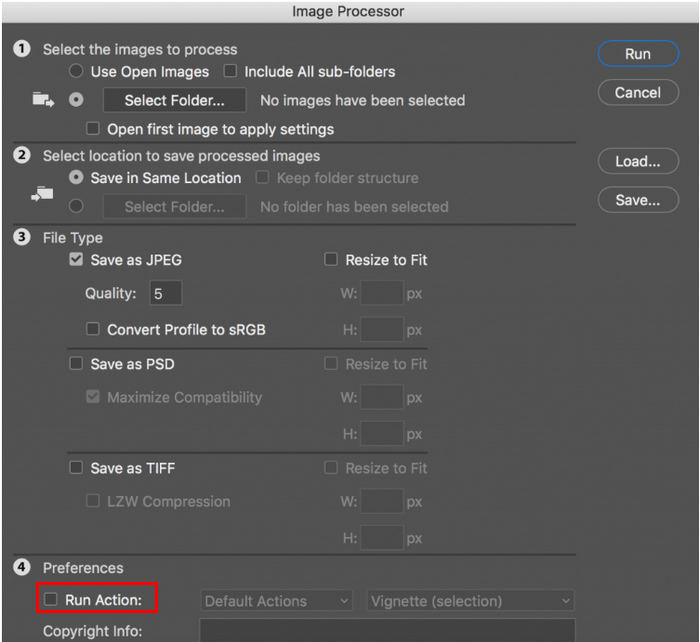
Βήμα 8. Μόλις τελειώσετε, κάντε κλικ στο Τρέξιμο κουμπί. Οι εικόνες στο φάκελό σας θα υποβληθούν σε επεξεργασία και θα αποθηκευτούν στον καθορισμένο φάκελο προορισμού.
Αυτή η μέθοδος είναι πραγματικά εξαιρετική όταν αντιμετωπίζετε έναν αριθμό αρχείων που πρέπει να συμπιεστούν. Ωστόσο, ορισμένοι χρήστες μπορεί να βρουν αυτή τη μέθοδο λίγο προκλητική, καθώς μπορεί να απαιτεί πολύπλοκα βήματα.
Μέρος 4. Ευκολότερη εναλλακτική λύση στο Photoshop για τη συμπίεση μιας εικόνας
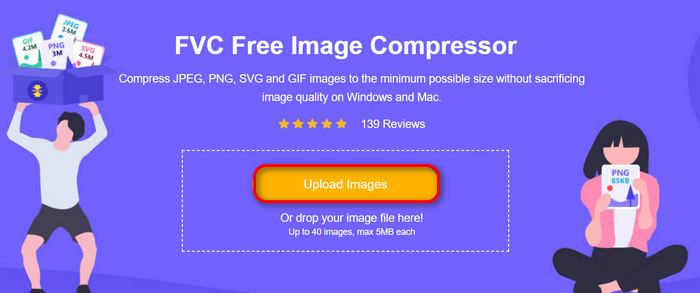
Αν ψάχνετε για μια ευκολότερη εναλλακτική για τη συρρίκνωση μιας εικόνας στο Photoshop, μπορείτε να χρησιμοποιήσετε το FVC Free Image Compressor. Αυτό το εργαλείο είναι δωρεάν και θα συμπιέσει αυτόματα τις φωτογραφίες σας, με αποτέλεσμα σημαντική απώλεια μεγέθους αλλά σχεδόν χωρίς απώλειες ποιότητας. Επιπλέον, όπως και το Photoshop, μπορείτε επίσης να συμπιέσετε ομαδικά έως και 40 εικόνες με ένα μόνο κλικ χρησιμοποιώντας αυτό το εργαλείο. Για να χρησιμοποιήσετε αυτό το εργαλείο, ακολουθήστε τα παρακάτω βήματα:
Βήμα 1. Στο πρόγραμμα περιήγησής σας, πληκτρολογήστε FVC Free Image Compressor και αναζητήστε τον.
Βήμα 2. Μετά από αυτό, μόλις βρεθείτε στην κύρια διεπαφή του, κάντε κλικ Ανεβάστε εικόνες για να εισαγάγετε τις εικόνες που θέλετε να συμπιέσετε.
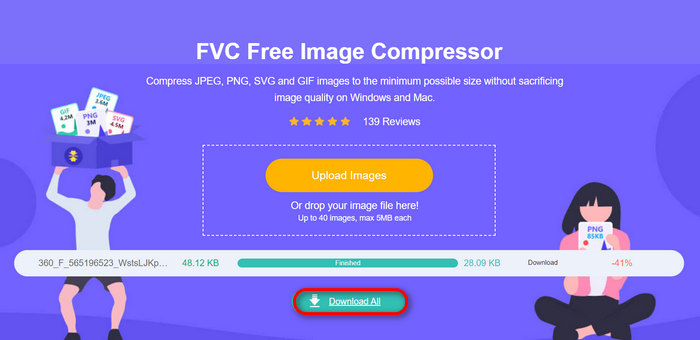
Βήμα 3. Αφού συμπιέσετε τις εικόνες σας, μπορείτε να τις κάνετε προεπισκόπηση ελέγχοντας τα νέα τους μεγέθη μετά τη συμπίεση. Τέλος, κάντε κλικ Κατέβασέ τα όλα για να αποθηκεύσετε την εικόνα σας.
Αυτό το εναλλακτικό εργαλείο μπορεί να σας βοηθήσει σε πολλές πτυχές. Είναι δωρεάν σε σύγκριση με το Photoshop, εύκολο στη χρήση και υποστηρίζει συμπίεση κατά παρτίδες. Έτσι, αν ψάχνετε για ένα εργαλείο συμπίεσης εν κινήσει, αυτός ο συμπιεστής εικόνας είναι ο κατάλληλος για εσάς.
Μέρος 5. Συχνές ερωτήσεις σχετικά με τη συρρίκνωση μιας εικόνας στο Photoshop
Πώς να δείτε το πραγματικό μέγεθος μιας εικόνας στο Photoshop;
Για να δείτε το πραγματικό μέγεθος μιας εικόνας στο Photoshop, πρέπει να μεταβείτε στην καρτέλα εικόνα και να κάνετε κλικ στο μέγεθος της εικόνας για να ελέγξετε τις διαστάσεις.
Ποιο είναι το καλό μέγεθος εικόνας για το Photoshop;
Ένα καλό μέγεθος εικόνας στο Photoshop εξαρτάται από την προβλεπόμενη χρήση σας. Για χρήση στον ιστό, οι εικόνες θα πρέπει γενικά να είναι κάτω από 2000 pixel και να αποθηκεύονται σε μορφή όπως το JPEG με μέτρια ποιότητα για εξισορρόπηση της ποιότητας και της ταχύτητας φόρτωσης. Για εκτύπωση, η ανάλυση εικόνας πρέπει να είναι τουλάχιστον 300 DPI (κουκκίδες ανά ίντσα) και οι διαστάσεις πρέπει να ταιριάζουν με το μέγεθος εκτύπωσης.
Ποιο είναι το προεπιλεγμένο μέγεθος εικόνας στο Photoshop σε ίντσες;
Το προεπιλεγμένο μέγεθος εικόνας στο Photoshop εξαρτάται συνήθως από τις ρυθμίσεις που έχουν διαμορφωθεί κατά τη δημιουργία νέου εγγράφου. Από προεπιλογή, το Photoshop μπορεί να ξεκινά με μέγεθος εγγράφου 8,5x11 ίντσες σε ανάλυση 300 DPI, το οποίο είναι κατάλληλο για εκτύπωση.
συμπέρασμα
Τώρα που γνωρίζετε τις διάφορες μεθόδους πώς να συρρικνώσετε μια εικόνα στο Photoshop, μπορείτε εύκολα να βελτιστοποιήσετε τις φωτογραφίες σας για αποθήκευση, χρήση στον ιστό ή κοινή χρήση χωρίς συμβιβασμούς στην ποιότητα. Ξεκινήστε να χρησιμοποιείτε αυτές τις τεχνικές σήμερα για να βελτιώσετε τη ροή εργασίας σας και να βελτιώσετε τις δεξιότητές σας στην επεξεργασία εικόνας.
-
 Πώς να μειώσετε το μέγεθος αρχείου φωτογραφιών στο iPhone: Βήματα για όλα τα iOS
 Αντιμετωπίζετε μεγάλα αρχεία εικόνας στο iPhone σας και δυσκολεύεστε να τα ανεβάσετε; Αυτό το άρθρο θα είναι ο οδηγός σας για το πώς να μειώσετε το μέγεθος αρχείου φωτογραφιών στο iPhone.
-
 Το Google Drive συμπιέζει τις φωτογραφίες; Ποια είναι η Αλήθεια;
 Αναρωτιέστε επίσης αν το Google Drive συμπιέζει φωτογραφίες; Διαβάστε την ολοκληρωμένη κριτική μας για να αποκαλύψετε την αλήθεια και να μάθετε πώς επηρεάζει την ποιότητα της εικόνας σας.
-
 3 τρόποι συμπίεσης εικόνων για Discord Emoji [Οδηγός]
 Αν ψάχνετε για μια μέθοδο συμπίεσης εικόνων για τα emoji του Discord λόγω του αυστηρού περιορισμού μεγέθους αρχείου, διαβάστε αυτό το άρθρο και καθοδηγηθείτε από 3 εύκολους τρόπους.