


Kompresní poměr fotografií: Komprimujte své obrázky efektivně
Pokud jde o kompresi obrazu, je důležité pochopit koncept kompresního poměru. I když se může jednat o běžný termín, vždy je špatně pochopen a v jiném kontextu je brán jinak. Uživatelé například předpokládají, že mohou vždy dosáhnout stejně kvalitního výstupu komprimovaného obrazu a mohou očekávat významnou ztrátu velikosti při použití nízkého kompresního poměru. Jde o to, že záleží na kompresním poměru a typu použité komprese.
Chcete-li komplexně porozumět kompresním poměrům fotografií a účinným metodám komprese, přečtěte si tento článek a ponořte se do toho, co to znamená kompresní poměr fotografiea také způsoby, jak je změnit. Připravte se a naučte se efektivně komprimovat obrázky.

Část 1. Co je to Photo Compression Ratio
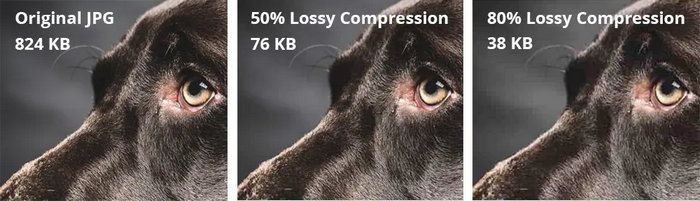
Kompresní poměr fotografie je poměr počtu bajtů v nekomprimované fotografii k počtu bajtů při komprimaci. V nejjednodušším vysvětlení se vztahuje k tomu, o kolik se soubor fotografie zmenší ve srovnání s jeho původní velikostí. Když má tedy fotografie vysoký kompresní poměr, znamená to, že fotografii lze zmenšit na menší velikost, díky čemuž může vypadat rozmazaně nebo pixelově. Mezitím, když má fotografie nízký kompresní poměr, měla fotografie na komprimované fotografii pouze malé zmenšení. Abyste tomu lépe porozuměli, zde je srovnání toho, co je ztrátová vs. bezeztrátová komprese.
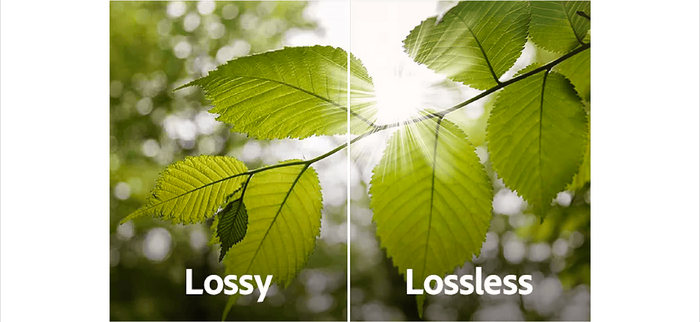
Ztrátová komprese
Jedná se o typ komprese obrazu, kdy může fotografie výrazně snížit její velikost a kvalitu. To znamená, že fotografie má vysoký kompresní poměr. Pokud má například fotografie původní velikost 10 MB a byla zkomprimována na 500 kB, znamená to, že dosáhla kompresního poměru fotografie 20:1.
výhody:
• Výrazně snižuje velikost souboru.
• Ideální pro použití na webu.
Nevýhody:
• Ztráta kvality obrazu, zejména při vysokých úrovních komprese.
• Nevhodné pro snímky vyžadující přesnou reprodukci původních dat.
Bezztrátová komprese
Ve srovnání se ztrátovou kompresí tento typ komprese znamená, že nedochází ke ztrátě informací a kvalita obrazu zůstává naprosto stejná jako u originálu.
výhody:
• Žádná výrazná ztráta kvality obrazu.
• Vhodné pro snímky vyžadující vysokou věrnost.
Nevýhody:
• Menší zmenšení velikosti souboru.
Část 2. Jak změnit kompresní poměr na fotografii
Úprava kompresního poměru obrázku pomáhá dosáhnout správné rovnováhy mezi jeho kvalitou a velikostí souboru a zajišťuje, že bude vypadat skvěle a zabere méně místa. Chcete-li toho dosáhnout, můžete použít Photoshop. Tento nástroj umožňuje uživatelům provádět širokou škálu úkolů pro úpravu obrázků, včetně úpravy kompresního poměru fotografií. Pomocí této konkrétní funkce můžete doladit kvalitu obrazu tak, aby vyhovovala konkrétním požadavkům. Zde je návod, jak můžete pomocí Photoshopu změnit kompresní poměr fotografie:
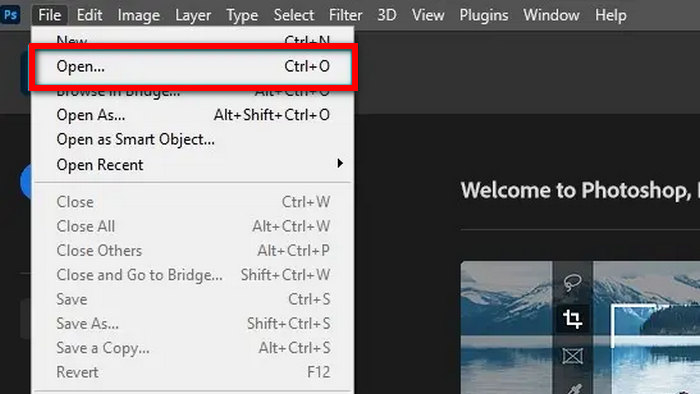
Krok 1. Nejprve importujte soubor obrázku, u kterého chcete změnit kompresní poměr, přejděte na kartu Soubor a klikněte na otevřeno volba.
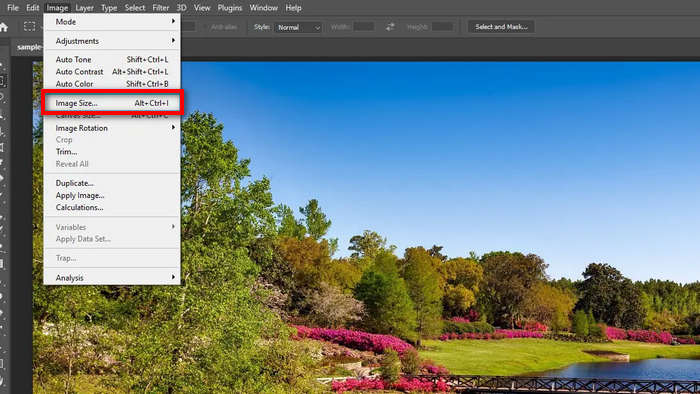
Krok 2. Jakmile budete mít svou fotografii importovanou ve Photoshopu, přejděte na Karta Obrázek a klikněte na Velikost obrázku.
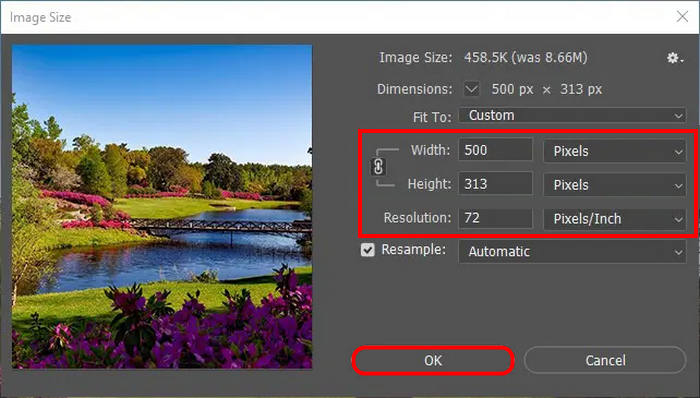
Krok 3. Nyní v dialogovém okně obrázku nastavte požadované rozlišení. Poté si stanovte svůj cíl Výška a Šířka hodnoty. Všimněte si, že je to v pixelech. Po dokončení stačí kliknout na OK knoflík.
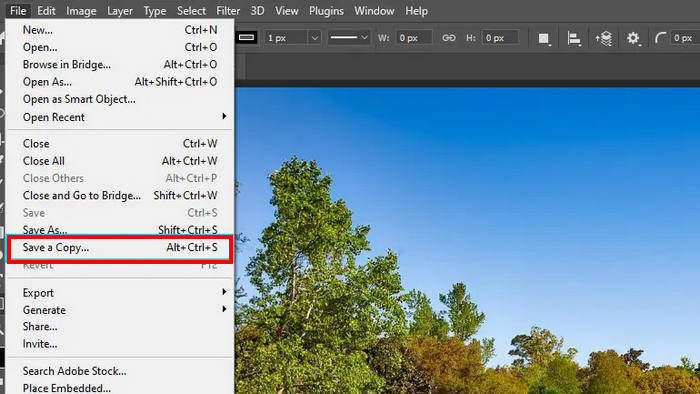
Krok 4. Chcete-li soubor uložit, přejděte na Karta Soubor a vybrat Uložit kopii v nabídce.
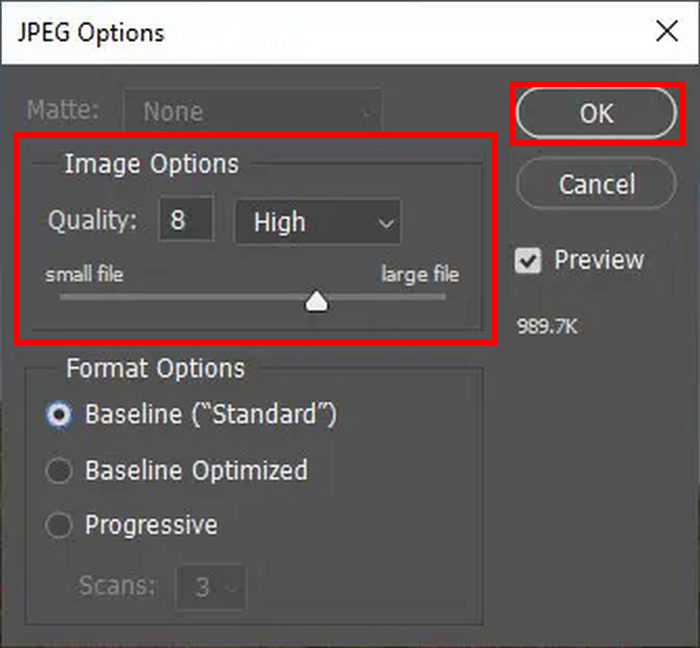
Krok 5. Po kliknutí na tlačítko Uložit se zobrazí pole možností JPEG. Odtud můžete snadno upravit kvalitu obrázku posunutím lišty v části Možnosti obrázku. Po dokončení klikněte OK zachránit.
Pomocí této metody můžete snadno změnit kompresní poměr vaší fotografie. Pro některé to však může být trochu komplikované a noví uživatelé musí využít předplatné, aby mohli využívat všechny funkce.
Část 3. Bonus: Komprimujte obrázek bez ztráty kvality
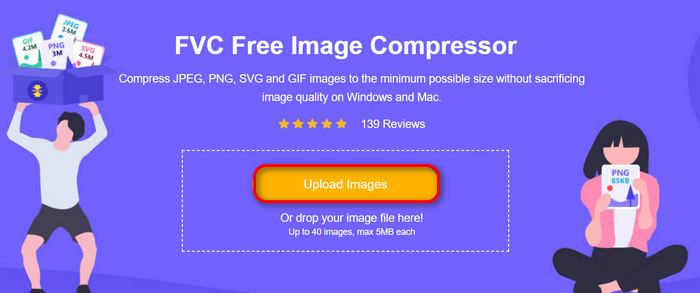
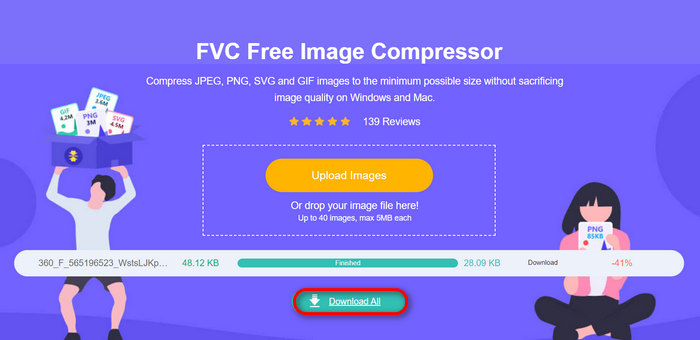
FVC bezplatný kompresor obrázků je bezplatný online nástroj pro kompresi obrázků, který zmenšuje velikost obrázku, ale nezanechává žádnou zjevnou ztrátu kvality výstupu. Ve srovnání s některými kompresorovými nástroji má tento skvělé optimalizační a kompresní algoritmy, které zajišťují nejlepší kvalitu rozlišení komprimované fotografie.
Zde je návod, jak komprimovat fotografie pomocí FVC Free Image Compressor
Krok 1. Nejprve si musíte projít oficiální webovou stránku FVC Free Image Compressor.
Krok 2. Poté klikněte Nahrajte obrázky pro import fotografií, které chcete komprimovat. Tento nástroj automaticky komprimuje vaše fotografie.
Krok 3. Počkejte na dokončení procesu komprese. Jakmile budete hotovi, uvidíte stav pruhu oznamující, že je hotovo, a informace o velikosti komprimovaného obrázku před a po. Poté klikněte Stáhnout vše pro uložení obrázku.
Pokud chcete své fotografie snadno komprimovat, je skvělou alternativou použití nástroje pro komprimaci obrázků zdarma FVC. K jejich komprimaci stačí jedno kliknutí a vše je zaručeno, že vaše fotografie budou dobře komprimované co do velikosti a kvality.
Část 4. Časté dotazy o poměru komprese fotografií
Jak zkomprimovat fotografii na poměr 20:1?
Ke kompresi fotografie na poměr 20:1 můžete použít nástroj pro úpravu obrázků, jako je Photoshop nebo online kompresor. Ve Photoshopu upravujte nastavení kvality obrazu a rozlišení, dokud nedosáhnete požadovaného kompresního poměru. Existují také online nástroje, které často poskytují možnost určit velikost cílového souboru nebo úroveň komprese, jako je komprese nebo matrice. Ale pokud jde o pohodlí, nástroj FVC Free Image Compressor může být také skvělým nástrojem pro kompresi fotografie s poměrem 20:1.
Jak zjistím kompresní poměr fotografie?
Chcete-li zjistit kompresní poměr fotografie, vydělte velikost původního souboru velikostí komprimovaného souboru. Pokud má například původní fotografie 10 MB a komprimovaná fotografie 0,5 MB, kompresní poměr je 10 MB / 0,5 MB = 20:1.
Jaký je kompresní poměr souboru JPG?
Kompresní poměr fotografie souboru JPG se liší v závislosti na nastavení kvality použitém během komprese. Vysoká komprese má za následek menší velikosti souborů, ale nižší kvalitu obrazu, zatímco nízká komprese udržuje vyšší kvalitu obrazu při větší velikosti souborů. Typické kompresní poměry JPG se pohybují od 10:1 do 20:1 pro použití na webu.
Existuje nějaké omezení, jak moc můžete komprimovat fotografii?
Ano, existují praktické limity toho, jak moc můžete komprimovat fotografii, než dojde k výrazné ztrátě kvality. Vyšší kompresní poměry často vedou k viditelným artefaktům, jako je pixelace nebo rozostření, zejména u obrázků se složitými detaily nebo přechody.
Závěr
Pochopení a přizpůsobení kompresní poměr fotografie je zásadní pro optimalizaci obrázků tak, aby byla vyvážena kvalita a velikost souboru. Adobe Photoshop nabízí výkonný způsob, jak to zvládnout, protože poskytuje vyladěnou kontrolu nad kvalitou obrazu. Pro ty, kteří hledají jednodušší řešení, nabízejí nástroje jako FVC Free Image Compressor efektivní alternativy.
Převezměte kontrolu nad optimalizací obrazu hned teď! Vyzkoušejte Adobe Photoshop pro pokročilé úpravy nebo použijte FVC Free Image Compressor pro rychlou a snadnou kompresi.
-
 3 způsoby změny velikosti obrázku na 20 kB: Bezproblémová komprese
 Obáváte se, jak dosáhnout velikosti 20 kB pro soubor obrázku? Tento článek vás naučí 3 způsoby, jak rychle a plynule změnit velikost obrázku na 20 kB.
-
 Příliš komprimovaná fotografie: Zde je návod, jak je snadno opravit
 Zajímá vás, co dělat, když je váš obrázek příliš komprimovaný? Přečtěte si tento článek a zjistěte, proč k tomuto problému s obrázkem dochází, a naučte se 2 způsoby, jak je opravit.
-
 Jak komprimovat JPEG na Windows a Mac [Ultimate Guide]
 Hledáte účinný nástroj pro kompresi souborů JPEG na zařízeních se systémem Windows a Mac? Přečtěte si tento článek a naučte se pět metod pro bezproblémovou kompresi.