


مراجعة كاملة لك: هل يقوم Google Drive بضغط الصور؟
بعض المواقع الإلكترونية تفرض قيودًا على عرض وارتفاع الصور المُدرجة. لذلك، من الطبيعي أن تواجه موقفًا تحتاج فيه إلى تكبير أو تصغير حجم الصورة. عند العمل على الصور، أول ما يتبادر إلى ذهنك هو برنامج فوتوشوب، الخبير في هذا المجال. فهو معروف بميزاته المتعددة. بالنسبة للمحترفين، يُعد فوتوشوب بلا شك الخيار الأمثل لتغيير حجم الصور. ولكن إذا كنت مبتدئًا، فقد لا تجد الوظائف المناسبة.
لا بأس؛ لقد قمنا بتغطية ذلك في دليلنا الأكثر تفصيلاً حول تصغير صورة في Photoshop. إذا كان لديك عمل أكثر إلحاحًا، ففكّر في استخدام أداة أخرى لمعالجة الصور أوصينا بها في هذه المقالة.

الجزء الأول: كيفية تغيير حجم الصورة في الفوتوشوب
دعونا أولاً نلقي نظرة على ما يمكنك فعله لتغيير حجم الصورة باستخدام برنامج Photoshop.
يُرجى العلم أن خطوات تغيير حجم الصورة وتصغيرها قد تختلف قليلاً. لذلك، سنُقسّم هذا الدليل إلى قسمين. ستجد إرشادات مُحددة حول تصغير حجم الصورة في القسم التالي.
الخطوة 1. افتح برنامج Photoshop، ثم انتقل إلى File > Open لتحديد الصورة التي تريد تغيير حجمها.
الخطوة 2. انتقل إلى Image > Image Size.
الخطوة 3. أدخل أبعاد البكسل أو حجم المستند أو الدقة التي تريدها في مربع الحوار Image Size.
الخطوة 4. اختر طريقة إعادة التعيين (Resampling Method) قبل تأكيد الإعدادات.
Bicubic: مثالي للتدرجات اللونية السلسة؛ إذ يحسب متوسط قيم البكسل للحصول على دقة أكبر.
Bicubic Smoother: الأفضل لتكبير الصور، خاصة تلك التي تحتوي على ضوضاء، مما ينتج عنه مظهر أكثر نعومة.
الخطوة 5. انقر على OK لتطبيق التغييرات.

لقد نجحت الآن في تغيير عرض وارتفاع صورتك. مع ذلك، يُرجى العلم أن هذا قد يزيد أيضًا من حجم ملف الصورة. لذا، مع مراعاة نسبة العرض إلى الارتفاع، تأكد من أن حجم ملف الصورة يتوافق مع متطلبات منصتك.
الجزء الثاني. كيفية تصغير الصورة في الفوتوشوب
في هذا القسم، سنركز على كيفية تقليل حجم الصورة في برنامج الفوتوشوب.
الخطوة 1. شغّل Photoshop ثم انتقل إلى File > Open لاختيار الصورة التي تريد تعديلها.
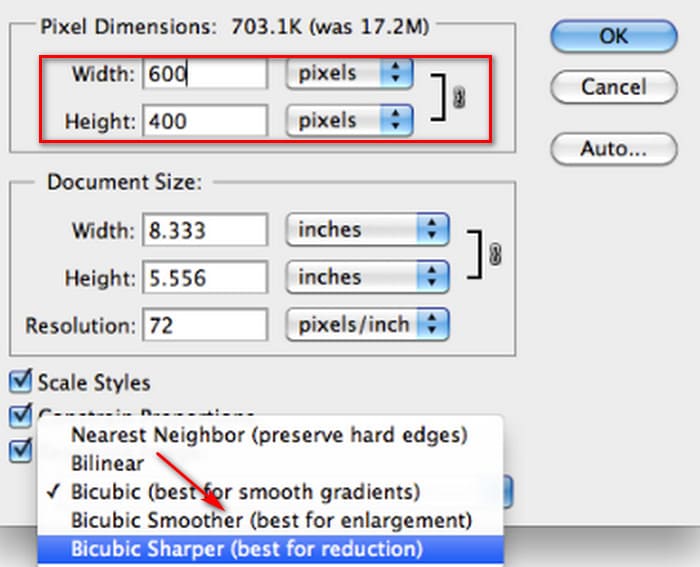
الخطوة 2. انتقل إلى Image > Image Size. سيؤدي هذا إلى فتح مربع الحوار Image Size.
الخطوة 3. أدخل القيم الجديدة لأبعاد البكسل أو حجم المستند أو الدقة وفقًا لاحتياجاتك.
الخطوة 4. اختر طريقة إعادة التعيين (Resampling Method).
Bicubic: مثالي للتدرجات اللونية السلسة؛ إذ يستخدم البكسلات المحيطة لإنشاء نتائج دقيقة.
Bicubic Sharper: يُوصى به لتقليل حجم الصورة مع الحفاظ على التفاصيل الحادة. إذا أصبحت الصورة حادة أكثر من اللازم، فارجع إلى خيار Bicubic.
الخطوة 5. انقر على OK لتطبيق التغييرات وتغيير حجم الصورة.
لقد نجحت الآن في تصغير حجم الصورة الأصلية. ومع ذلك، وكما في الجزء الأول، ستلاحظ أيضًا تغييرًا ملحوظًا في حجم ملف الصورة بعد إتمام العملية، ويتجلى ذلك بشكل رئيسي في ضغطها بشكل أصغر.
يجب ملاحظة أنه قد يكون قد حدث فقدان في جودة الصورة. إذا شعرت أن ذلك مبالغ فيه نوعًا ما ويؤثر في متعة المشاهدة لديك، يمكنك إصلاحها مرة أخرى باستخدام أداة تحسين جودة الصور.
الجزء 3. كيفية تغيير حجم الصورة دفعة واحدة في برنامج فوتوشوب
يتطلب تغيير حجم صورة باستخدام فوتوشوب عدة خطوات. عندما يكون لديك عدد كبير من الصور التي تحتاج إلى معالجة، فإن سحبها واحدة تلو الأخرى إلى فوتوشوب لتحريرها يستغرق وقتًا طويلاً ويتطلب جهدًا كبيرًا. لحسن الحظ، لدينا طريقة أخرى لتقليل حجم الصور دفعةً واحدة.
إليك كيفية تقليل حجم الصورة دفعة واحدة في برنامج فوتوشوب.
الخطوة 1. أولاً، ضع جميع الصور التي تريد ضغطها دفعة واحدة في مجلد واحد.
الخطوة 2. شغّل Photoshop، ثم انتقل إلى قائمة File، واختر Scripts، ثم حدد Image Processor.
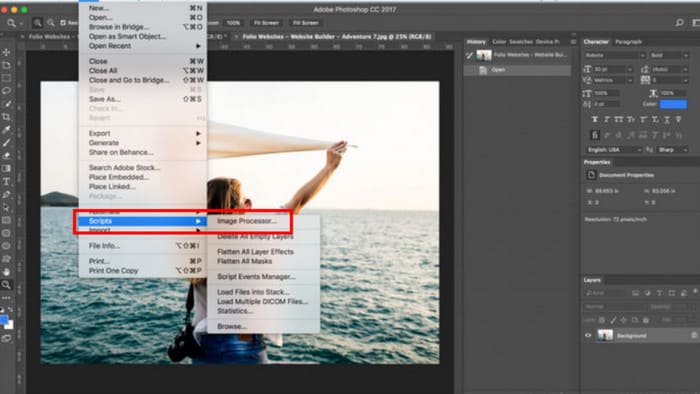
الخطوة 3. انقر على Select Folder ضمن Select the images to process لاستيراد الصور التي تريد ضغطها.

الخطوة 4. سيقوم Photoshop تلقائيًا بإنشاء مجلد جديد داخل المجلد الأصلي لتخزين الصور المضغوطة.
الخطوة 5. في قسم File Type، فعّل خيار Resize to Fit، ثم حدد أقصى عرض وارتفاع للصور التي سيتم تغيير حجمها.

الجزء الرابع. بديل فوتوشوب عبر الإنترنت - ضاغط الصور FVC
ما يزال واجهــة Photoshop معقدة جدًا للمبتدئين ولمن لديهم مهام معالجة صور عاجلة، كما أن هناك العديد من الخطوات اللازمة لتقليل حجم الصورة. هناك بديل أكثر سهولة، وهو FVC Free Image Compressor. كل ما عليك فعله هو رفع الصورة التي تريد معالجتها من خلال المتصفح، وسيتكفّل تلقائيًا بضغط حجم الصورة لك، كما يتيح لك ضبط نسبة العرض إلى الارتفاع يدويًا، وتدوير الصورة أو قلبها مباشرة على صفحة الويب.
هناك مشكلة أخرى لا يُمكن تجاهلها. يتطلب الاستخدام المنتظم لبرنامج فوتوشوب اشتراكًا. لكن منتجات أدوبي باهظة الثمن. أداة FVC Free Image Compressor هي أداة مجانية تمامًا عبر الإنترنت. هل فكرتَ في معالجة الصور دفعةً واحدة؟ لم يُغفل مطورو FVC Free Image Compressor هذه النقطة. حاليًا، يُمكنك معالجة ما يصل إلى 40 صورة دفعةً واحدة على هذه المنصة.
الخطوة 1. انتقل إلى الموقع الرسمي لأداة FVC Free Image Compressor.

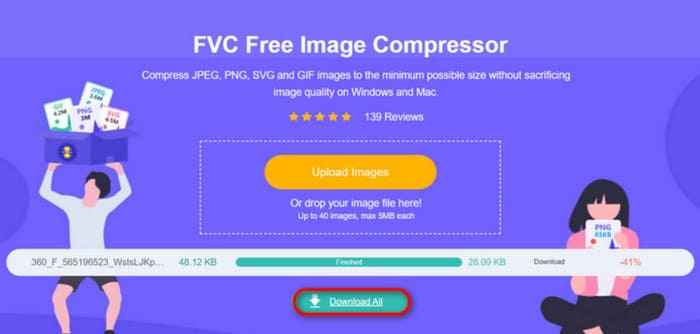
الخطوة 2. انقر على Upload Images لاختيار الصور التي تريد ضغطها ورفعها.
الخطوة 3. بعد انتهاء عملية الضغط، عاين أحجام الملفات المحدّثة، ثم انقر على Download All لحفظ الصور المضغوطة على جهازك.
بعد الحصول على نتائج الضغط، هل تفاجأتَ من عدم فقدان دقة الصور كثيرًا؟ يستخدم ضاغط الصور المجاني FVC أحدث تقنيات الضغط وأكثرها فعاليةً لتحقيق التوازن المثالي بين دقة الصورة وحجمها.
سواء كنت مبتدئًا أو محترفًا، ستجد أن FVC Free Image Compressor هو البديل الأفضل لبرنامج Photoshop.
الجزء 5. الأسئلة الشائعة حول كيفية تصغير الصورة في برنامج فوتوشوب
كيف يمكنك تصغير حجم الصورة في الفوتوشوب دون فقدان الجودة؟
لتقليل حجم الصورة في فوتوشوب دون تشويه، يُنصح باختيار خيار إعادة التشكيل (Resample) عند العمل. من الضروري أيضًا مراقبة تغيرات الحدة عند ضبط نسبة العرض إلى الارتفاع.
كيف يمكنك تصغير الصورة دون اقتصاصها؟
يمكنك استخدام أداة تغيير حجم الصور لتعديل حجم العرض على الشاشة. كخيار بديل، فكّر في ضغط ملفات الصور، فهذا سيجعل حجمها أصغر بكثير.
كيف تصنع صورة حجمها أقل من 1 ميجا بايت؟
يمكنك استخدام بعض برامج ضغط الصور المتخصصة. يُنصح بشدة باستخدام أدوات تتيح لك ضبط مستوى الضغط ومعاينة حجم الصورة المضغوطة قبل تنزيلها، مثل Photoshop أو FVC Free Image Compressor.
خاتمة
بعد أن تعلّمت كيفية تصغير صورة في Photoshop في المحتوى أعلاه، يمكنك الآن تجربة ذلك بنفسك. لقد أرفقنا صورًا لكل خطوة حتى تتمكّن من رؤية كل تفصيل بوضوح. وإذا كنت لا ترغب في تنزيل Photoshop إضافيًا على جهازك أو تنفر من واجهته المعقدة، فجرّب استخدام FVC Free Image Compressor لصورك. فهو سهل الاستخدام، بخطوات بسيطة وخدمة مجانية.
-
 كيفية ضغط MXF باستخدام Premiere Pro وعلى الإنترنت مجانًا
 كيف يتم ضغط MXF بحجم ملف أصغر؟ كيف تضغط ملفات MXF في Adobe Premiere Pro؟ يشارك هذا المنشور طريقتين لضغط ملفات MXF.
-
 كيفية ضغط ملفات MOV بسهولة: 6 خيارات مجانية لك
 لضغط ملفات MOV، يمكنك الرجوع إلى الخيارات الستة المذكورة في هذه المقالة، بما في ذلك ثلاثة برامج سطح مكتب وثلاث منصات إلكترونية. سنشرح لك كيفية استخدامها هنا.
-
 كيفية ضغط فيديو MP4 إلى حجم أصغر
 هل فيديو MP4 كبير جدًا بحيث لا يمكن تحميله؟ تريد تصغير حجم الفيديو؟ فيما يلي 3 طرق فعالة لضغط ملف MP4 إلى حجم أصغر بلا حدود.