


Learn 2 Methods on How to Split Audio in Audacity [2024]
Are you working on an audio project and find the track extra lengthy? Well, that’s where splitting an audio track comes in. Splitting is a process where one audio track is divided into two. This allows users to move either or both of the pieces of the audio, add different effects to them, or do anything else for an easier editing process. Moreover, splitting tracks is a common thing faced by audio editors so they can easily manipulate the tracks for whatever modification they want to do with them.
With this, if you plan to use Audacity to edit your audio projects, but you don’t know how to use it, especially for splitting the tracks, we got you covered! This article will teach you various ways how to split tracks in Audacity with great ease and precision. Let’s get started!

Part 1. How to Split Track in Audacity
Audacity is an audio editing and recording tool that is available on multiple operating systems, such as Windows, Linux, and macOS. With this tool, users can perform basic to professional alike audio editing tasks like splitting audio tracks into specific or intended segments. Moreover, this tool supports popular file formats such as MP3, M4A, AIFF, FLAC, and WAV, which is great in terms of compatibility.
Now, let’s learn how to split track in Audacity.
Step 1. First, download the tool on your computer and launch it.
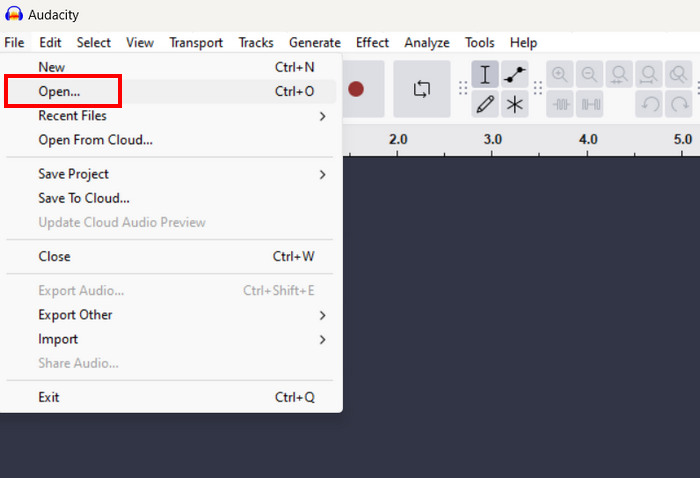
Step 2. After that, load the track that you want to split by going to the File tab and clicking the Open menu.
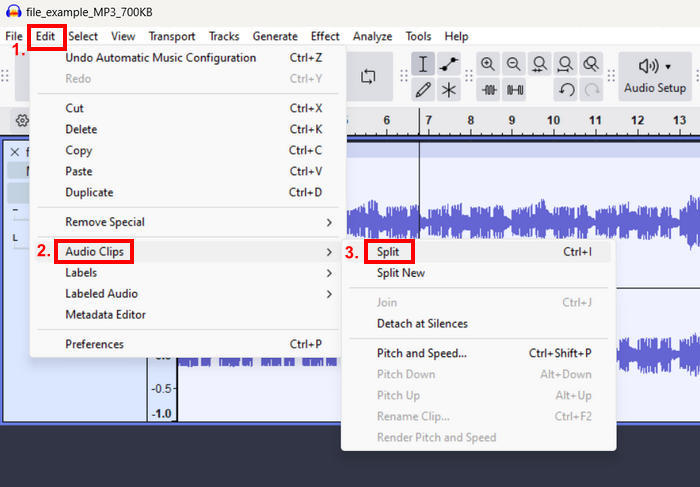
Step 3. Now, on the wave track, select the part where you want to split your audio, then go to the Edit tab, choose Audio Clips from the menu, and click Split.
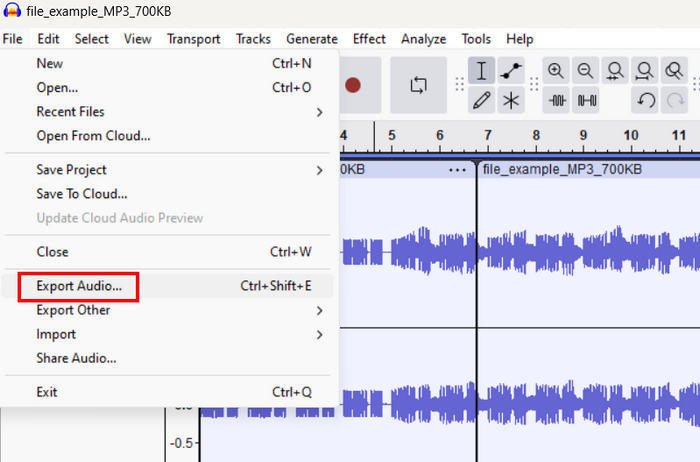
Step 4. Lastly, to save the edited track, go to the File tab and select the Export Audio option from the menu.
Although Audacity has a complex user interface to absorb, its splitting feature can easily be used when properly guided. Users must take note that splitting audio in Audacity precisely requires a careful selection of the exact points on the waveform. If the selection is off, even by a small margin, it may result in an abrupt or unintended cut in the audio.
Part 2. Split Track Automatically in Audacity with Labels
Meanwhile, if you are working with lengthy tracks that require more than two splittings, adding labels to corresponding tracks is essential. Fortunately, Audacity splits audio files with labels. With this feature, users are guided through the tracks that they are going to manipulate when editing their audio projects.
Here’s a step-by-step guide on how to split track in Audacity with labels:
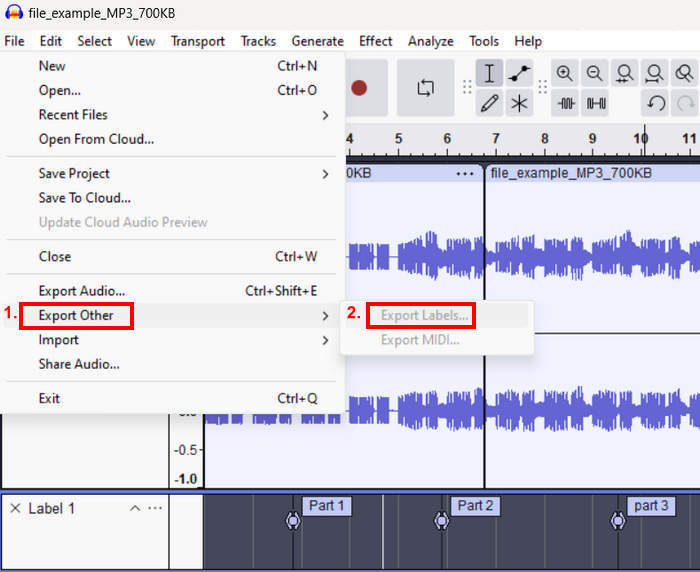
Step 1. The same process, first, load the track that you want to split by going to the File tab and clicking the Open menu.
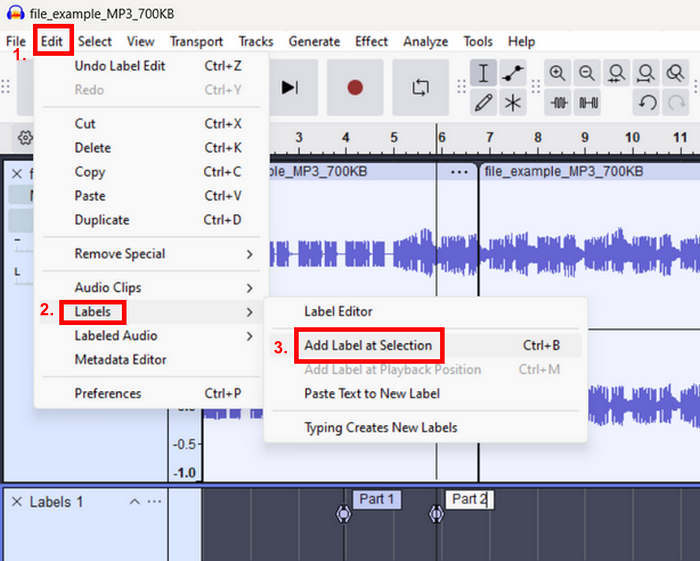
Step 2. Next, on the wave track, select the part where you want to split your audio with labels, then go to the Edit tab, choose Labels from the menu, and click Add Label at Selection. This will automatically split the track of your audio and will allow you to change the label name accordingly.
Step 3. After that, export the track by going to the File tab. Click on the Export option and choose Export Labels.
With this feature, users can easily navigate the parts they split from the track, which is great for management and organization. However, Users will still need to export each labeled section individually if they want them as separate audio files.
Part 3. Split Track with Audacity Alternative
Audacity has a really complex interface that might cause confusion for users, especially beginners. So, if you’re looking for an easier and simple alternative tool for splitting lengthy audio tracks, the FVC picked Video Converter Ultimate is the one for you. This tool is known for its comprehensive toolset and features, which can easily be accessed due to its very user-friendly and intuitive interface. Moreover, compared to Audacity, this tool supports a wider range of audio file formats, reaching up to 20, to ensure compatibility with most audio files that need editing.
Step 1. First, on your Mac or Windows computer, download and install the FVC picked Video Converter Ultimate.
Free DownloadFor Windows 7 or laterSecure Download
Free DownloadFor MacOS 10.7 or laterSecure Download
Step 2. Next, add the track that you want to split by clicking the Add Files button.
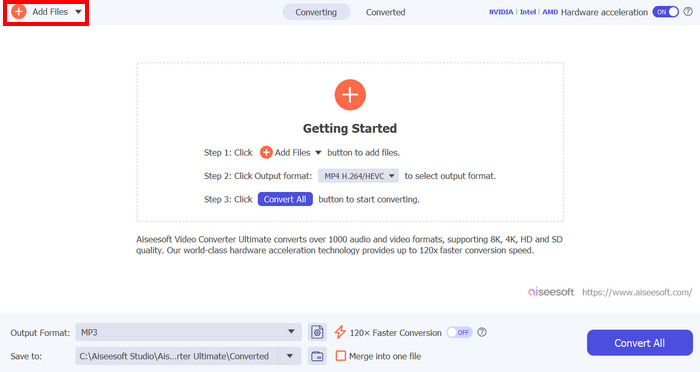
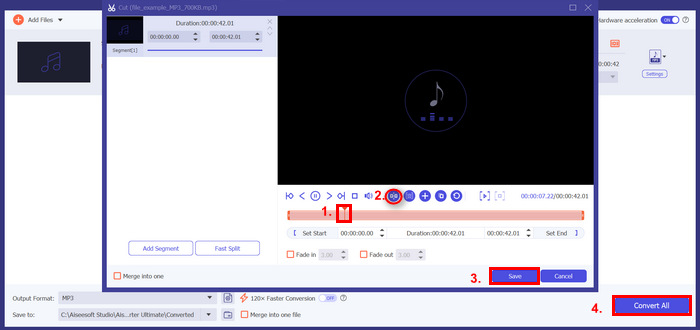
Step 3. After that, click on the Cut button, and it will lead you to another window. From there, click on the track, move the red line, and position it to the part where you want to split the track, once done, click on the Split button. After that, click Save. Lastly, to save your edited audio track, click on the Convert All button.
So, when splitting track in Audacity isn’t for you, this FVC picked Video Converter Ultimate can be a great alternative for your lengthy audio files. It gives you the same function, but compared to Audacity, it offers an easier way of splitting tracks, which can be a great deal for any level of user.
Part 4. FAQs about Audacity Split Track
What is the shortcut for a split in Audacity?
You can quickly split a track by using various shortcut methods. For example, if you are a Windows user, you can use the Ctrl + I, and for macOS users, you can use the Command + I. This command allows you to instantly split the selected portion of the audio track.
Why can't I split a track in Audacity?
If you're unable to split a track in Audacity, it could be due to a few reasons. One common issue is that the track might not be selected properly before attempting to split. Make sure you've highlighted the exact section of the waveform you wish to split.
How to cut and join audio in Audacity?
To cut and join audio in Audacity, first, select the portion of the audio you want to cut using the selection tool. Once selected, you can press Ctrl + X for Windows users and Command + X for macOS users to cut the audio. Moreover, you can go to the Edit tab and choose the Cut option from the menu. Meanwhile, to join or merge audio, simply position the cursor where you want to paste the cut section and press Ctrl + V if you are a Windows user and Command + V for macOS users to paste it.
Conclusion
Finally, you now know how to split track in Audacity! Easy, right? Except for its complex interface. But don’t! There’s a much easier and simpler alternative that you can check on, which is the FVC picked Video Converter Ultimate. So, if you want to optimize your audio editing workflow by using a user-friendly and intuitive MP3 splitting tool, use this now!
-
 Concrete Tutorial – How to Merge Two Audio Tracks in Audacity
 Audacity is favored for editing audio, but how use it to merge audio tracks? This post will tell you how to merge tracks in Audacity.
-
 How to Use Audacity to Reverse Audio on Windows 10/11
 If you’re editing an audio file in Audacity and wondering how to reverse all or a part of it, read here and learn how to reverse audio in Audacity easily.
-
 How to Fade Audio in Audacity: 4 Different Ways [2024]
 Discover steps on how to fade audio in Audacity effectively and some extra knowledge about Audacity’s fade-in/out effects. Buckle up now, and let’s dive in.