Compress Pictures in Word: Ultimate Guide for Beginners
When creating a Word document, there are times when we need to attach photos. These photos add visual appeal or maybe documentation or attachments to support our documents. While this is a great way to effectively communicate, adding photos with large file sizes will take up more storage space and will make it longer to open the file. Consequently, it will cause inconvenience to those who will be opening the file as well as to the sender who is sending it.
But here’s a thing! We’ve got you covered, as this article will teach you 2 ways how to compress images in Word and an alternative way to easily compress pictures for Word. Take this opportunity now and start optimizing your photos to create an efficient Word document.

Part 1. Compress Pictures in Word
Microsoft Word is a widely utilized word processing software across the globe, where users can compose any word document and attach photos. However, due to large file image attachments, the Word document takes up more space, which makes it hard to manage. But here’s the thing, users can directly compress their images within their Word document. The following are the two methods how you can compress pictures in Word:
Method 1. Compress Images in Word on Windows
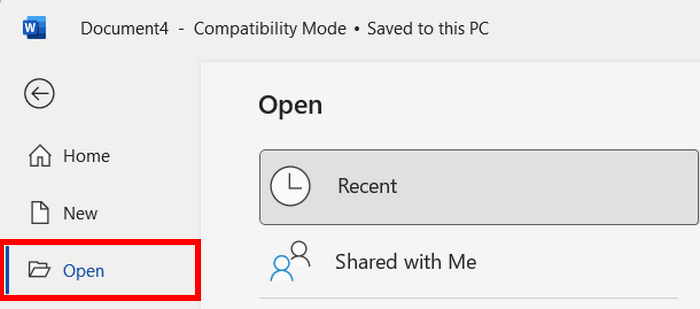
Step 1. Open your Word Software, and you’ll see three buttons on the left side. Among them, choose Open to launch the Word file that contains photos that you want to compress.
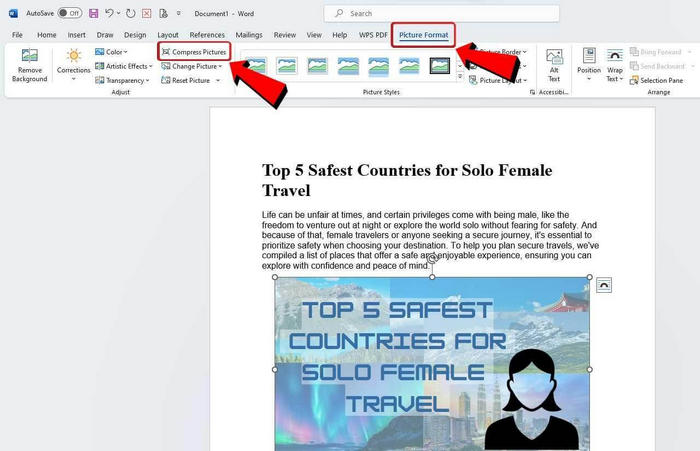
Step 2. Now, to compress the photos, scroll down on your file and find the image file that you want to compress. Once you have found it, click on it. After that, go to the Picture Format tab, and among the ribbons below, click on Compress Pictures.
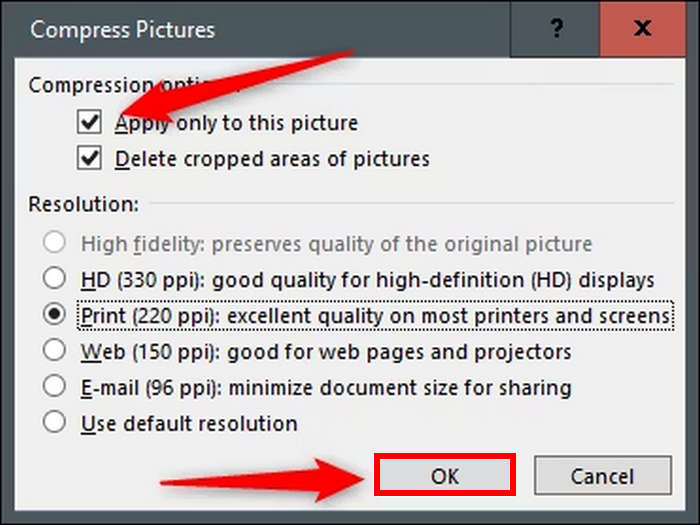
Step 3. From there, you have two options on how you can compress your photos:
• Apply only to this picture: This option ensures that other pictures in your document will not be affected but only the selected one will be compressed.
• Delete cropped areas of pictures: When you have cropped images, it's best to tick this option. Cropped images leave a cropped area in your document's background, affecting the file size.
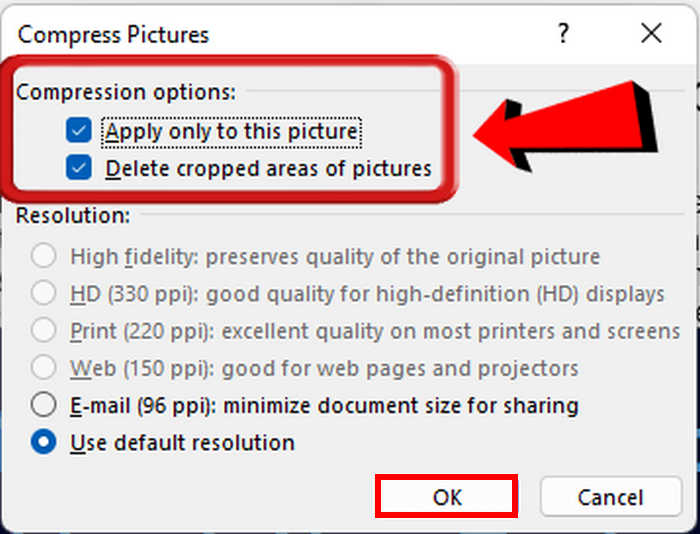
Step 4. For the Resolution, it is highly recommended that you choose the Use default resolution. This will result in a good balance in quality and resize reduction. Once done, just click the OK button.
This method is useful for Windows users. This will help them reduce the file size of their Word file, and they can ensure a smooth experience when saving, sharing, and opening documents. However, compressing images in Word can sometimes lead to a noticeable loss in image quality, affecting the clarity and detail of the images, which can be problematic if the document's visual elements are critical, such as in professional presentations or detailed graphics.
Method 2. Compress Pictures in Word on Mac
Step 1. First, open the Word file to access the document containing the images you want to compress.
Step 2. Now, find the picture you want to compress in your Word file document and right-click on it. Then, go to Picture Format, and in the ribbons, choose the Compress option.
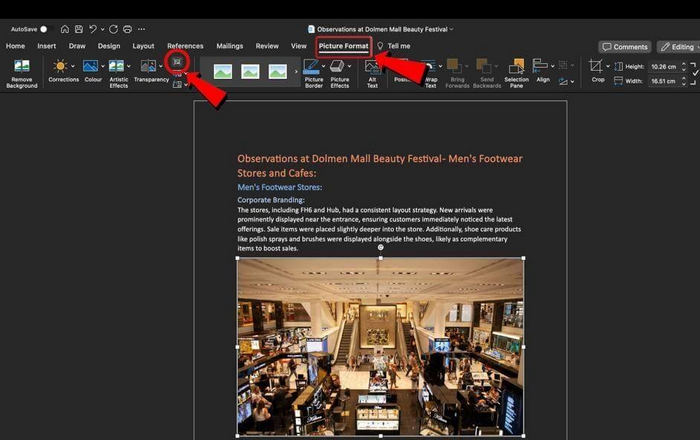
Step 3. In the Compress Picture Windows, choose High Fidelity as the Picture Quality. Moreover, just like for Windows, tick the box to Delete cropped areas of pictures, as this will remove the cropped area from the background.
Step 4. Lastly, in the Apply to option, you can either choose All pictures in this file or Selected pictures only. Once done, click the OK button.
Just like in Windows, this method can help Mac users optimize their document files by compressing their photos directly in the Word Software. This eliminates the need to use other image compressor tools to reduce the size of the images. But the thing is, this can cause obvious quality loss in the image quality unlike using dedicated image compressor tools.
Part 2. Best Way to Compress Images With One Click [Easy & Fast]
Since directly compressing pictures in Word can cause a noticeable loss in quality, there are alternative tools that you can use to optimize your Word document by using compressed photos from other tools. FVC Free Image Compressor is the best alternative. This is a free online image compressing tool ideal for users who are looking for a faster way to compress images easily for Word. In one click, your photos will be automatically resized and their quality will be retained almost as is. Also, this tool is super user-friendly and intuitive. Lastly, when you have a bunch of image files to attach to your Word file, you can take advantage of its batch processing feature, allowing you to simultaneously compress 40 photos in one click.
Here’s how to compress an image using FVC Free Image Compressor
Step 1. On your browser, type in FVC Free Image Compressor and search for it.
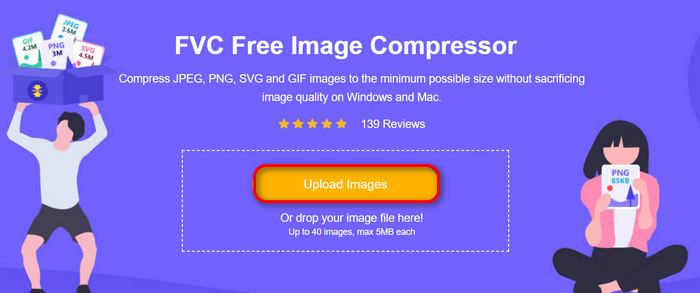
Step 2. Once you have landed on their official website, click Upload Images to import the photos you want to compress.
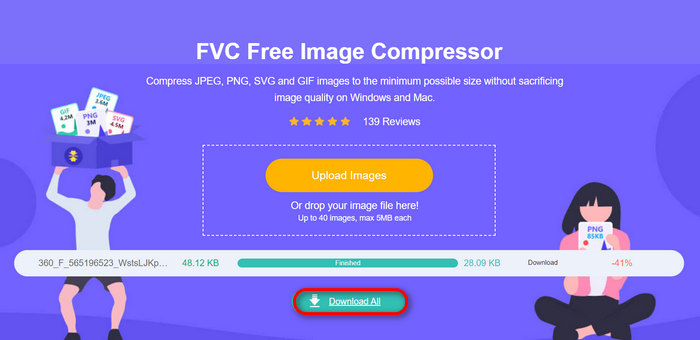
Step 3. Wait for the compression process to finish. Once done, you’ll see a bar status stating it’s finished and information on the before-and-after size of the compressed image. After that, click Download to save your image.
With the FVC Free Image Compressor, compressing won’t take a toll on your effort. Also, this tool is completely free and super accessible, so it’s really a great alternative if you want to use compressed photos for your Word document.
Part 3. FAQs about Compressing Pictures in Word
How do I manage pictures in Word?
Managing pictures in Word involves several steps to ensure they fit well within your document. You can resize, crop, and adjust the layout of the pictures using the Picture Format tab. Also, to maintain the document's efficiency, it's also recommended to compress the images to reduce file size without compromising too much on quality.
How can I turn a picture into a Word document?
To turn a picture into a Word document, you can use Optical Character Recognition software. This technology converts different types of documents, such as scanned paper documents, PDFs, etc., into editable and searchable data. You just need to insert the picture into a Word document, then use an OCR tool, either built-in or third-party, to extract the text.
How do I reduce picture file size in Word by cropping?
To reduce picture file size in Word by cropping, start by selecting the picture and using the crop tool to keep only the desired portion of the image. After cropping, access the picture formatting options and choose to compress the picture. In the compression settings, ensure that you delete the cropped areas of the picture to remove the unnecessary parts and reduce the overall file size. Finally, select the desired resolution and apply the changes to achieve a balance between image quality and file size reduction.
Conclusion
In conclusion, the need to compress pictures in Word roots from the idea that document files that contain large image files are harder to manage and can slow down the loading time of the file. But with the methods outlined in this article, you can easily compress easily compress your images.
Start compressing your images today to make your Word documents more manageable and efficient!


 Video Converter Ultimate
 Screen Recorder

