


How to Trim Audio in iMovie: Tutorial for iPhone and Mac
iMovie is a free video/audio editing software for iPhone and Mac developed by Apple, allowing users to edit and produce media projects seamlessly. When Apple users are looking for ways to edit, trim, and cut out parts of specific audio they have, it is just right for them to use software for it. Little did they know iMovie can also be used for audio cutting and trimming tasks; thus, following through this guide can help users like you effectively navigate your way to a seamless cutting of audio in the iMovie process.

Part 1. How to Trim Audio in iMovie
iPhone
Trimming music in iMovie using an iPhone is easier than using a Mac. The mobile version of iMovie is lightweight and straightforward, allowing for a seamless process that lets users trim their audio files within a few taps in the mobile app. As straightforward as it is compared to its Mac version, it has limited features in video and audio editing.
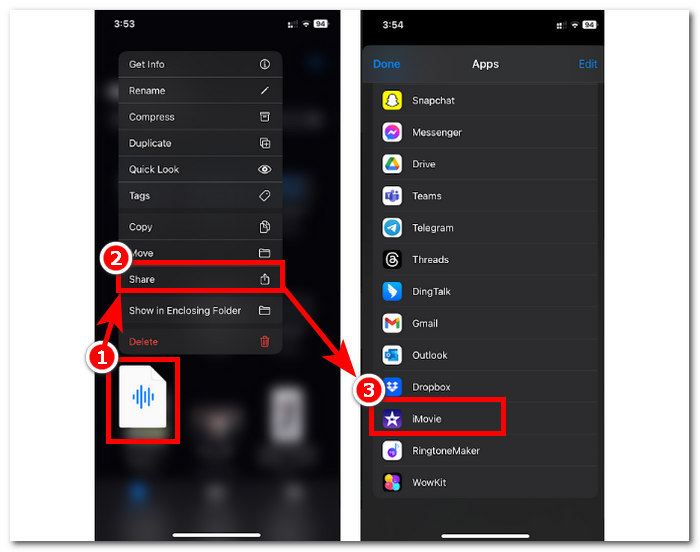
Step 1. Go to your Files app, long-press on the audio file you want to trim, tap Share, and open it on the iMovie app. If you want to cut a recording, record the audio file on iMovie first.

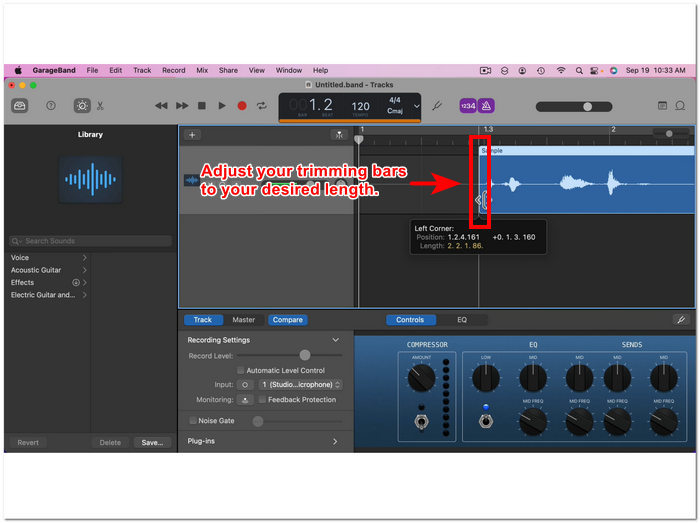
Step 2. To trim your audio file, go to the start and end parts of your audio file in the timeline, and you will see tha trimming bars on both sides. Just simply drag the trimming bars from left and right until you are satisfied with the trim your audio has. Once done, click the Done button above to proceed.
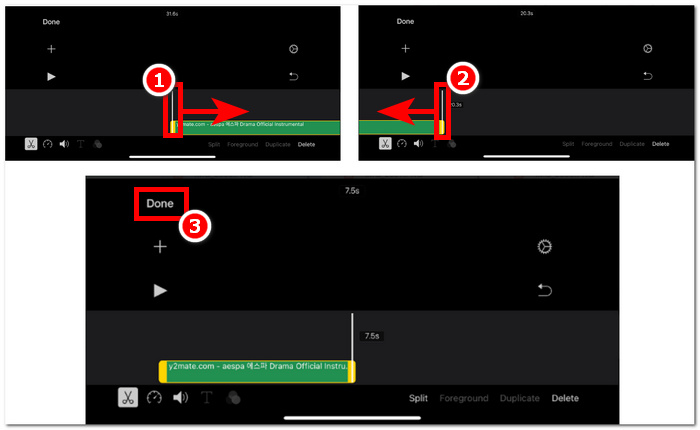
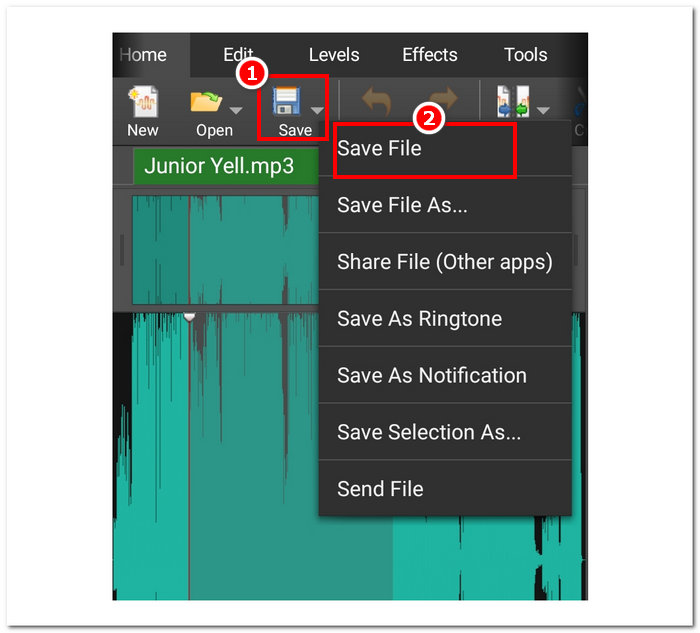
Step 3. Finally, click the Share icon in the lower-center part of the app and proceed to save it.

Mac
How to trim music iMovie? Users have an option to trim audio clips using iMovie on their Mac device. Using the Mac version of iMovie to trim an audio file lets users have access to a variety of audio editing features, for this case, the use of a clip trimmer, which is not available on its mobile version. This clip trimmer allows the seamless dragging of the trimmer bars from the left and right to create an instant trim. To do it effectively, you must follow the steps below.
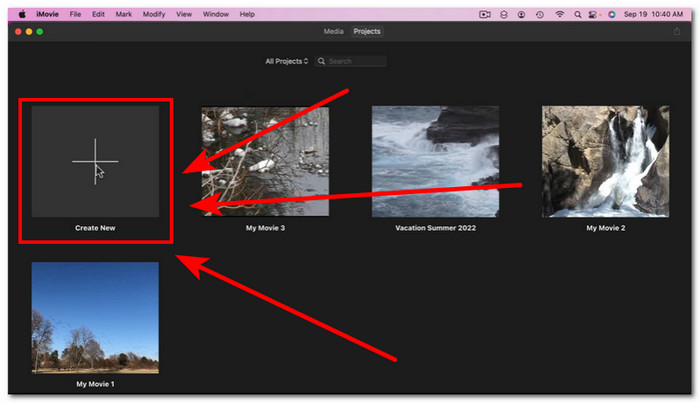
Step 1. Open iMovie software on your Mac and add your audio file or drag it onto the software timeline.
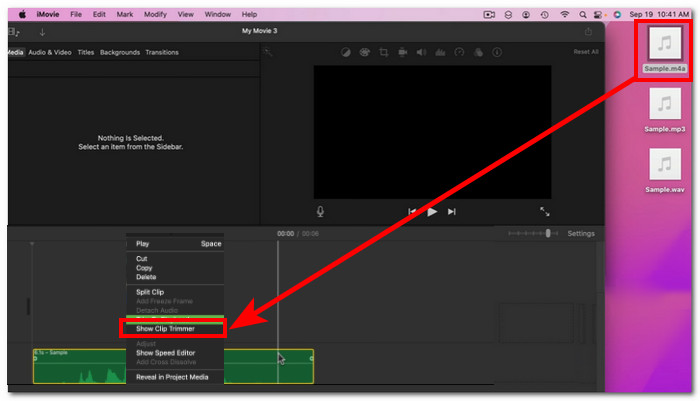
Step 2. Once the file is loaded in the software, right click on your audio file and proceed to click the Show Clip Trimmer menu.
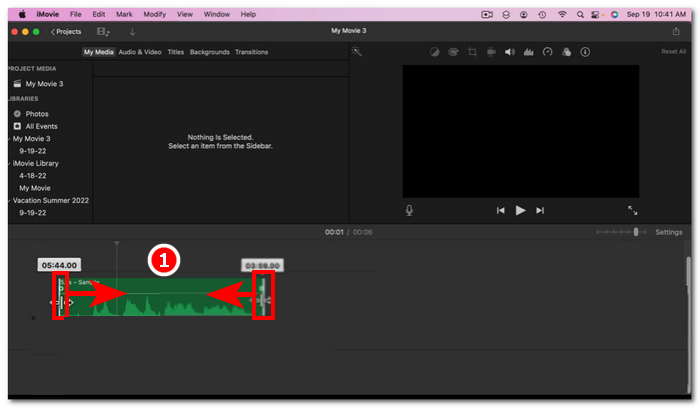
Step 3. Once you have clicked it, proceed to drag the trimming bars located from both ends of your audio file to trim your audio.
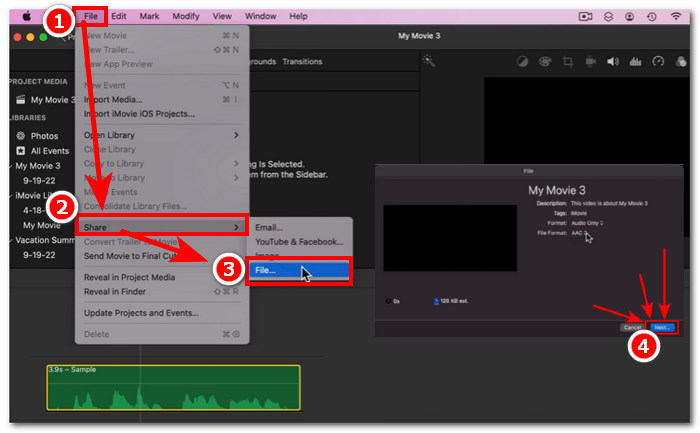
Step 4. Once you've finished trimming, you can save the file by clicking on the File menu section at the top left of the software and following this navigation: File > Share > File > Next to save it to your Mac. iMovie is only available for Mac computers.
If you need to use iMovie for Windows with such a trimming feature, check it out here.
Part 2. How to Cut Out Parts of Audio in iMovie
iPhone
How do you cut music on an iMovie? To cut certain parts in music or audio using the iMovie on iPhone is by going to specific parts in your timeline that you want to remove or cut out. Then delete it using the dedicated delete button for easy removal of parts in the timeline.
Step 1. To trim an audio file, long-press on it in the Files app. Then, tap the Share button and select the iMovie app to open the file in it.
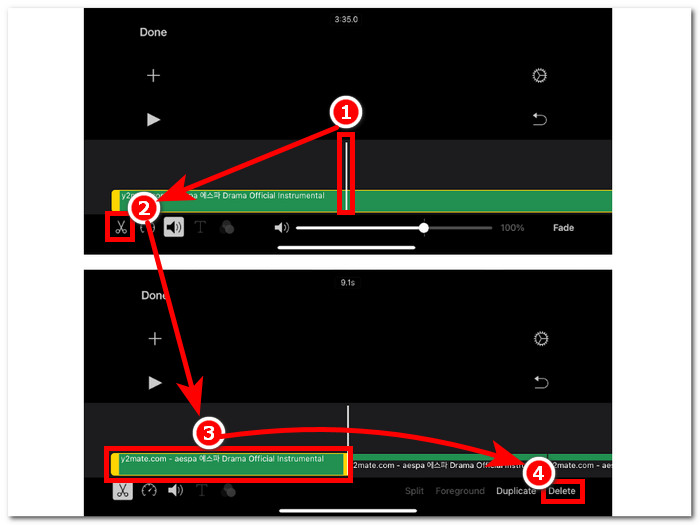
Step 2. Go to the part you want to cut your audio file, then tap on the scissor icon in the lower-left part of your screen to split it into to parts. You will now have two parts in your timeline. Select the part you don’t need and click the Delete button to cut it out.
Step 3. Once you have removed all the unnecessary parts from your audio file, click the Done button in the upper-left corner of your screen.
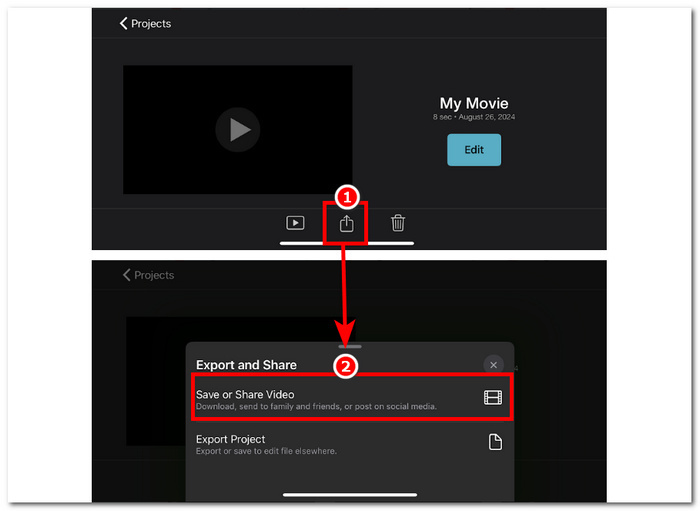
Step 4. Save your file by clicking on the Share icon, then tap Save or Share Video.
Mac
Cutting out certain parts of your audio file using iMovie is easy, as it relies on the tool's basic functions: combining the Split Clip feature and deleting. Below are the easiest ways to do it.
Step 1. Open iMovie on your Mac and click on the + button to open the audio file from which you want to cut parts.

Step 2. Once your audio file is in the software, go to the part of your audio you want to cut, right-click, and choose Split Clip.
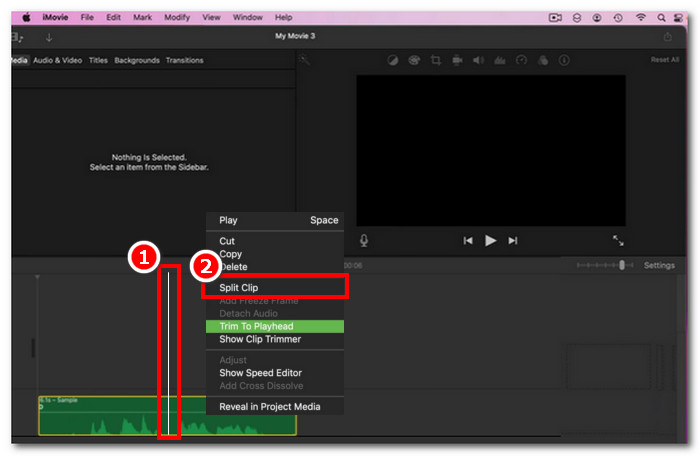
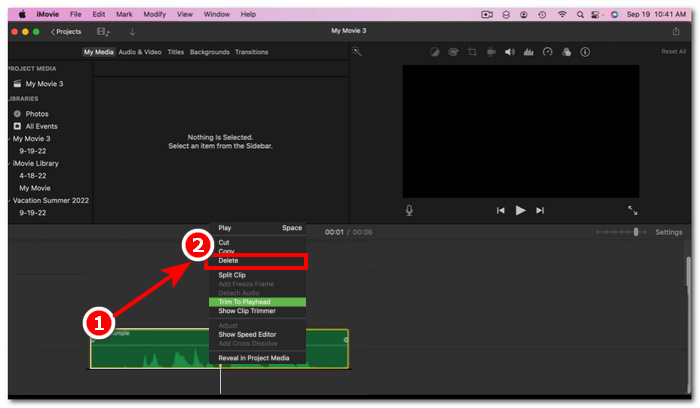
Step 3. Once the audio file is separated, delete or cut the parts where you don’t need anymore by right-clicking on it and then Delete.
Step 4. Then, you cut the part you don’t want in your audio. Save your file by clicking on File > Share > File, then click Next to save it on your Mac.
Part 3. Best iMovie Alternative to Cut Audio
While iMovie works just fine for cutting or trimming audio files, we have found the best alternative software tool in case you experience bugs or iMovie stops working for some reason. FVC-picked Video Converter Ultimate is the perfect tool that can be used not just as an audio cutter or trimmer but also video, similar to iMovie. In addition, it features an editing tool, cuts audio, and allows manipulation of output format. Thus, it goes beyond the basic trimming or cutting of audio like any other software tool out there, as it has unbeatable processing speed while also ensuring a lossless audio quality.
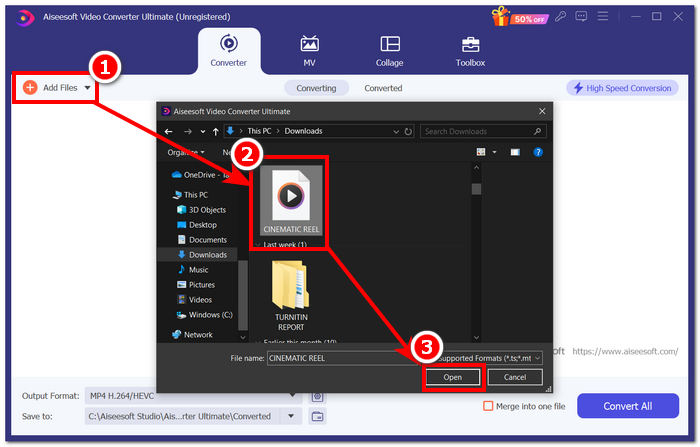
Step 1. On your computer, download and open the FVC-picked Video Converter Ultimate software. On the software interface, click on the Add Files to load the audio file you want to trim or cut certain parts in it.
Free DownloadFor Windows 7 or laterSecure Download
Free DownloadFor MacOS 10.7 or laterSecure Download
Step 2. Click on the scissor icon to access the software's cut and trimming features.
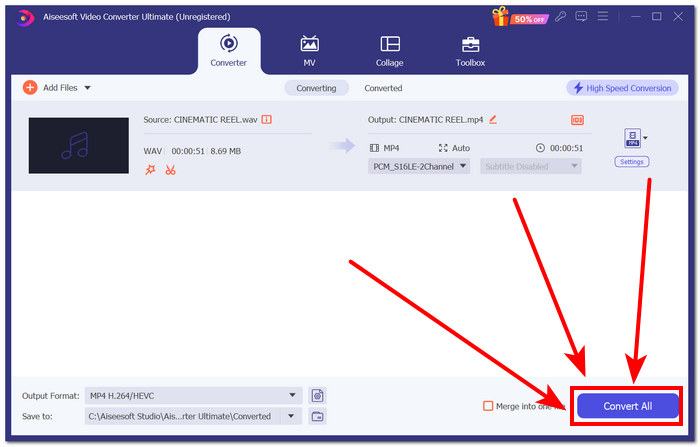
Step 3. To cut or trim the audio file using the software features, just simply move the trimming bars to the parts you want to retain.
The parts outside the trimming bars are the parts you will have to remove to cut your audio file shorter.
Step 4. Finally, to save your new and shorter audio file, click on the Convert All button to save the changes and have it saved in the dedicated folder on your computer.
Part 4. FAQs about How to Cut Audio in iMovie
How do you select part of the audio in iMovie?
Once you have split your audio file into many parts, you can select a part by simply tapping or clicking on the specific parts of the audio located in your timeline. Once the part you have selected has a yellow border all around it, that means you have selected that part.
Why is iMovie cutting off my audio?
If iMovie abruptly cuts a part of your video off, that may indicate that the length of your audio exceeds iMovie's maximum audio length. As of writing this guide, the maximum length of audio a user can import in iMovie software is one hour and ten minutes.
Can you trim the audio in Quicktime?
Yes, users can trim audio files using QuickTime by loading their audio file in the player, clicking on the Edit menu in the upper part of the player interface, and proceeding with the Trim section.
Conclusion
Creating trim and cutting out certain parts in an audio file is simple and easy, thanks to Apple’s very own iMovie software. While it is known for video editor software, it can somehow manage to do audio editing tasks such as trimming and cutting without a problem. Surely, iOS and macOS users can know to maximize the features offered by iMovie in audio editing tasks; however, it is worth noting that when the software appears to have a problem in the future, be sure to use the all-in-on FVC-picked Video Converter Ultimate.
-
 How to Compress MPEG-4 Files Online – No Download, No Watermark
 Don't have enough file storage to keep all of your MPEG-4 files? Here are some solutions which could help you make your video files smaller.
-
 How to Compress VOB Files Online & Free [No Download]
 Are you looking for methods to compress VOB files? Learn the best way to make VOB files size smaller in this article.
-
 How to Compress an OGV File without Losing Quality
 Can't send large OGV files to others? Well, this article will introduce you 2 easy ways to help you compress OGV files easily.