How to Edit WAV Files for A Fast Audio High-Quality Editing
WAV files are the most popular audio file format and are considered the ideal way to contain music or recordings with different bitrates. Better file formats equate to better quality, and editing WAV files can contribute to making it much better. But how can you ensure you’re not ruining your WAV file quality unknowingly? Worry not, as this guide will provide you with answers about what software or tools are best used to edit your WAV files. We have come up with four methods straight out of our experience using them. Moreover, in this guide, whether you are just a novice or an experienced individual, you’ll get to learn step-by-step how to edit WAV files effectively without ruining them.

Part 1. Best Way to Edit WAV with the Full-Featured WAV Editor
FVC has browsed the internet to find the perfect way to edit WAV worthy to be featured in this article so that you won’t have to. To our surprise, we came across this FVC-picked Video Converter Ultimate that is easy to use and has a simple interface that offers full-featured tools such as the ability to cut, split, merge, volume booster, etc. Editing WAV files through this exceptional software for both Windows and Mac, with over five million downloads garnering trust not just for WAV editing but also works as a converter and video editing tool.
Key Features:
• Versatile and easy-to-use WAV editor.
• Featured tools such as audio cutter, merger, compressor, noise remover, volume booster, etc.
• Supported supports 1000+ audio/video formats such as MP3, AAC, WMA, WAV, and more.
• No file size limitations when uploading your WAV.
Step 1. Download and install the FVC-picked Video Converter Ultimate here.
Free DownloadFor Windows 7 or laterSecure Download
Free DownloadFor MacOS 10.7 or laterSecure Download
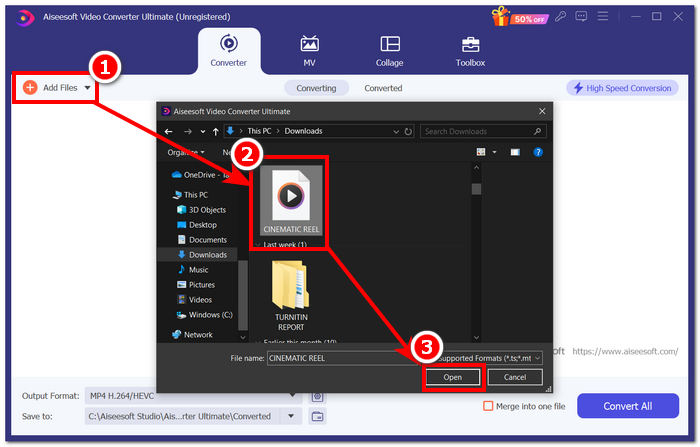
Step 2. On the tool interface, click on the Add Files button to add your WAV file to the software.
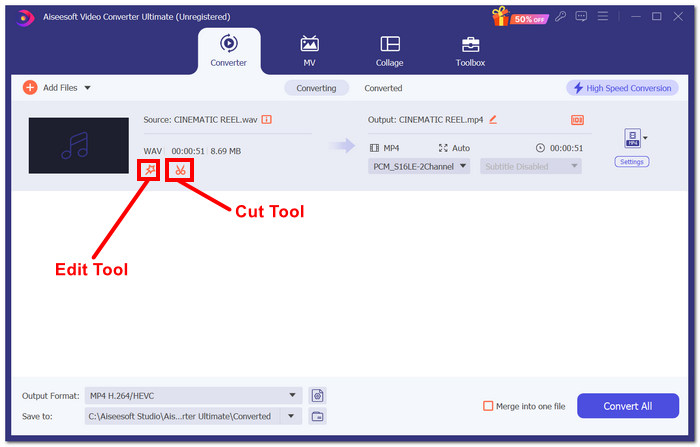
Step 3. Once your WAV file is in the tool, you can edit it by clicking on the Edit and Cut tool located right beside your uploaded WAV file.
Note:
The Edit Tool is the magic wand-looking icon, and the tool houses the Volume Booster and Audio Delay features.
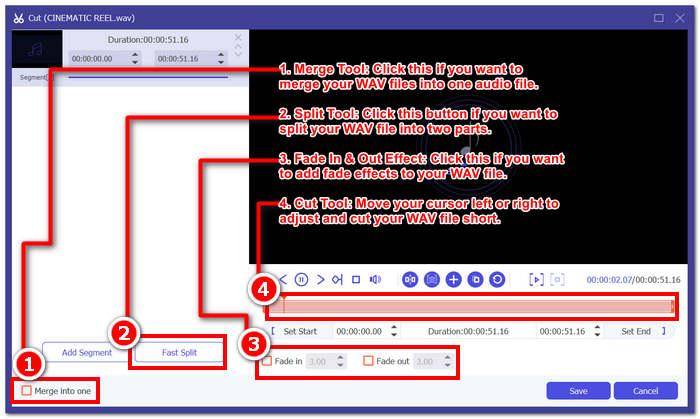
The Cut Tool is the scissor icon, and it contains the Cut, Split, Merge, and Add Fade effects.
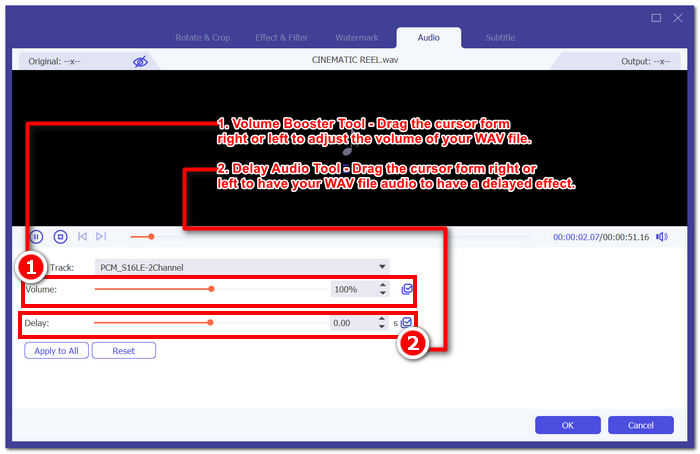
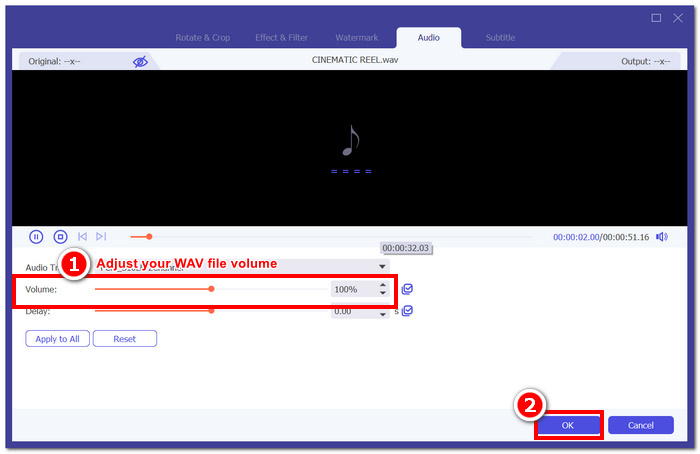
Step 4. To edit your WAV file, click on the magic-looking icon for the volume booster features and drag the volume cursor left or right to adjust the volume, or directly enter the volume you want. If you want to fix the audio delay, drag the delay cursor to adjust the audio delay. Once you've done this, click on the OK button.
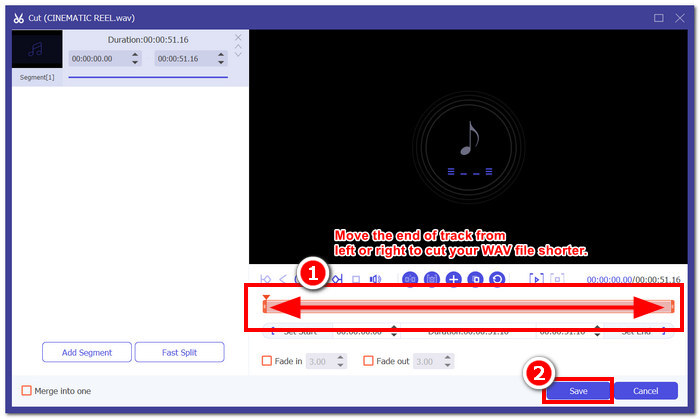
On the other hand, to cut your WAV file, click the scissor button and simply drag your cursor to the track from left to right to shorten your WAV file. Once you're done cutting your WAV file, proceed to click on the Save button.
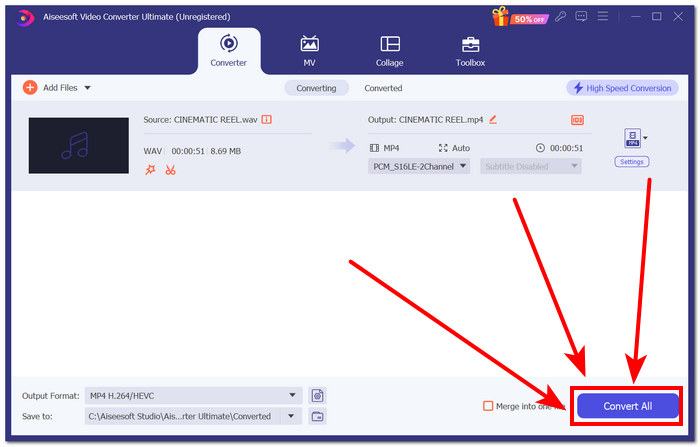
Step 5. Once you have successfully Edit and Cut your WAV file to your liking, click on the Convert All button to have it downloaded to your desktop download designated folder.
Our experience in editing a WAV file using the FVC-picked software saves us time and lives on its reputation, as following the steps above helps us to perform the task smoothly. Additionally, while using the software, we noticed that it is jam-packed with other features for video and audio editing. Overall, this gives us a lot of options in choosing what we can do more to edit our WAV files.
Part 2. Edit a WAV File on Windows 7/8/10/11 with the Built-in Tool
Method 1. Edit WAV Files in Windows Media Player with A Plugin
Windows Media Player, a built-in media player in Windows devices, can also be used as a WAV file editor by using a plug-in. To do so, the SolveigMM WMP Trimmer Plugin is available to download in your Microsoft Store for free to be able to cut and edit your WAV file.
Step 1. Go to your Windows Microsoft Store and download the SolveigMM WMP Trimmer Plugin from there.
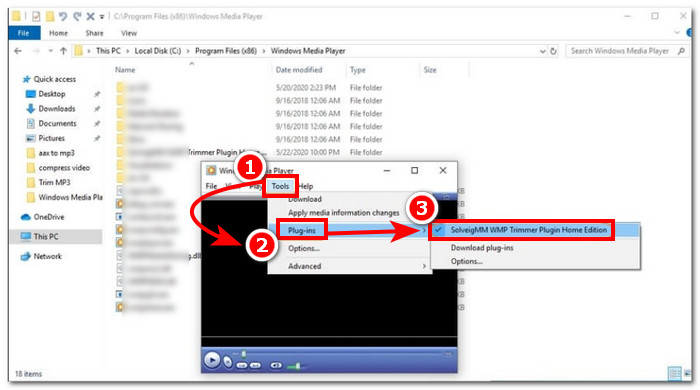
Step 2. Once the plug-in is installed, open your Windows Media Player click on the Tools section located on the top-most part of the player, and then click on the Plug-ins to enable the SolveigMM WMP Trimmer Plugin.
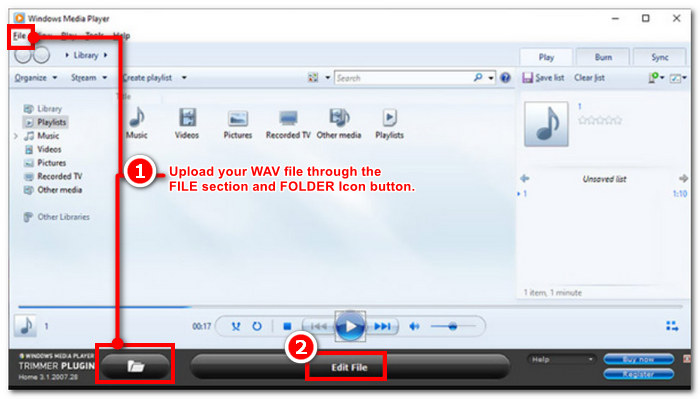
Step 3. Once the plug-in is enabled, proceed to upload your WAV file by clicking on the File folder located in the top-most left corner of the player or the Folder icon located in the lower-left part of the player to upload your WAV file. Once the WAV file is uploaded to the player, click the Edit File button to proceed to actual WAV editing.
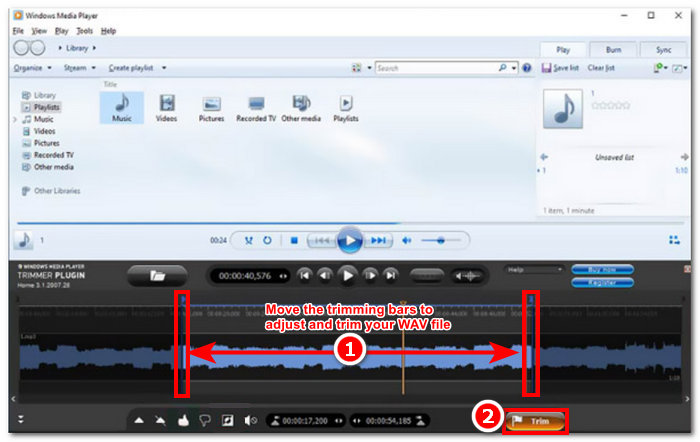
Step 4. You can now perform editing tasks, such as trimming your WAV file by adjusting the trimming bars from left to right. Once you are satisfied with the length of your WAV file, click on the Trim button to have it saved by default in the same file as your WAV.
Now that you have edited your WAV file, in this case, perform trimming through Windows Media Player with the help of plug-ins. You can now edit your WAV file through the built-in player. The plug-ins may be useful for the user's convenience, but they are not totally free as they only come with limited editing features compared to their paid version.
Method 2. Edit WAV Files Properties with File Explorer
If you find software tools difficult to navigate in general, we also have something for you to edit WAV files using the built-in tool in your Windows 7/8/10/11. Believe it or not, Windows doesn’t have pre-built-in software or features that can freely edit your WAV file, but it is still possible to edit your WAV file information properties by using the default method. To cut the story short, using the default method is a way of editing your WAV file information by tweaking the properties when you view the file. Hence, we are going to list the methods for editing your WAV file information properties below.
Step 1. Open your File Explorer and locate the WAV file you want to edit.
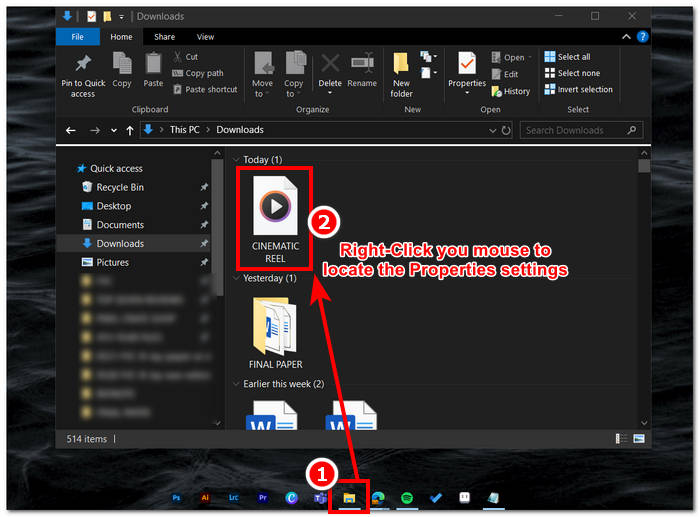
Step 2. Once you locate the Properties, click on it, and a window will appear with the information about your WAV file.
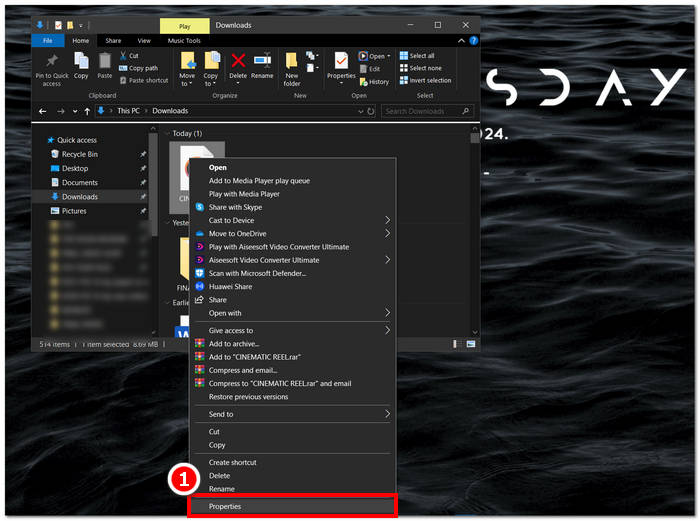
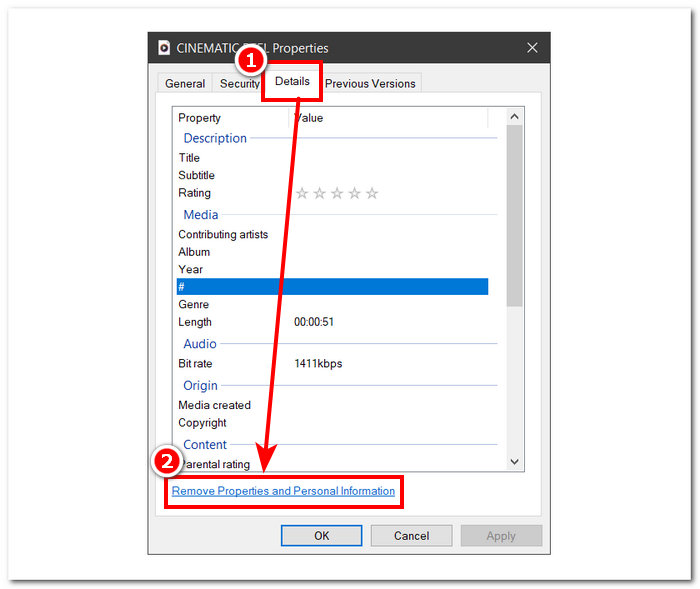
Step 3. In the newly opened window, click on Details and proceed to click on Remove Properties and Personal Information in the lower part of the window.
Step 4. Select the second option - Remove the following properties from this file, then click the Select All button. Lastly, click the OK button to reset your WAV file information details to its default setting.
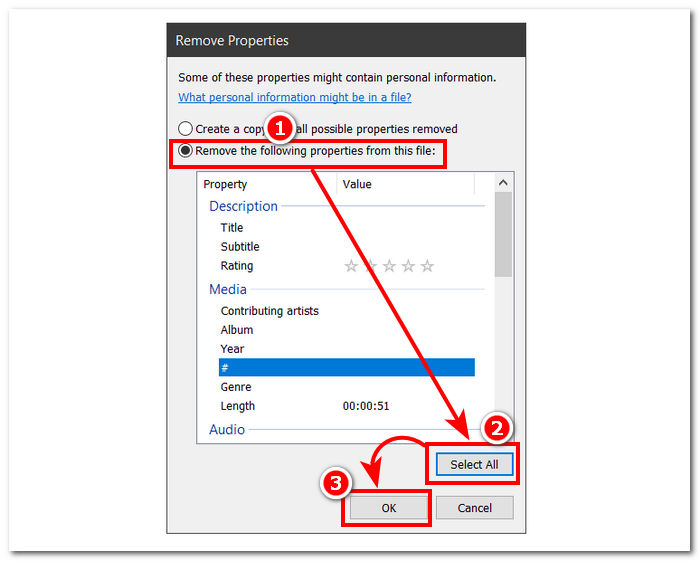
Remember that this method is exclusively for Windows users and does not allow users to adjust the audio file but rather the information properties. Overall, using the default method to reset your WAV file information is convenient. Still, when you want to fill in the information details of your WAV file, there’s no other way other than using software for it, in this case, the FVC-picked software.
Part 3. Edit WAV Files on Mac with GarageBand
We stumbled upon software that also has a mobile application version. GarageBand is a popular tool for macOS and iOS devices that delivers a full-featured audio editor. The tool offers pre-made presets and integrates with smart controls. Moreover, we have listed a simple method below to use GarageBand; in this case, we will use the macOS version.
Step 1. Download GarageBand to your macOS device, and once you have completely installed the software, open it.
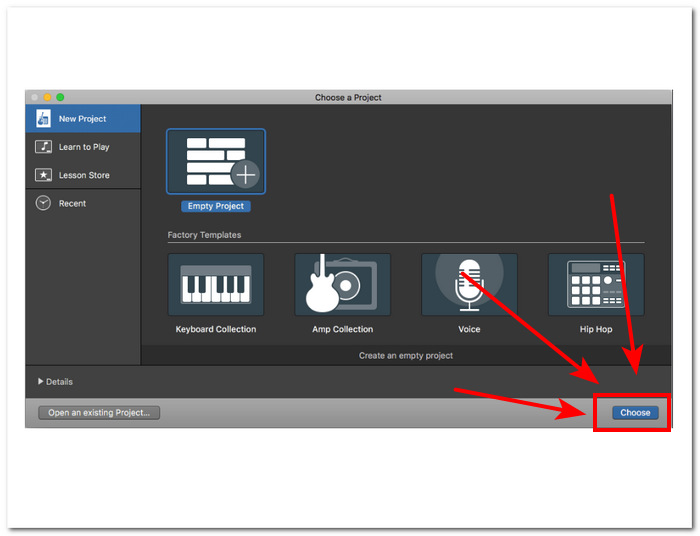
Step 2. Load your WAV file into the software by clicking on the Choose button. Once your WAV file is loaded in the tool, proceed to double-click on the track for the Audio Editor window to appear at the bottom of the interface.
Step 3. Edit your WAV file by exploring the Track and Region section located at the lower part of the software.
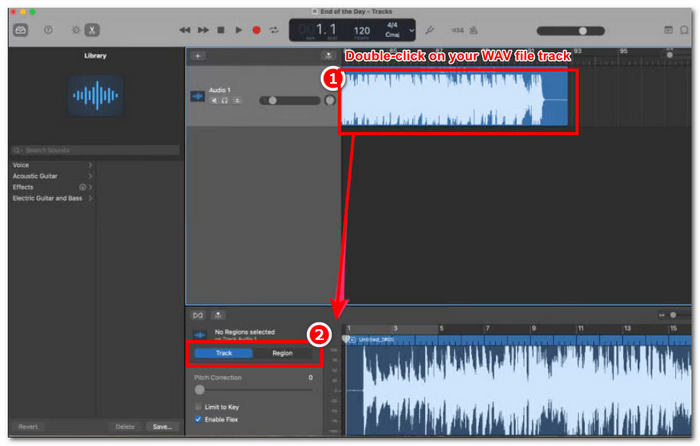
The Track section is responsible for editing the pitch of your WAV file and serves as a corrector.
The Region section houses the adjustments of transposition, this can help the user reverse playback the WAV file.
Step 4. Once you are satisfied with the changes you made in your WAV file, export your file by clicking on Share > Export Songs to Disk, and choose where you want your edited WAV file to be saved.
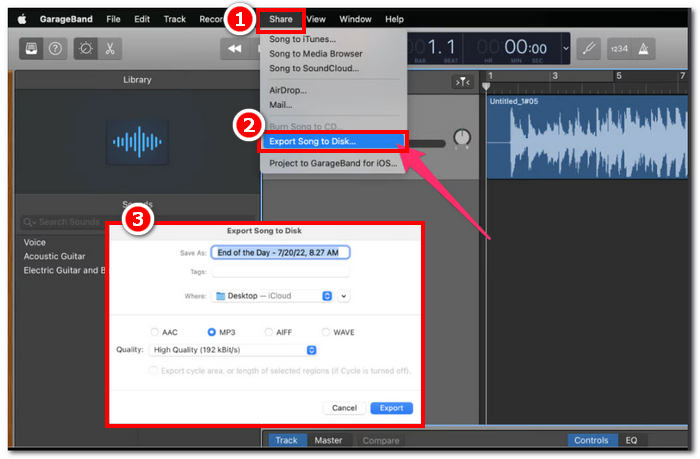
GarageBand is reliable software for editing your WAV file on macOS and iOS. Hence, if you are looking for more advanced features, we recommend using the GarageBand macOS version. Overall, both versions excel in basic to mid-level audio editing, but please do note that you need to have a certain knowledge of the tool’s interface to avoid confusion.
Part 4. Edit WAV Files with an Online Editor
Another method of editing your WAV file is to use an online tool that can handle basic editing. TwistedWave emerged as a web-based audio editor that not only works as an online editor but also allows users to edit WAV audio. Moreover, despite its outdated interface, it’s a trusted WAV tool and has one of the simplest designs among the web-based WAV editor tools we found.
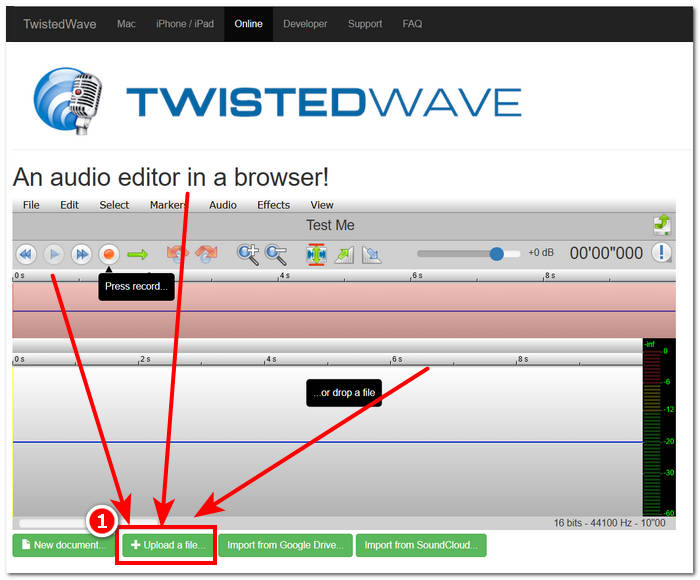
Step 1. Go to TwistedWave official website and click on the Upload a file button to select your WAV file on your desktop to edit in the tool.
Step 2. Once your WAV file is in the tool, click on the Effect section located at the top of the tool interface. Choose your desired actions on the available effects that you want to apply to your WAV file.
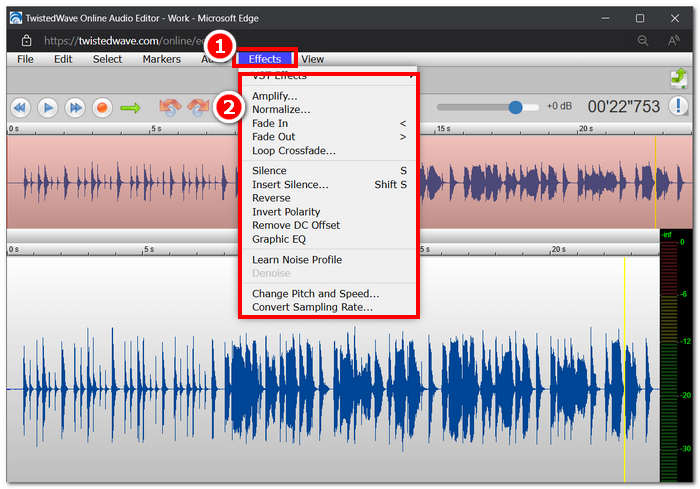
Step 3. Once you have selected the effects you want in your file, proceed to download your edited WAV. To do this, click on the File section in the top-left corner of the tool and click Download to export the WAV file to your download folder.
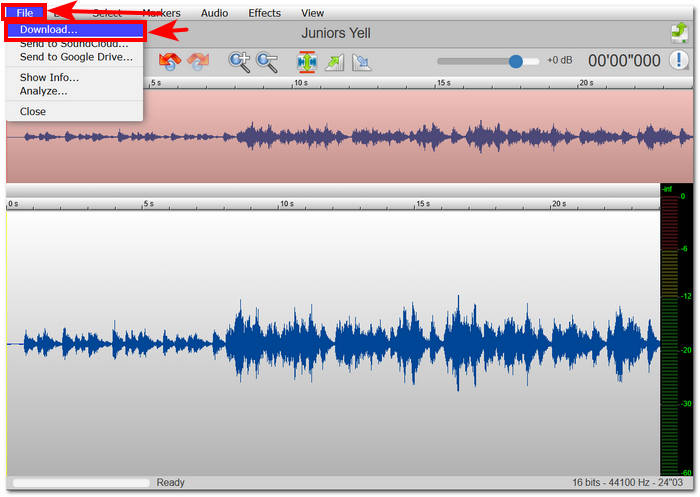
To edit WAV files online, TwistedWave is the easiest way to process a WAV file on the server, so the need to download software would be unnecessary. Despite its convenient use, it only allows the user to edit one file in the free account for a maximum of five minutes.
Part 5. FAQs about Editing WAV Files
Does Microsoft have an audio editing software?
Can you trim a WAV file in Windows Media Player?
What is the easiest audio editing app for a Mac?
What are WAV files commonly used for?
Is a WAV file digital or analog?
Conclusion
Editing WAV files using the right software and tools ensures higher-quality audio. Thus, follow the various steps to edit WAV files, including the recommended full-featured software, built-in methods for Windows, GarageBand for macOS and iOS users, and finally, web-based tool users.


 Video Converter Ultimate
 Screen Recorder


