How to Compress SVG Files: Achieve Lossless Quality Output
SVG, or Scalable Vector Graphics, is a unique image format that stores images through mathematical formulas based on their precise points and lines on a grid. This is totally opposed to JPEGs, which are pixel-based raster files. Moreover, this kind of file is commonly used for web and graphic design due to its scalability and workable file size.
However, users are now commonly compressing this file to improve load times and performance. So, if you’re looking for a compression tool for your SVG files, then you’re on the right page. Learn in this article about the best SVG compression tools and how to effectively use them to optimize your images without sacrificing quality.

Part 1: Compress SVG at Minimum Size Without Obvious Quality Loss Online
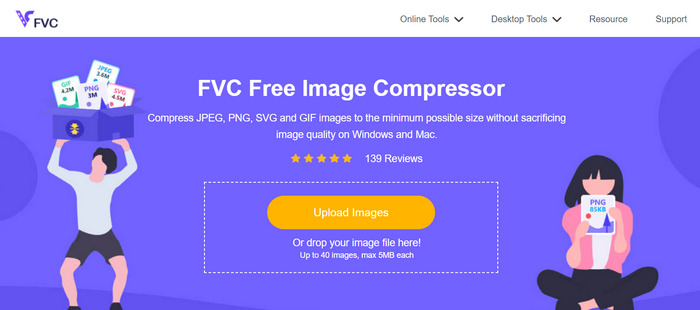
If you want to compress your SVG files to a minimum size without an obvious quality loss online, the best tool you can use for this is the FVC Free Image Compressor. This tool is 100% free, and compared to other compressor tools that offer free service, this one is an exception as it compresses image files while maintaining their quality.
Step 1. First, you need to visit the official website of this tool.
Step 2. Once you’re on their main interface, you need to click the Upload Images button to import the photos you want to compress.
Step 3. Wait for the conversion process to complete. After that, you’ll see a bar status stating it’s finished. Now, click Download to save your image.
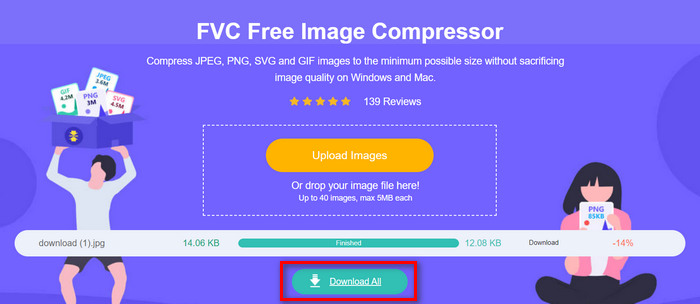
What’s best about this SVG compression tool is it performs an automatic compression upon upload. Moreover, its batch-processing feature allows users to compress up to 40 image files simultaneously. This is helpful for those who have a bunch of SVG files that need compression. Also, these files are quickly and automatically reduced to a maximum of 5MB to ensure load performance when using them. Lastly, aside from SVG files, you can compress other image file formats like JPEG, PNG, and GIF.
Part 2: Compress SVG with Professional Software- Adobe Illustrator
If you want professional software to compress SVG files, Adobe Illustrator would be the best choice. This software program is known for its advanced graphic design capabilities. Still, it is also capable of optimizing and reducing the file size of your SVG file while maintaining high quality.
Here are the steps on how you can compress SVG files when you are using Adobe Illustrator:
Step 1. On your Adobe Illustrator program, open the SVG file by going to the File tab and clicking the Open button.
Once you’re on the main interface, go to the File tab again and click the Save As button or press Shift-Control-S to save your document.
Step 2. Now, choose Adobe Illustrator.Ai for the file type, set the name of your document, and then press Save.
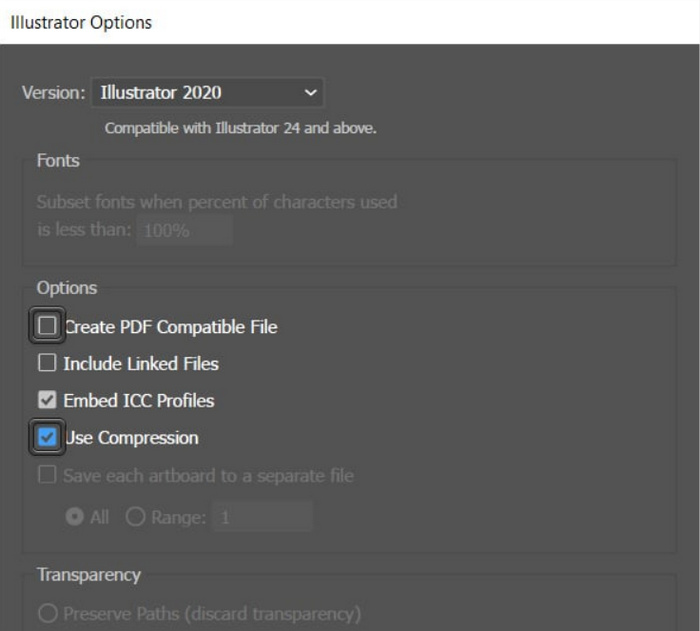
Step 3. Now, uncheck the Create PDF Compatible File box and check the Use Compression box is checked. Once done, just click OK to save the file reduced in size.
Here you can also use this tool to export SVG to JPG or PNG that you need.
Users can take advantage of this method when they are creating SVG file projects in the Adobe Illustrator program. The program has a feature that allows users to compress the file directly before saving it. However, this is not your typical SVG compression tool that offers batch conversion for a bunch of SVG files and has an automatic compression rate, but then again, when you’re using this program, you can easily and quickly compress these kinds of files to the smallest file size possible while maintaining their quality integrity.
Part 3: Compress SVG with Fast Speed
When you’re looking for a fast-speed SVG compression tool, maybe Compress-Or-Die is the perfect for you. This is an online image compressor tool that not only reduces the image size of your files but also analyzes and repairs them. Moreover, this tool compresses SVG files to a smaller size while maintaining the quality to the maximum extent.
Step 1. First, import the SVG file by clicking on the Select File button. Aside from that, you can also use the Drag & Drop feature, or just simply paste the URL.
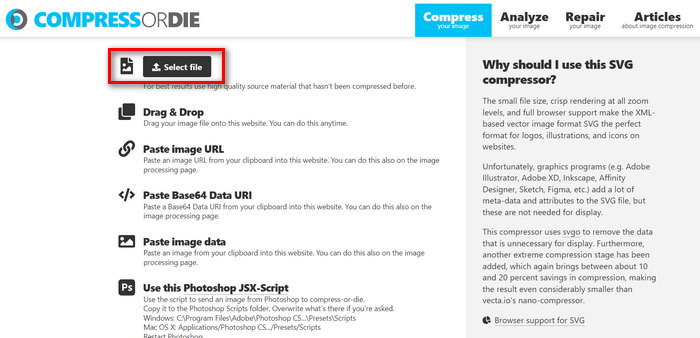
Step 2. Once you have selected your SVG file, it will automatically compress it.
Step 3. After the compression, you’ll see the new file size of your SVG file. Now, to save it, just click the Download button.
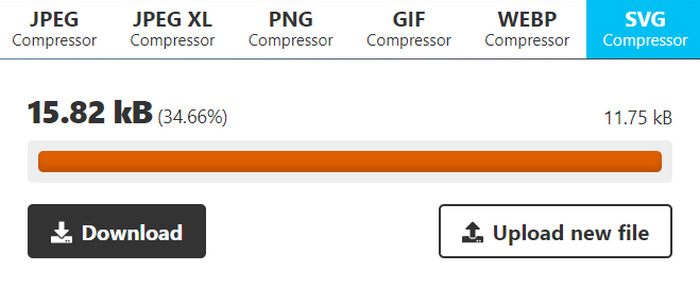
This tool offers convenience and flexibility when it comes to compressing SVG files. Users can customize compression settings for varying levels of optimization and compare original and compressed images. However, the lack of support for batch image compression limits efficiency for users managing multiple images simultaneously. Compression speed varies depending on factors like image size and complexity. Overall, while it excels in individual compression tasks, it may not be optimal for users requiring batch-processing capabilities.
Part 4: FAQs about Compressing SVG
Can you resize SVG files for Cricut?
Yes. SVG files are scalable vector graphics, meaning they can be resized without losing quality. This makes them ideal for use with cutting machines like Cricut, as you can change the size of the design to fit your project perfectly.
Do SVGs lose quality when resized?
No. SVGs do not lose quality when resized. Unlike other image formats like JPEG or PNG, which can become pixelated when resized, SVG files maintain their quality because they are based on mathematical formulas rather than a fixed grid of pixels.
How to create a resizable SVG?
Creating a resizable SVG involves designing the graphic using vector-based software like Adobe Illustrator. When saving the file, just make sure that it is saved in the SVG format. This format allows the graphic to be scaled up or down without loss of quality, making it resizable for various applications and devices. Check more ways to convert images to SVG here.
Conclusion
There you have it, you can now compress SVG files using 3 different tools based on your needs. Each of them offers a different set of unique features to suit your preferences and requirements. Remember, reducing the size of your SVG files not only enhances performance but also helps in optimizing bandwidth usage, improving load times, and ensuring smoother user experiences. So, explore these tools, experiment with their features, and find the perfect solution that fits your workflow. Start compressing now!


 Video Converter Ultimate
 Screen Recorder
