A Comprehensive Guide to Export iMovie to MP4
iMovie is one of the most used and popular video editing tools developed by Apple for Mac, iPhone, and iPad users. This tool has a good set of editing features that any editor would love to have. But on the other side, there’s one thing that users are kind of struggling with. Videos from this tool are being exported to MOV format. This default format can impose limitations when it comes to compatibility with other devices and platforms. With this, most users have to convert MOV files to another globally recognized format like MP4 to be able to play it on other video players. So, if you’re also looking for ways to export iMovie to MP4, then read this entire article.

Part 1: How to Export iMovie to MP4 on Mac
When it comes to exporting videos from iMovie, there are plenty of output formats to choose from. It’s just that we are used to its default MOV format. With this, we usually encounter compatibility issues when playing a video exported from it. So, learning how to export iMovie to MP4 is becoming a thing since this format is widely used and mostly supported by all digital devices and media players. To export iMovie to MP4 on Mac, follow the steps below:
Step 1. First, launch the iMovie on your Mac.
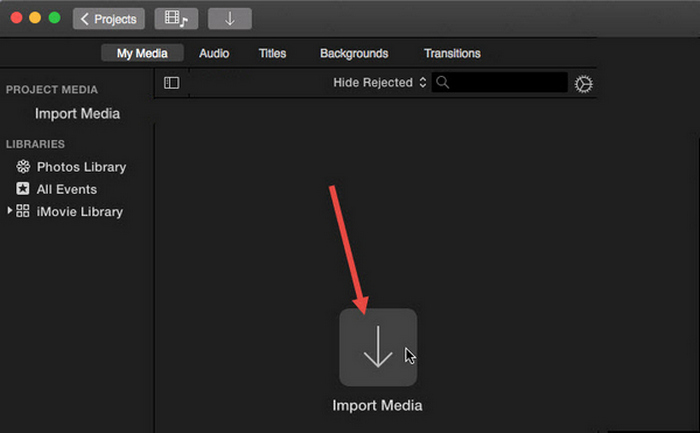
Step 2. Next, import your video into the software by clicking the Import Media button.
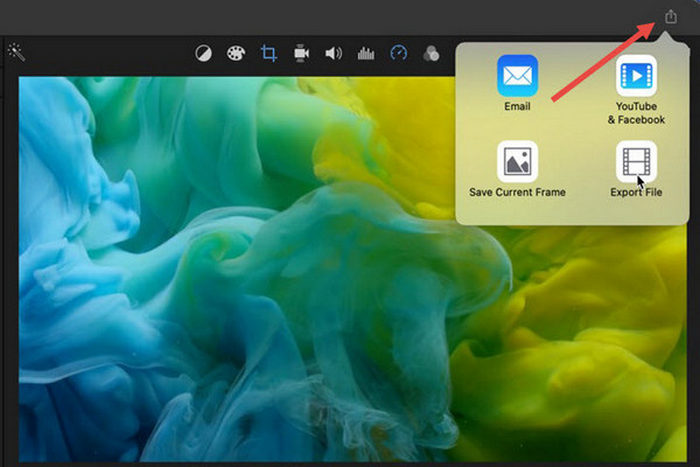
Step 3. Now, at the top toolbar, click on the File button, go to Share, then to File, or at the preview window, click the Share icon and then choose the File option in the pop-up dialog.
Step 4. Choose Video and Audio in the new pop-up file window as the output format, and adjust resolution, quality, and other parameters based on your needs.
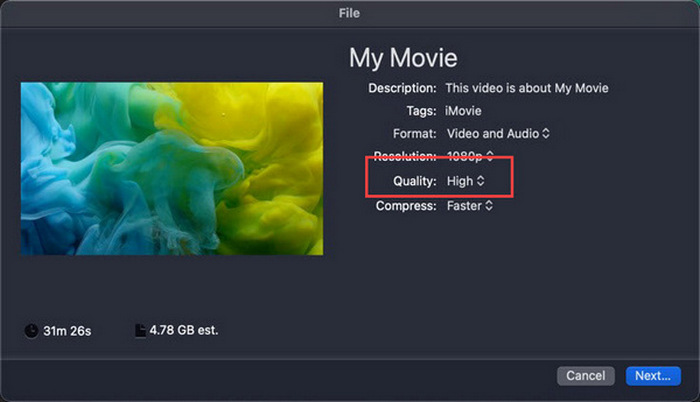
Note: Don’t select the ProRes quality option if you desire to export the video file in MP4 format because it will be saved in MOV format.
Step 5. Lastly, click the Next button and name the iMovie MP4 file you are going to export. Don’t forget to select an output directory and click Next to save it as MP4.
There’s really a way to export iMovie to MP4 directly from Mac. However, the process might seem a bit complicated, especially when dealing with its default file format when saving the video.
If you want to use iMovie on Windows, do not miss this post here.
Part 2: How to Fix iMovie Export Not Working [Common Solution]
There can be several reasons why iMovie export might not be functioning properly. Below are some solutions and alternatives to address the iMovie export not working problem:
Solution 1: Checking the Storage Space
One common cause of iMovie export issues is insufficient disk space on your Mac. If you encounter problems exporting videos, start by checking your storage availability.
For macOS Ventura or later: Navigate to the Apple menu logo, choose System Preferences, click General, and then select Storage on the right-hand side.
For earlier macOS versions: Access the Apple menu logo, then click on About This Mac and go to Storage.
Then, if your Mac is running low on storage, consider deleting unnecessary files or apps to free up space. Once you've done that, return to iMovie and attempt the export again.
Solution 2: Double Check the File Name
If iMovie fails to export a video after attempting to export a few times, then it's essential to review the file name in the output settings to ensure it doesn't include any special characters like hyphens, slashes, commas, etc. Usually, iMovie does not support special characters in naming the file.
Solution 3: Restart iMovie
Now, if the problem persists, try restarting the app and exporting the video again. But don’t forget to save your current project first. Now, to close iMovie completely, click the app icon and choose the Quit option. After that, launch the iMovie again, open a project, and check if it can now export videos. Also, try to restart the Mac to fix the problem.
Solution 4: Update iMovie
An outdated version of iMovie usually causes export failure due to some bugs and system issues that weren’t updated. To update iMovie, open the App Store, click on Updates on the left side, and check for updates available for iMovie, then click on it.
Solution 5: Reinstall iMovie
If other solutions fail to resolve the export problem, consider reinstalling iMovie. To uninstall iMovie from a Mac, open Launchpad and press the Option key, click and hold iMovie, then click the X button next to the app, and click Delete to confirm. Then, go to the App Store to download and install iMovie.
Bonus: How to Fix iMovie Export Not Working [Alternative Way]
If none of the solutions work on your end, then it’s time for you to try this alternative way to fix the iMovie export not working problem. FVC Video Converter Ultimate is known for its comprehensive conversion capabilities, which give users the ability to convert videos into any format they prefer. But more than that, it has other features like the MV that was designed for users who wanted to edit videos. Like the iMovie, you just need to simply import the files that you want to edit, then utilize the editing features, like cropping and rotating the clips, adding effects and filters, as well as placing a music background to make it engaging, and more. After that, export the file to MP4.
Moreover, this tool supports HD/4K/8K resolutions, ensuring top-notch output quality. And the best part? It operates at a lightning-fast speed, completing conversions 120 times faster than other methods.
Step 1. First, on your Windows or Mac computer, download and Install the FVC Video Converter Ultimate.
Free DownloadFor Windows 7 or laterSecure Download
Free DownloadFor MacOS 10.7 or laterSecure Download
Step 2. After that, when you’re on the tool’s interface, go to the MV tab.
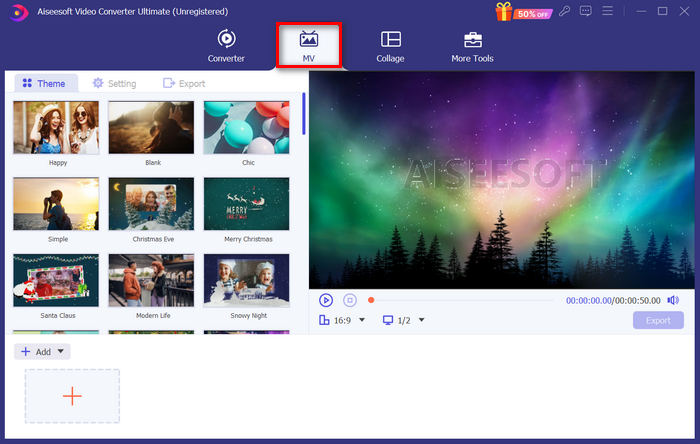
Step 3. Now, click the Add File button to add the files that you want to convert to MP4.
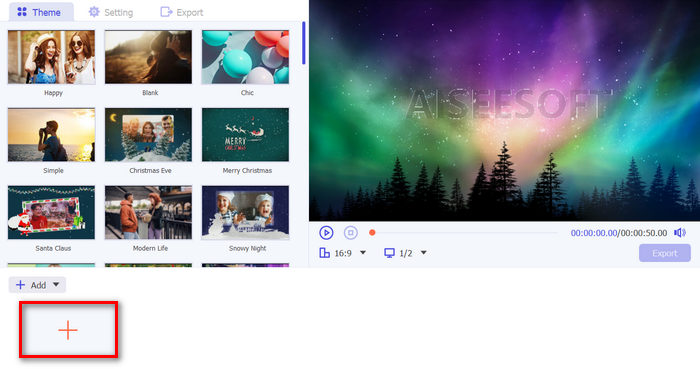
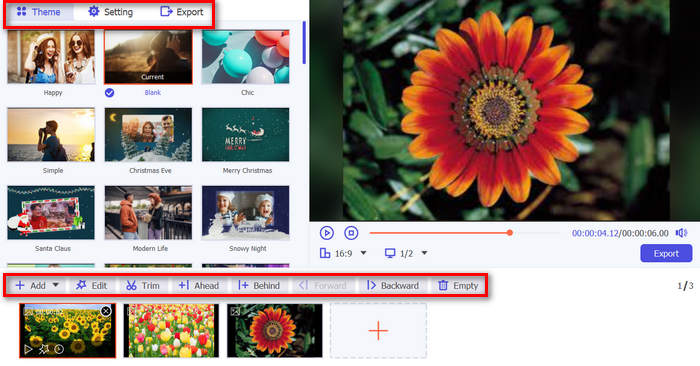
Step 4. To add, edit, and trim your MP4 video, click the button at the upper part of the Add File button. Moreover, you can add a theme for your video by choosing from the list of pre-set themes from the Theme tab above.
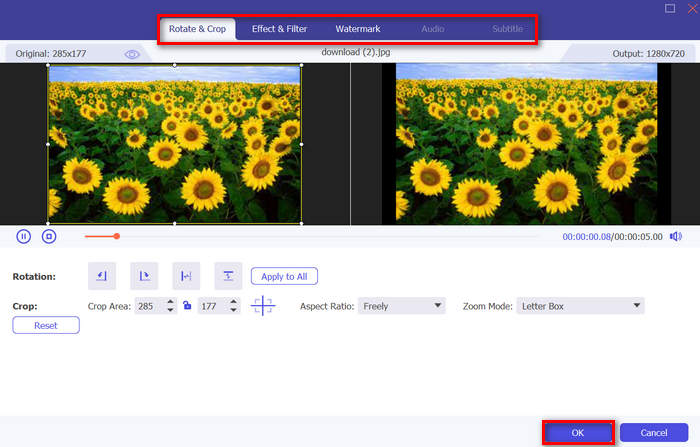
Step 5. To further enhance the MP4 file that you are editing, you can add filters and effects to it by clicking the Edit icon below. Also, you can add a watermark to make the file personalized.
Step 6. Once done, click the Export button, where you can change the format to MP4 and change the frame rate, resolution, and quality.
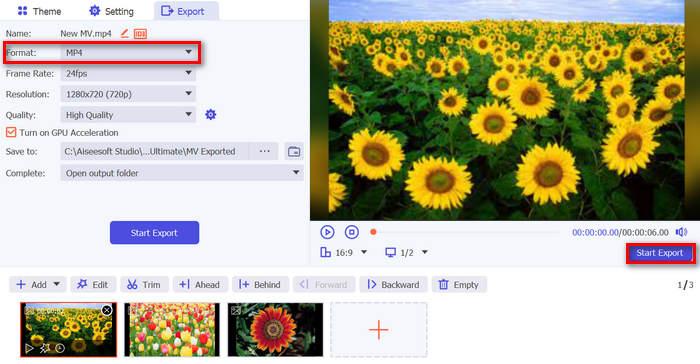
Step 7. Lastly, to save your file, click on the Start Export button.
With FVC Video Converter Ultimate, you don’t need to worry about how to convert your iMovie to MP4 files when it is exported in MOV format. Also, it’s a great alternative whenever you encounter an exporting problem with iMovie, as this is a full-featured tool. You can have everything you need, especially about converting files from one format to another.
Part 3: How to Export iMovie to MP4 on iPad/ iPhone
For those using iOS or iPadOS and want to export and convert iMovie to MP4 on their iPhone or iPad, here’s how to export iMovie to MP4 on iPad/iPhone.
Step 1. First, on your iPhone or iPad, open the iMovie app.
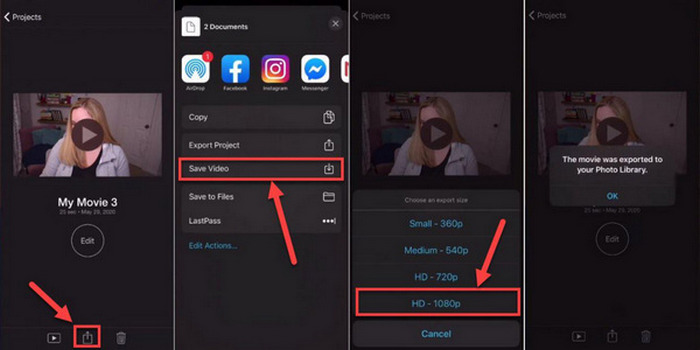
Step 2. After that, from the Projects tab, choose the project you want to export to MP4.
Step 3. Next, tap the Share button and select Export Project.
Step 4. Lastly, choose Save Video, then choose an export size and convert and save iMovie to MP4 on your iPhone or iPad.
When exporting and converting iMovie to MP4 directly on your iPhone or iPad, remember to ensure that you have enough storage space available on your device to accommodate the exported MP4 file, as this leads to export issues and problems.
Part 4: FAQs about Exporting iMovie to MP4
Why is my iMovie video file not compatible with QuickTime?
iMovie files may not be compatible with QuickTime due to differences in codecs or file formats. QuickTime supports a limited range of video codecs and file types, so if your iMovie file uses a codec or format not supported by QuickTime, compatibility issues may arise. To resolve this, try exporting your iMovie project in a different format or codec that is compatible with QuickTime.
How long does it take to export an iMovie?
It usually takes 1.5 to 2 times the playback time of the project to render and encode during the export process. Factors such as project complexity, video resolution, and your device's processing power can affect export times. Additionally, exporting larger or more complex projects may take longer than smaller or simpler ones.
Exporting iMovie to MP4 affect the quality of my videos?
Exporting iMovie to MP4 should not significantly affect the quality of your videos as long as you choose the appropriate export settings. However, it's essential to ensure that you select the desired resolution, bitrate, and compression settings to maintain the quality of the videos you want to export.
Conclusion
Learning how to export iMovie to MP4 is important in ensuring compatibility and versatility in sharing your video projects across various devices and platforms. So, if you encounter any issues during the export process on your iMovie, be sure to explore the common solutions outlined here. Start exporting your iMovie projects to MP4 today with this guide.


 Video Converter Ultimate
 Screen Recorder


