


[Solved] 4 Methods to Take Screenshots on Android
Taking screenshots is one of the most common things we can do with our phones today. When we want to save a picture, a text, or a post that we have seen on our screens while scrolling through it, we take a screenshot of it. Now, if you’re using an Android device and wondering how to take advantage of its screenshot features, we've got you covered! In this article, learn how to take screenshots on Android in 4 ways and make the most out of your device's capabilities. Keep reading to save the content that matters to you by taking a screenshot!

Part 1: How to Take a Screenshot on Android Phone
You might wonder this, but taking screenshots on Android really varies depending on the device manufacturer and operating system version. So, if you’re an Android user and you don’t know what method to use when you want to take a screenshot, then check the steps below:
Method 1: Using the Hardware Buttons
The most common way to take screenshots on an Android device is by using its hardware or physical buttons. It’s the most known method used in taking screenshots on Android because of its accessibility and convenience.
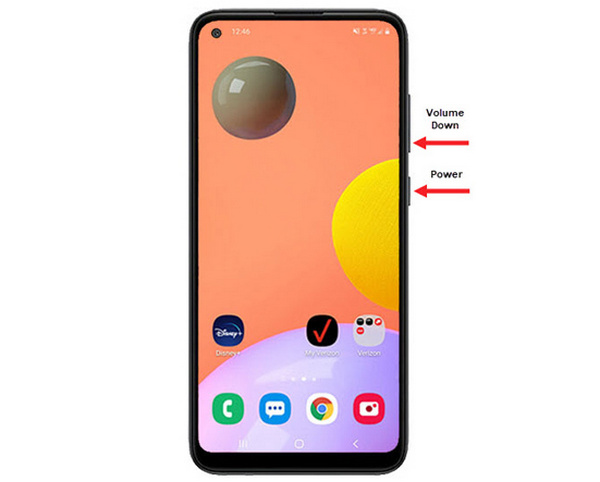
Step 1. First, on your Android phone, press the Volume Down and Power buttons together. Hold them until the screenshot is taken.
Step 2. After that, access your screenshot in the Gallery app.
So, if your hardware buttons are working properly, you can follow this method to take screenshots on your Android easily.
Method 2: Using Shortcuts
Today, some Android devices have a built-in screenshot feature in the quick settings panel, which is useful to take a screenshot quickly.
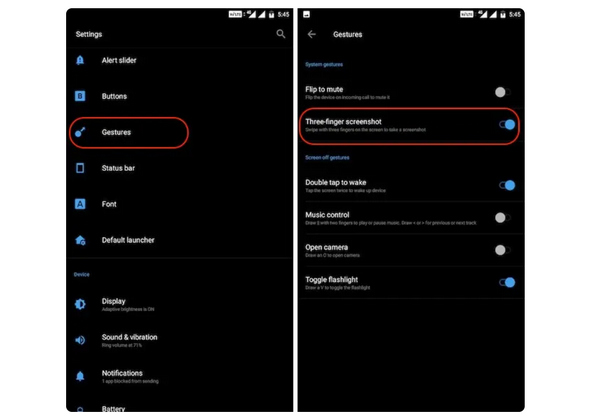
Step 1. First, on your Android phone, go to Settings. Scroll down a bit and select the Gestures or Buttons option.
Step 2. From there, look for the Screenshot option and toggle it on.
Step 3. Finally, in order for you to take a screenshot using this, simply swipe down with your three fingers on the screen you want to capture.
This method is best when you don’t want to press the buttons to take a screenshot. However, you need to set this up first on your settings. So, if you’re not familiar with it, just follow the steps above.
Method 3: Using Google Assistant
Meanwhile, if your Android phone has a Google Assistant, you can use it to take a screenshot easily.
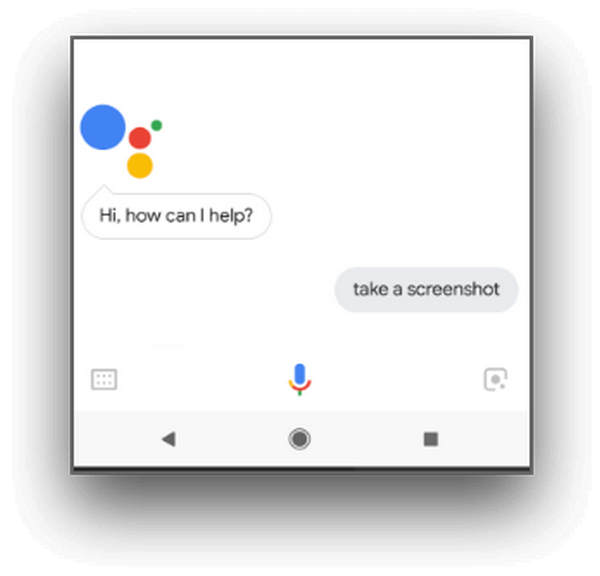
Step 1. First, you need to activate the Google Assistant by pressing the home button or by doing a voice command saying, OK, Hello Google.
Step 2. When activated, say, Take a screenshot or Screenshot.
Note: There must be an animation or you must hear a sound that indicates the screenshot has been taken.
Step 3. You can access your screenshot in your phone's Gallery app in the Screenshots folder.
Note: This is not applicable for all Android devices, so if your phone happens to have a Google Assistant that allows you to take screenshots by giving a voice command, then just follow the steps here.
Part 2: How to Take Screenshots on Android Tablet
If you own an Android tablet and if you’re wondering how to take a screenshot using it, here’s how:
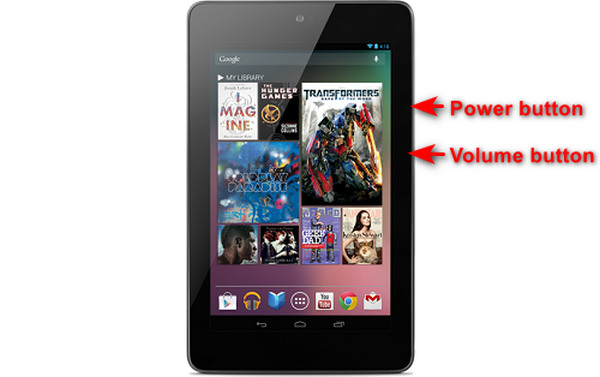
Step 1. On your Android tablet, simultaneously press the Power and the Volume Down button and hold it for a few seconds.
Note: You should be notified if your screenshot has been taken.
Step 2. After that, access your screenshot on your tablet's Gallery in the Screenshots folder.
If this method doesn't work on your Android tablet, the next thing that you need to do is to employ third-party apps from the Google Play Store for you to be able to take screenshots.
Part 3: How to Take Screenshots on Android With a Computer
Now, if you want to take a screenshot on Android using a computer, maybe because any of those methods are not working on your phone, the best tool you can use for this is the FVC Screen Recorder. This tool is designed to take screenshots of any phone’s screen mirrored to the computer, so it is perfectly compatible with Android devices. So by using its Phone Recorder feature, users can take a screenshot on Android using a computer without any hassle. Moreover, compared to any third-party tool that’s available today, this tool has a very intuitive and user-friendly interface that will surely not trouble you in using it.
Step 1. First, download and open FVC Screen Recorder on your computer.
Free DownloadFor Windows 7 or laterSecure Download
Free DownloadFor MacOS 10.7 or laterSecure Download
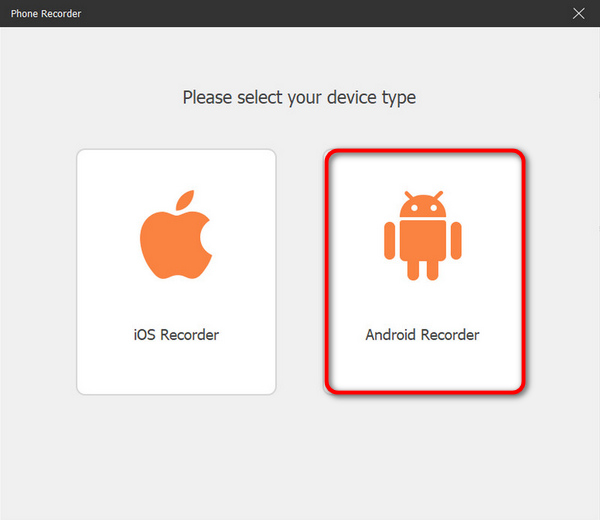
Step 2. Now, click on the Phone recorder option. You’ll find this on the right side of the tool’s window, together with the other 3 options.
Step 3. Next, click on Android Recorder.
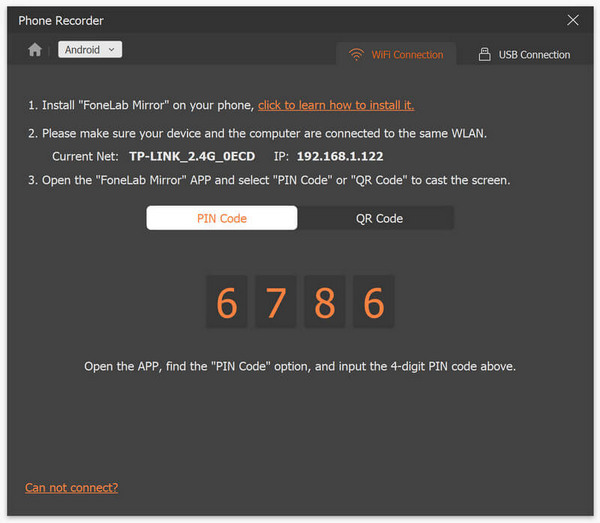
Step 4. To cast your phone’s screen, you can do it through WiFi or USB. However, if you choose WiFi, you can easily cast your phone to the tool’s phone recorder feature on your computer via PIN Code or QR Code.
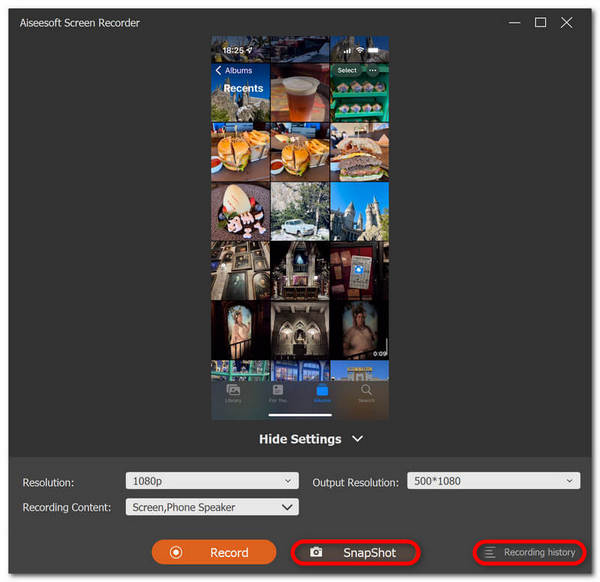
Step 5. When the mirroring is finally enabled, to take a screenshot on your Computer from your Android screen, just click on the Snapshot icon.
Step 6. Lastly, access your screenshot images directly to their designated folder on your Windows computer.
FVC Screen Recorder is a perfect tool when you want to take a screenshot on Android with a computer. Using its phone recording feature, everything will be easy for you, from setting both the devices and to actually taking screenshots. This tool has everything you need.
Part 4: How to Take Scrolling Screenshots on Android
If you want to take a screenshot of a web page or a long conversation on Android in one shot, instead of taking a bunch of screenshots, follow the steps below:
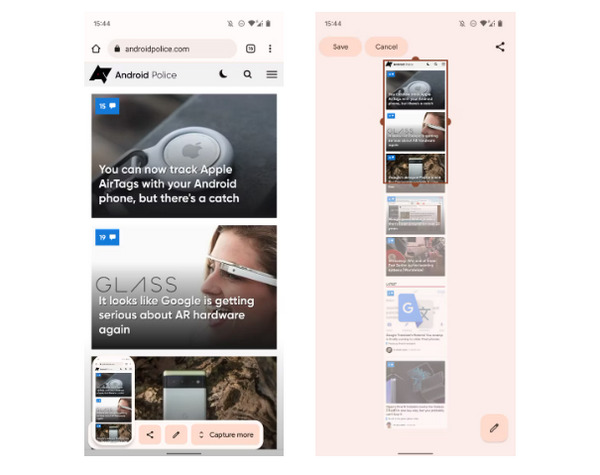
Step 1. First, on your Android phone, take a screenshot.
Step 2. Next, tap the Capture More button after clicking the preview of your screenshot.
Note: When you use the window to expand a screenshot, the system shows a magnifier for better precision.
Step 3. Lastly, tap Save to save your screenshot.
You will no longer take a bunch of screenshots just to show the entire web page or the whole screenshot conversation anymore.
Part 5: FAQs about Taking Screenshots on Android
Can I change the default screenshot folder on my Android device?
Yes. You can change the default screenshot folder if you want to. All you have to do is create a new folder or select a different folder for your screenshots on your Android phone.
How to take a screenshot on an Android phone if its hardware buttons are not working?
First, if you’re wondering if you can still take a screenshot if the hardware buttons of your Android phone are not working, the answer for that is Yes. So in cases like this, it is best to use a third-party screen recording tool like the FVC Screen Recording, which will allow users to take screenshots on their Android phone by simply utilizing its phone recorder feature.
Can I annotate or edit screenshots on my Android device?
Yes. You can annotate or edit your screenshots and photos on your Android device. This can be done directly after you take a screenshot using their built-in editing features. You can add text, drawings, arrows, and shapes to your screenshots, as well as cropping, resizing, and applying filters.
Conclusion
There you have it. Taking screenshots on your Android is just now a piece of cake. You just need to know what method fits your device, and everything will work perfectly for you. So, choose your method and start capturing those memorable moments on your Android today!
-
 How to Take Screenshots on Mac Easily With This Basic Guide
 Want to take a screenshot on your Mac but not sure how? We got you! We'll show you the simplest and quickest ways to screenshot and save images of your screen.
-
 How to Take Screenshots on Mac Easily With This Basic Guide
 Want to take a screenshot on your Mac but not sure how? We got you! We'll show you the simplest and quickest ways to screenshot and save images of your screen.
-
 Screenshot a Video Easily With This Basic Guide [2024]
 Learn how to take screenshots from videos with these simple methods easily. Follow our guide and start taking screenshots of your favorite videos now!