How to Resize Images in Photoshop in 3 Quick and Easy Methods
Resizing images in Photoshop is a fundamental skill for anyone involved in digital media, photography, or design. Adobe Photoshop, a powerhouse in image editing, provides various methods to alter image dimensions without compromising quality. In this comprehensive guide, we'll explore three efficient methods on how to resize images in Photoshop and offer tips on batch resizing. Additionally, for those seeking alternatives, we'll introduce two user-friendly tools, highlighting their features and step-by-step guide.
Optimize your visual journey now and explore the possibilities in the digital landscape.

Part 1. How to Resize Images in Photoshop?
There are a lot of methods on how to change the size of an image in Photoshop. You can resize them by changing the image size by pixels, inches, and percentages. These three methods can indeed resize the image. However, each method should correspond to the quality we specifically need. But here are the three methods to resize images in Photoshop:
Method 1: Changing the Image Size by Pixels
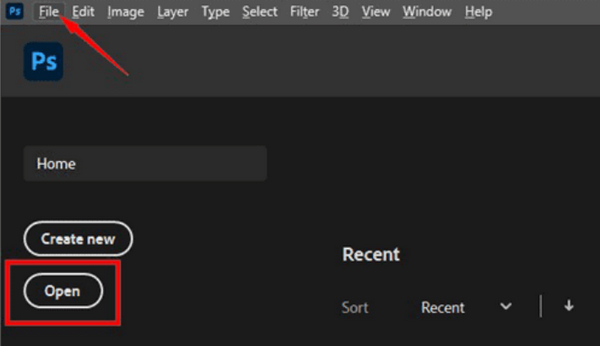
Step 1. Open your image in Photoshop by clicking Open or go to File and select your image.
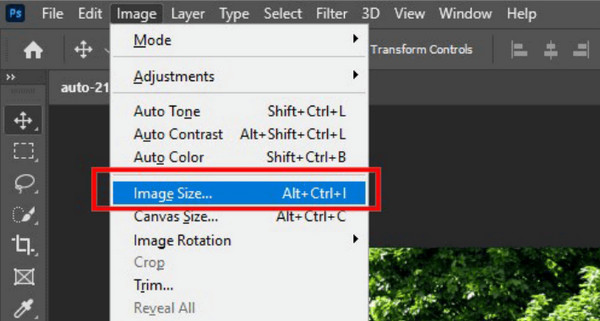
Step 2. Now, head to the Image tab and select Image Size.
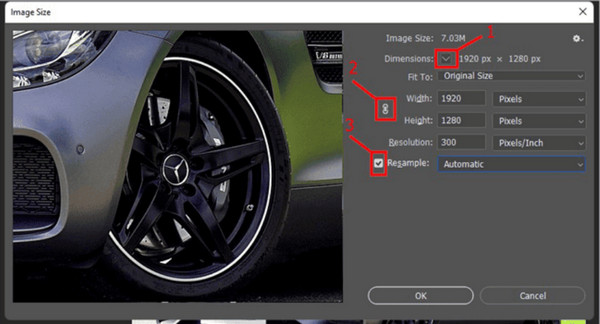
Step 3. In the Image Size dialog box, choose Pixels from the drop-down menu. To set specific dimensions, enter values in width and height text boxes and click OK to resize the image.
Step 4. Lastly, save the final image via File by clicking the Save As button.
When you want to sharpen your images in Photoshop, you can adjust the percentage to a higher.
Don’t forget to save as JPEG the PSD file when saving it.
Method 2: Changing the Image Size by Inches
This second method is just the same as method 1, the only thing you need to do is to change the size by inches and not by pixels. But here’s the step-by-step guide on how to change the image size by inches:
Step 1. Open your image in Photoshop by clicking Open or go to File and select your image.
Step 2. Now, head to the Image tab and select Image Size.
Step 3. In the Image Size dialog box, choose Inches from the drop-down menu. To set specific dimensions, enter values in width and height text boxes and click OK to resize the image.

Step 4. Lastly, save the final image via File by clicking the Save As button.
Resizing images by inches in Photoshop (follows the same approach as method 1. Remember to maintain consistency in your chosen method, be it pixels or inches, to ensure clarity and high resolution in your images. This uniformity is key to achieving a professional and cohesive outcome.
Method 3: Changing the Image Size by Percentage
This method is rarely used. However, changing an image size by percentage is the same with methods 1 and 2, the only thing you need to change in the Image Size dialogue box is the Percentage instead of pixels or inches.
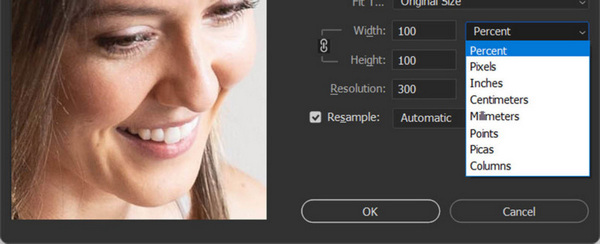
The method you use in changing the size of your image should correspond accordingly to the one you need, as changing them may result in a decrease in image resolution.
Tips on How to Resize Batch Images in Photoshop?
You can actually resize bulk images in Photoshop by following the methods 1-3. However, there are certain things that you need to do in order to do this.
Tip 1. You need first to consolidate the images. Place them in one folder for easy navigation.
Tip 2. When saving and changing their sizes, ensure that the Don’t Enlarge is checked.
Tip 3. Save your resized images to a new and different folder to avoid mixing them from the originals.
There you are! You can now follow the how-to resize an image in Photoshop step-by-step guide from any of the methods you like provided in this post. Just make sure to follow the tips in doing them.
Part 2. How to Resize Images in Photoshop [Alternatives] with No Quality Loss?
There are alternative tools that you can use when you don’t know how to resize an image in Photoshop or when you don’t have access to it. These tools offer user-friendly interfaces and diverse features, allowing you to achieve high-quality results without the requirement of advanced photo editing software.
FVC Free Image Compressor
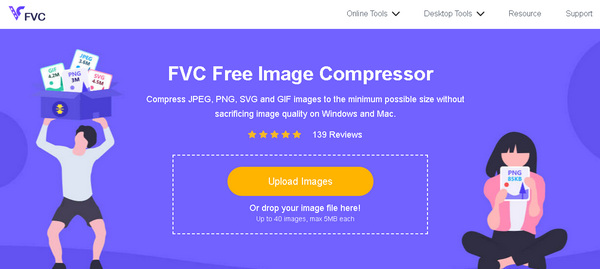
FVC Free Image Compressor is a speedy and user-friendly tool specifically designed to reduce the size of your photos without compromising quality. It excels at compressing various photo formats like JPEG, PNG, SVG, and GIFs, offering superior compression compared to alternative software options.
Features:
◆ Compresses multiple image formats.
◆ Batch image compression.
◆ Drag and drop files.
Quick Guide:
Step 1. Go to their official website.
Step 2. Click Upload Images to import the photos you want to compress.
Step 3. Wait for the compression process. When done, you’ll see a bar status stating it’s finished and information on the before and after size of the compressed image. Click Download to save your image.
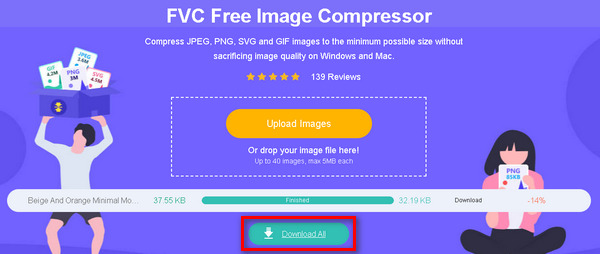
Using FVC Free Image Compressor is indeed one of the best alternatives for Photoshop when you want to reduce the size of your image. Aside from it’s easy to use, it guarantees the best quality that suits your needs.
FVC Free Image Upscaler
FVC Free Image Upscaler is a robust image enhancement tool leveraging AI Super Resolution technology. This image upscaler tool excels at automatic recognition of blurred elements, making precise adjustments to enhance lost pixels, colors, textures, and intricate details effectively. Notably, it easily identifies and naturally restores portrait features, showcasing its advanced capabilities in image upscaling and refinement.
Features:
◆ Enlarge images up to 8× with high quality.
◆ Preview effect.
◆ Compatible with multiple formats.
◆ AI integration in automatically enhancing images.
Quick Guide:
Step 1. Visit their official website.
Step 2. Click on the Upload Photo. Select the image you want to upscale

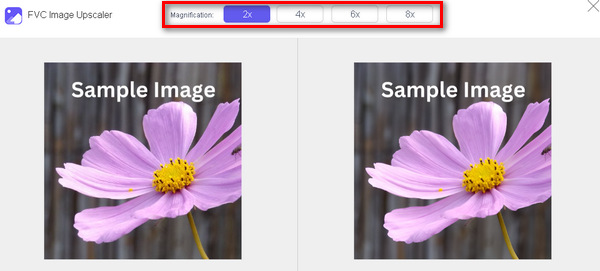
Step 3. The tool will preview your image. You can utilize the Magnifier option to check the quality of the image.
Step 4. Click Save to download your image.
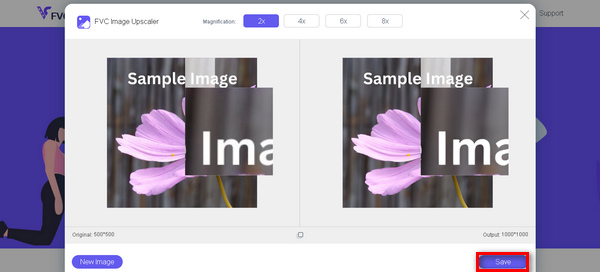
FVC Free Image Upscaler is a top-tier when it comes to upscaling images. Also, this tool made it easier for users to enhance their images. No complicated interface, just quick and quality results.
Part 3. FAQs about How to Resize an Image in Photoshop
How do I resize an image in Photoshop and keep the proportions?
To maintain proportions while resizing in Photoshop, ensure the constrained aspect ratio option is enabled. This is typically represented by a chain icon linking width and height. By doing so, adjusting one dimension will automatically scale the other proportionally.
Does Photoshop resize any images?
Yes. Photoshop allows you to resize images easily. You can access the Image Size option under the Image menu, enabling you to adjust the dimensions according to your preferences.
What are the shortcuts to resize an image in Photoshop?
Two common shortcuts for resizing in Photoshop are Alt + Ctrl + I (PC) or Option + Command + I (Mac) to open the Image Size dialog and Ctrl + T (PC) or Command + T (Mac) to activate Free Transform, allowing you to resize manually.
Does resampling the image in Photoshop ruin the quality?
Resampling in Photoshop doesn't necessarily ruin quality if done carefully. When resizing, if the Resample option is selected and set appropriately, it adjusts the pixel count to maintain image quality. However, excessive enlargement may result in some loss of detail. Also, you can upscale the image quality with the photo pixel enhancer software.
Can I resize bulk images at once in Photoshop?
Yes, Photoshop provides a batch-processing feature. Utilize the Image Processor or create an action to resize multiple images simultaneously. This streamlines the process and ensures consistency across a batch of images.
Conclusion
You can really do a lot with online AI tools nowadays. Hence, learning how to resize images using Photoshop is one necessary thing for those seeking an image resizer, especially those who are actually using this tool but haven’t really got into its full capabilities. If you are not using it and you find it complicated to use, you can use the two alternatives by changing the size of an image or by upscaling it. As technology evolves, harness its potential and navigate the digital landscape with confidence and efficiency. It's time to make the most of the tools at your fingertips!


 Video Converter Ultimate
 Screen Recorder


